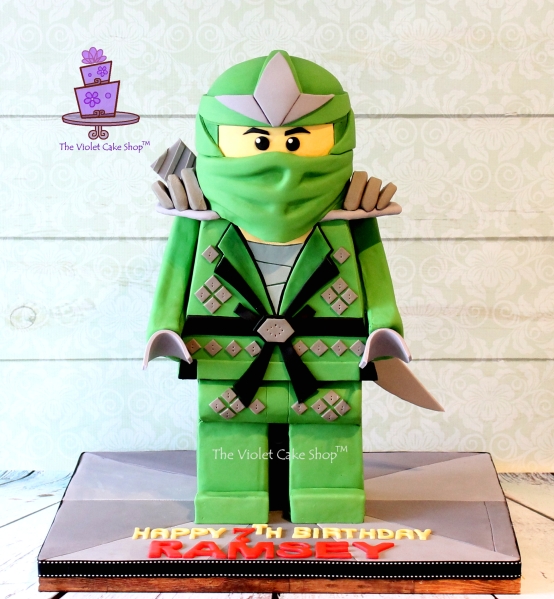
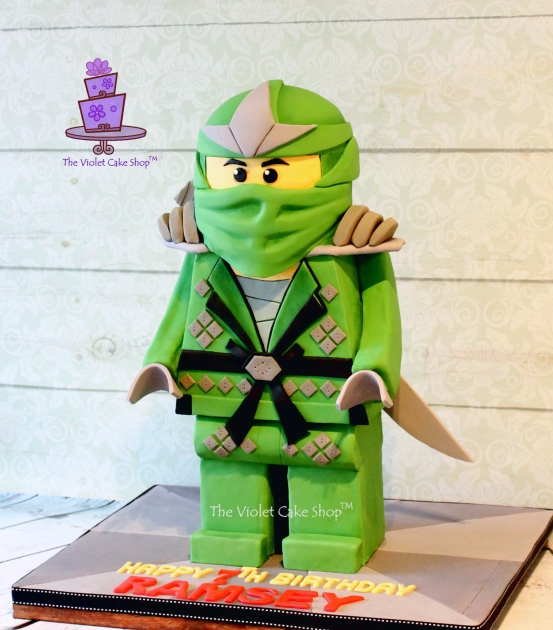
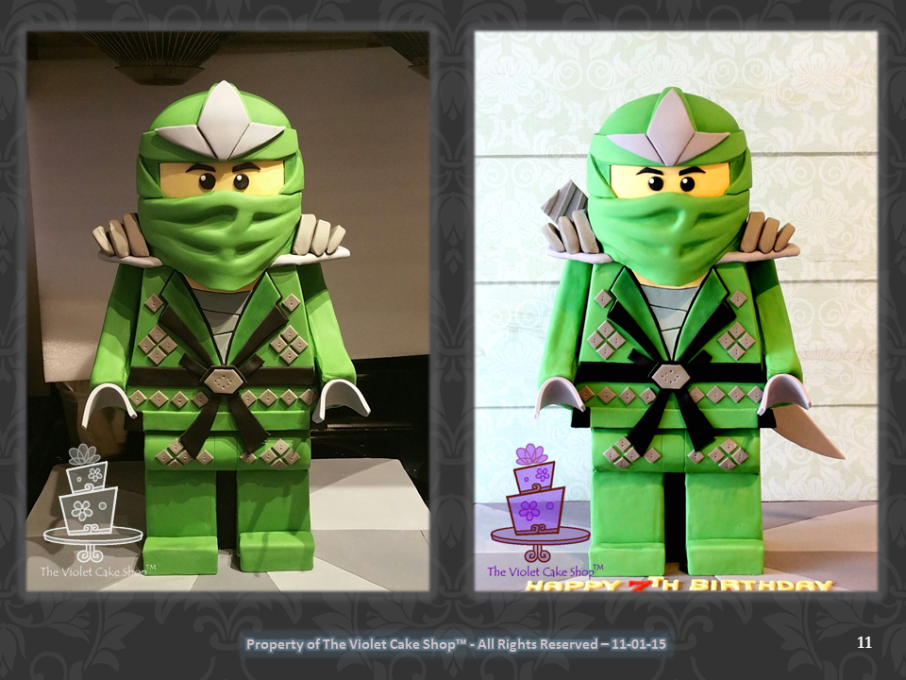
Well, anyone who knows me knows that I steer clear from standing, structured or gravity-defying cakes whenever possible because they TOTALLY stress me out!! I will not lie and pretend I love them. I am not one of those that thrive on the thrill of the challenge. I sweat and fret the whole way through. But when I get asked by a valued client if I can wow them again on their son’s birthday, I just cannot say “no” so I buck up and take the challenge. And ta-da…after much fretting and cursing and stressing, here is the cake for Ramsey’s 7th birthday a few weeks ago…
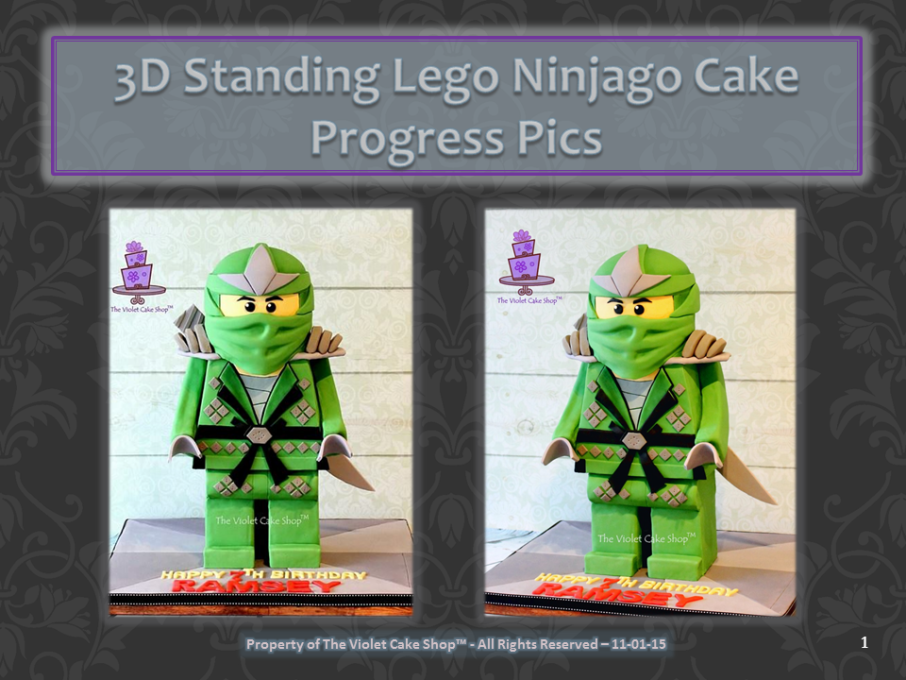
And below, is how I went about making him. I took progress pics this time just to document it for myself, in case I ever have to make another one or something similar because my old brain just cannot retain information like it used to! Those who know my work may say, “hey…I’ve seen a standing Minion and a standing robot cake from you before” and to those, I’ll explain that I’ve made standing cakes before but they never had to travel in a car (all only had to travel from one room to another) so I used only the bare minimum structural supports which involved usually just the legs being stainless steel rods and the rest being secured as you would a tiered cake, with wooden dowels.
And I should also preface this post by saying that this is not necessarily the best way to do a standing 3D cake, definitely NOT the only way and probably could have been done better myself had I planned or calculated things a bit better. But it does show one of many ways that these kinds of cakes can be done and it shows what we cakers sometimes have to go through when we are forced to think on the fly and/or work with unforeseen challenges or (ahem) in my case here, a big brain-fart of a miscalculation (which I will blame on severe lack of sleep due to both kiddos being sick after a week long trip, haha!)
So this cake needed to serve minimum 25 (dessert sizes of 1″ x 2″ x 4″) and I had figured out (mistakenly) that the cake would need to be 12″ tall. And on that basis, I went and bought all my hardware with the expectation that I would need just one 22″ long 1/4″ rod that could be cut in half so that I’d have two rods going up the cake to just above the neck area. Why, you might ask, did I need more than just one? Well, I am a worry-wart and my stressed-out brain and heart would not have been secure or calm with just one solid rod, knowing it had to travel at least 40 minutes to the party.
I didn’t realize until after I went to bake the cakes, that I actually had made a miscalculation and would need the cake to be taller. I had forgotten to take into account that the cake was going to be only half as deep as it was wide – I had made initial calculations based on a cubed torso section. So to get the minimum 25 servings, the cake now had to be at least 6″ taller so would end up being over 18″ tall…but now I only had the one rod. I guess I could have used cake also in the leg portion to keep it at 12″, BUT…I wanted to keep that section as cereal treats as another added piece of structural security for me… And I guess I could have gone out and bought another rod BUT…I stubbornly decided to work with what I had and decided I could use one rod most of the way up the height, with a shorter rod to at least the hip section, just under the torso. And so we (meaning hubby) cut the rod to 15″ and 7″ – taking into account that just under 1″ of each rod would be buried into the board underneath.
So here are the pics, with some explanations along the way…hopefully this is helpful for some…or if not, at least maybe you’ll find it to be slightly amusing musings…hahaha!!
3D Standing Lego Ninjago Cake Tutorial:
(Note: these are my own techniques developed independently with my own ideas and shared for personal use ONLY. They are not to be used for monetary gain or to develop products, books, DVDs, downloads or lessons for sale or to be taught in classes or tutorials, whether hands-on, on-line, in video format or in print without express written consent.)
Some basic STATS:
The base board was 18″ x 14″
He has cereal treat arms, legs and hips, with cake for his torso and head
Total Height: 18.5” tall
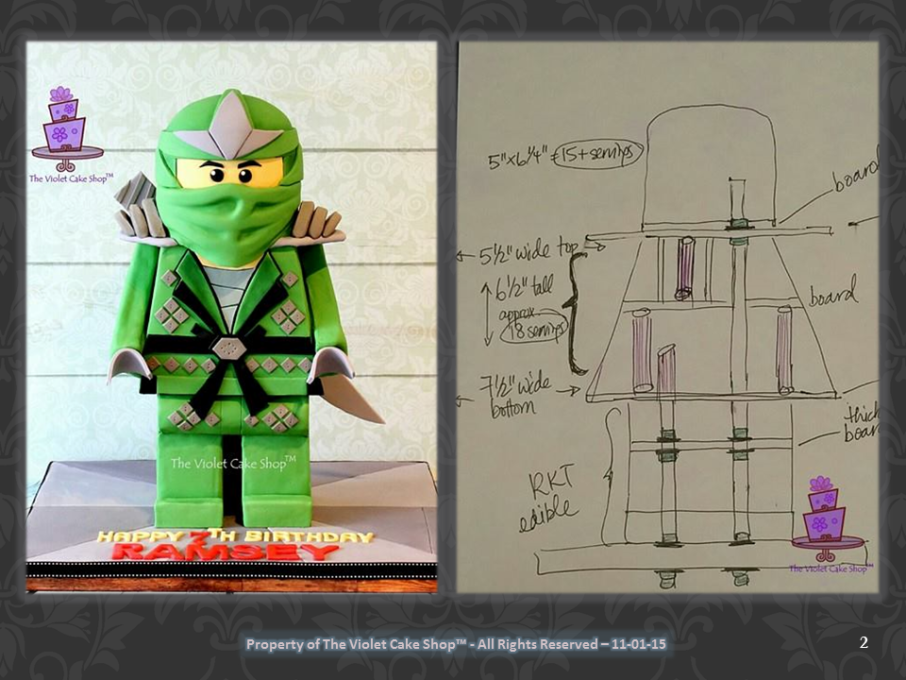
Head Section: was 5” diameter cake that was 6” tall before ganache; after ganache was approximately 5.5” diameter and 6.25″ tall
Torso Section: 6.25” tall, 4” deep; 5.5” across at top of torso; 7.5” across at bottom of torso (widest part of cake)
Leg Section: 6.25” tall, 3.5” deep; 6.5” across
1/4″ stainless steel rod, washers and nuts (TIP: rods were cut with a rotating saw and the jagged edges were smoothed out with a grinder); all sections of the rods were wrapped with Glad Press ‘n Seal before being covered by the bubble tea straws – you will have to do this in sections (in between where the nuts and washers go)
Measurements for the cereal treat sections and internal boards are in Slides 12-17
Total servings: approximately 33 servings with 15 for the head section and 18 for the torso section based on 1″ x 2″ x 4″ sized servings
Slide 2: The purple shading are bubble tea straws and the green are the nuts. The one bubble tea straw that does not extend all the way to the board above it, is there just to cap the rod underneath (added food safety) as it does poke through the boards which all had holes pre-cut based on the original plan. All rods were wrapped with Glad Press ‘n Seal before being covered by the bubble tea straws. You will have to do this in sections (in between where the nuts and washers go).
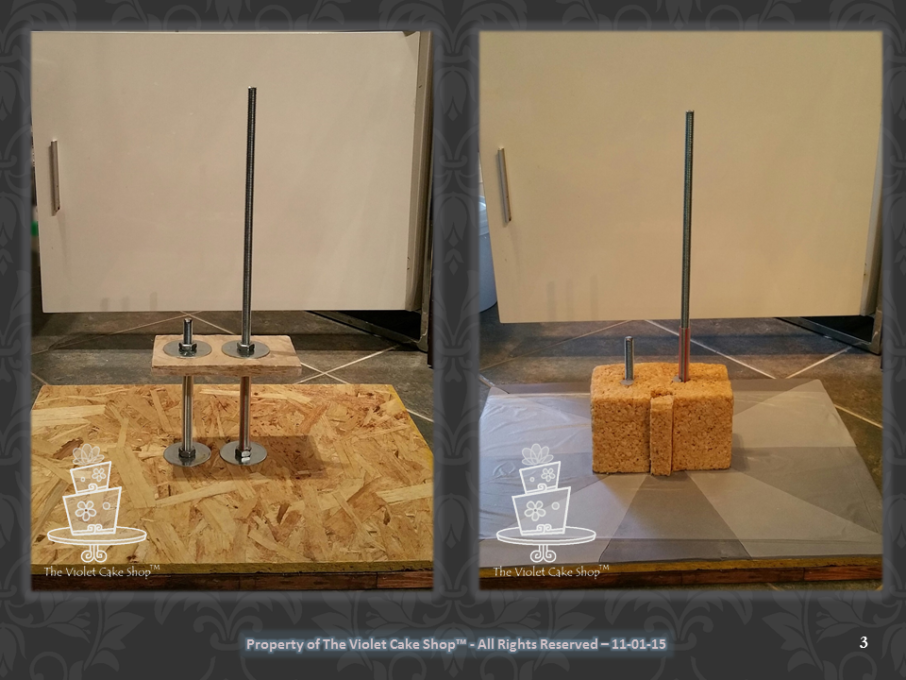
Slide 3:
Left pic just shows the structure in the leg/hip section without the edible pieces. The longer rod on the right in the pic is slightly off-centre. This is on purpose as I want it to be as close to centre as possible without being too close to the other rod, for stability.
Right pic – the cakeboard was first covered, then a large piece of Glad Press ‘n Seal was added on top to protect the board underneath from the mess of crumbcoating and covering the cake later; the cereal treat leg section was added with bubble tea straws over the rods so the treats don’t touch the rod, and a portion was cut out to give the impression of two separate legs
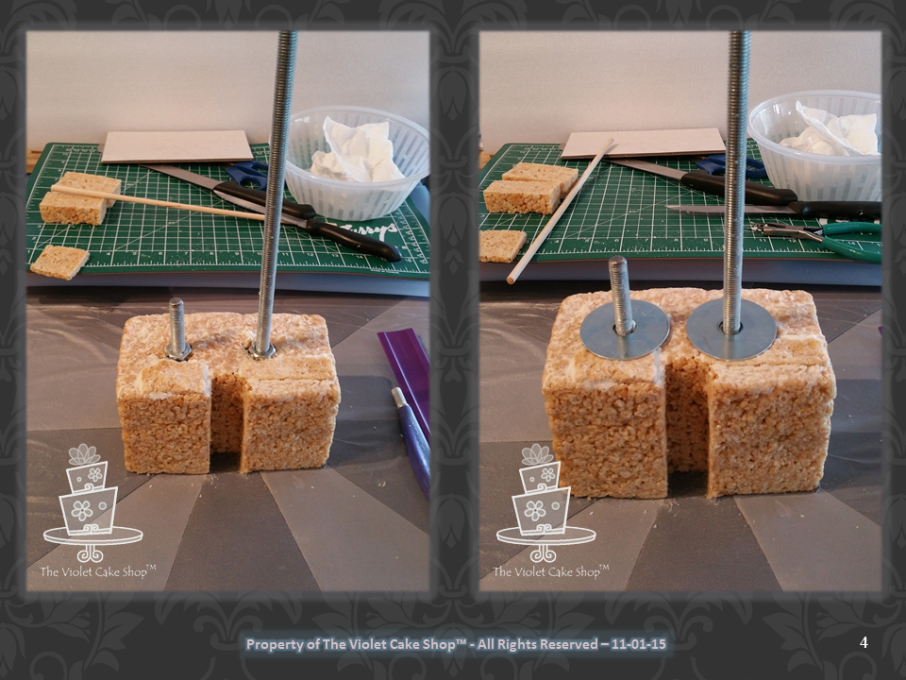
Side 4:
Left pic – I had to add some pieces of cereal treats to level off this section and I added the nuts so they are sitting on top of the bubble tea straws that are underneath but buried into the cereal treats; although the cereal treats in this section are touching the nuts, I informed my client to cut around this area if it was to be consumed
Right pic – washers were added – notice I used wide washers which I chose for added security
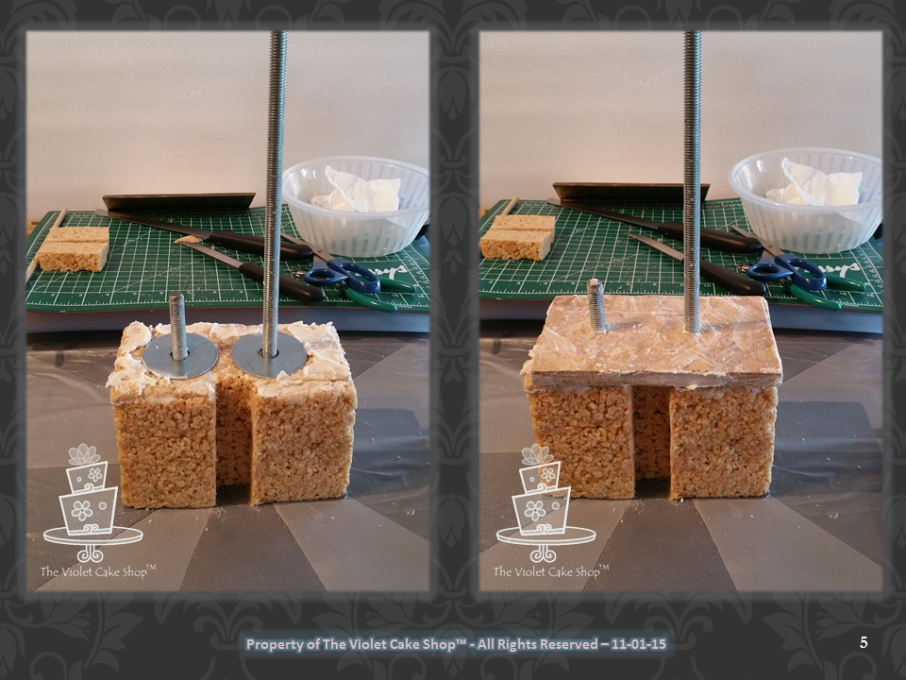
Slide 5:
Left pic – buttercream ‘glue’ was added to help hold the board on top
Right pic – a 1/4″ thick board was added which would be bolted in place with the nuts and washers on top and below
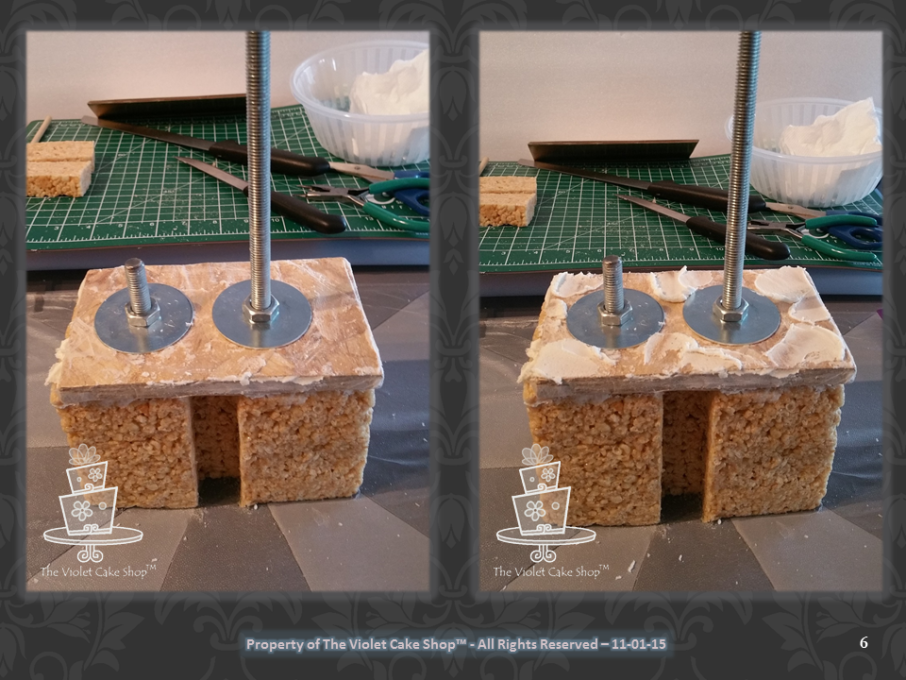
Slide 6:
Left pic – another set of washers and nuts are added
Right pic – more buttercream ‘glue’ is added to help hold it to the piece to be added on top
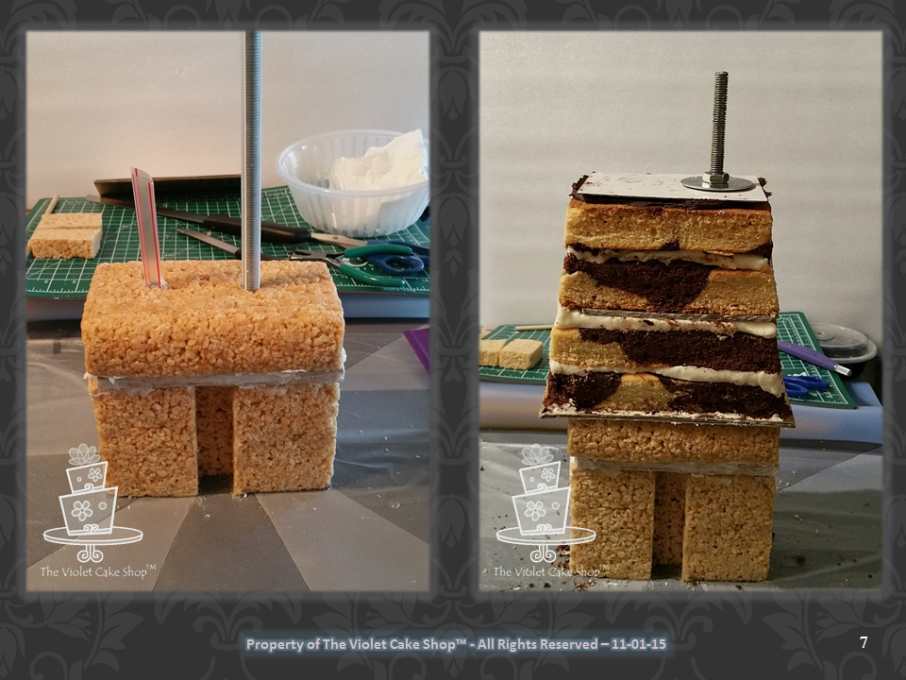
Slide 7:
Left pic – the cereal treat hip section was added – notice it is slightly rounded in the front; the bubble tea straws were then inserted – the one on the left was trimmed to less than 1″ and is there to cap off the rod that poked through underneath, the one on the right was added after the pic was taken
Right pic – the torso section was torted, filled, dowelled and stacked separate from the stainless steel structure on it’s own cakeboard; I also used a centre cakeboard at the 3″ mark with dowels inserted above and below it (see diagram on Slide 2); both the centre and bottom cakeboards were made by gluing three thin cake cards together to make it stronger and had holes pre-punched); the entire assembled torso section was then stacked on top of the cereal treat hip section before another thin cake card was placed on top along with a washer and nut
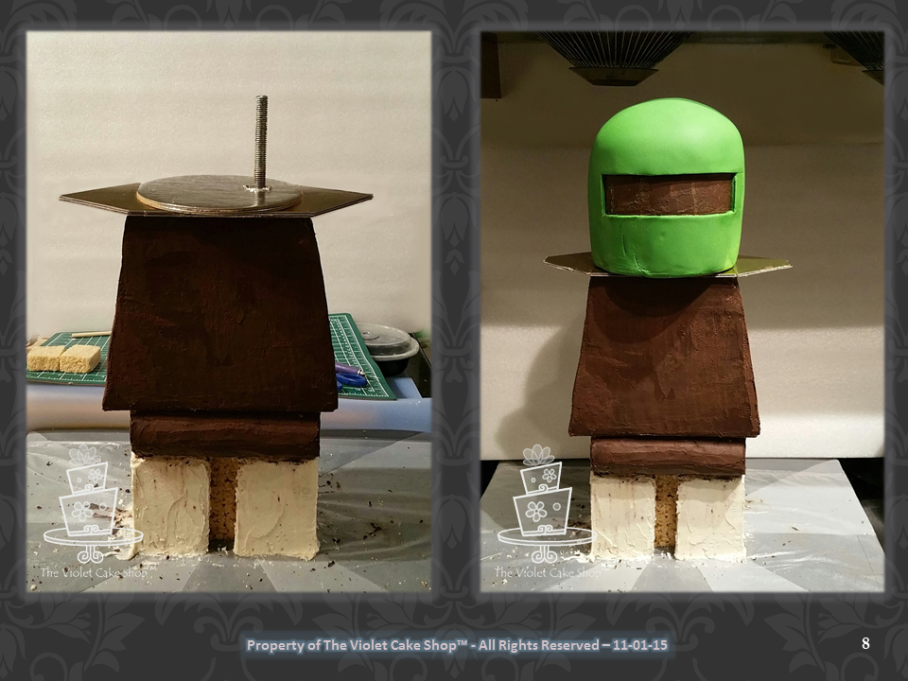
Slide 8:
Left pic – the cereal treat leg section was crumbcoated with buttercream; the hip and torso sections were ganached; the board for the shoulder detailing was added on top – I cut the hole to fit around the nut that was already there (see Slide 7, Right pic); I then cut the hole in the cakeboard for the head section (round board on top) so it could sit flush with the nut; it is pictured just to show that it sits flush with the nut but the head section was actually torted, filled, stacked, ganached and covered with fondant separate from the structure and added after, which you see in the Right pic
Right pic – head section was prepared as mentioned and added on top with some ganache and fresh fondant under the cakeboard it sits on, to secure it to the shoulder board underneath; the “visor” section for the eyes was cut out using an x-acto knife; you’ll notice there are some imperfections on the right side of the chin – that will be covered over later so no need to fret
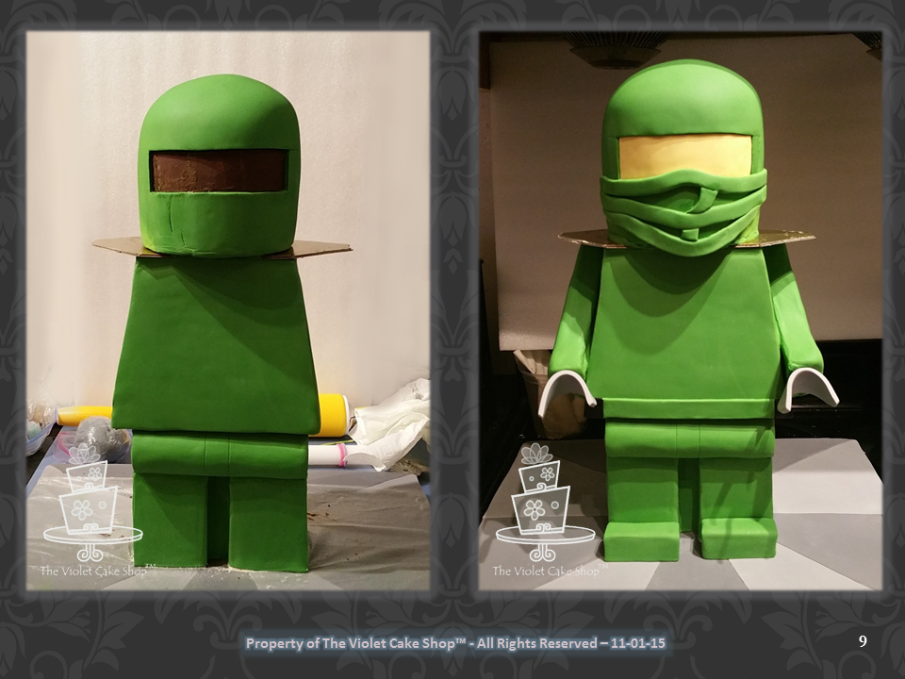
Slide 9:
Left pic – each section of the legs, hips and torso were covered with fondant using the panelling method; line detailing was added to the hip section; again notice the imperfection to the right side of the chin; change-o, prest-o and it’s gone in the right pic!!
Right pic – the cereal treat arms were crumbcoated with buttercream and covered with fondant then attached to the sides of the torso with fresh fondant and held for 10 minutes to ensure they were firmly secured; the hands (made from fondant with CMC/Tylose) were each attached with fresh fondant and held in place until secure (at least 3 minutes); the cereal treat feet were crumbcoated then covered with fondant and added; thin bands of fondant were cut and strategically placed on top of the mouth/chin section in the pattern as seen on the actual character; Oooo and LOOK, the imperfection is now gone hehe!
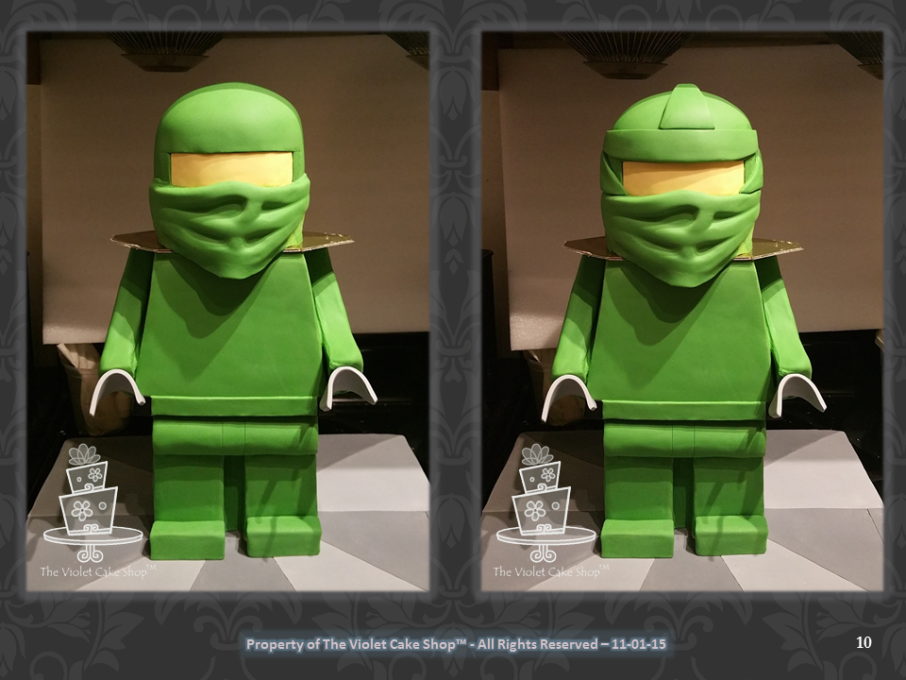
Slide 10:
Left pic – a thin sheet of fondant was rolled out in the size needed to cover the mouth/chin section and draped on top to give the look of bunched up fabric
Right pic – side, front and top helmet detailing were added – sorry, no templates for these as I normally just go and cut by eye, then check the pieces I cut out against the actual part of the cake it will be added to, before I secure it with water
Slide 11:
Left pic – the shoulder board was covered with fondant; then the shoulder details were cut from fondant and added; grey section of the helmet were cut and added – again no templates, sorry; shirt, lapels, belt and diamond detailing were then added to the front
Right pic – a bit of dark green dusting was brushed into the crevices of the mask, along the helmet detailing, on top of the lapels, inside the area between the arms and the torso and under the rounded part of the hip section to bring out details; a gumpaste sword made earlier and let dry for 5 days was added to the back
(Note: these are my own techniques developed independently with my own ideas and shared for personal use ONLY. They are not to be used for monetary gain or to develop products, books, DVDs, downloads or lessons for sale or to be taught in classes or tutorials, whether hands-on, on-line, in video format or in print without express written consent.)
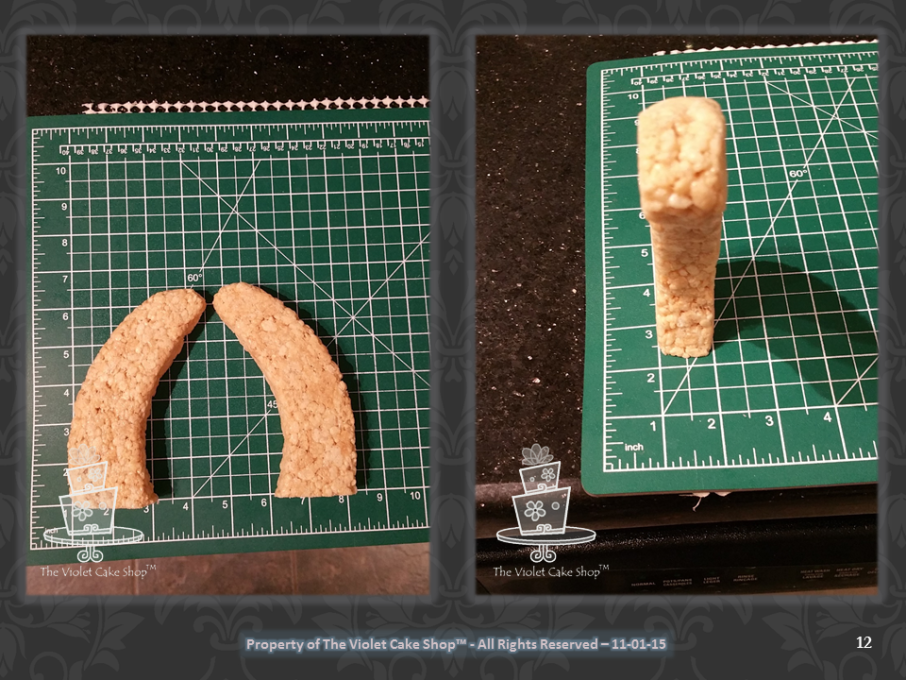
Slide 12: cereal treat arms – which were oddly shaped but 1″ thick
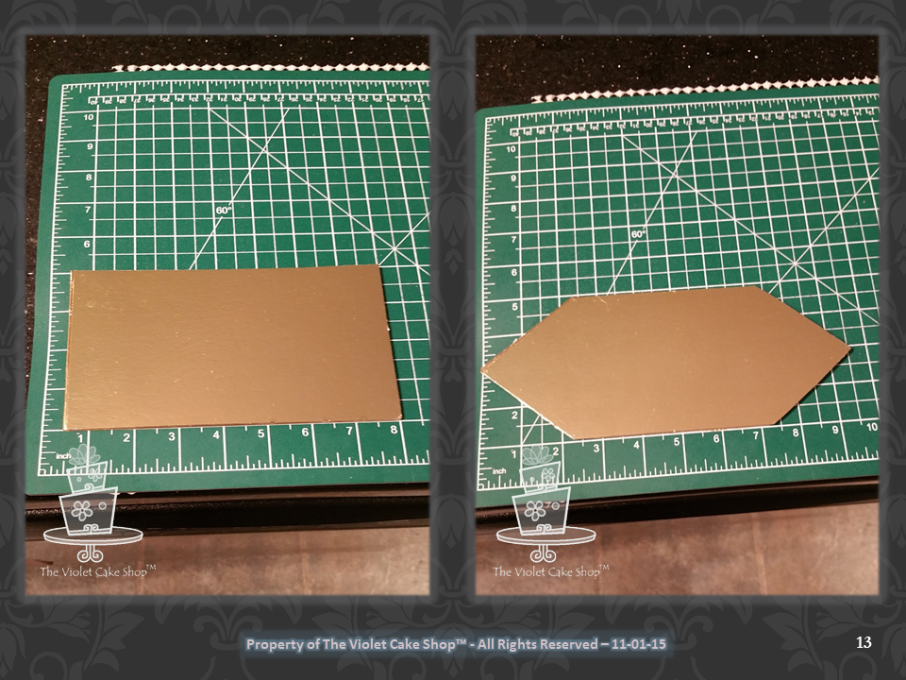
Slide 13:
Left pic – the cakeboard for the bottom of the torso – which was 7.5″ wide and 4″ deep
Right pic – the cakeboard for the shoulder section – which was 9.5″ wide and 4″ deep
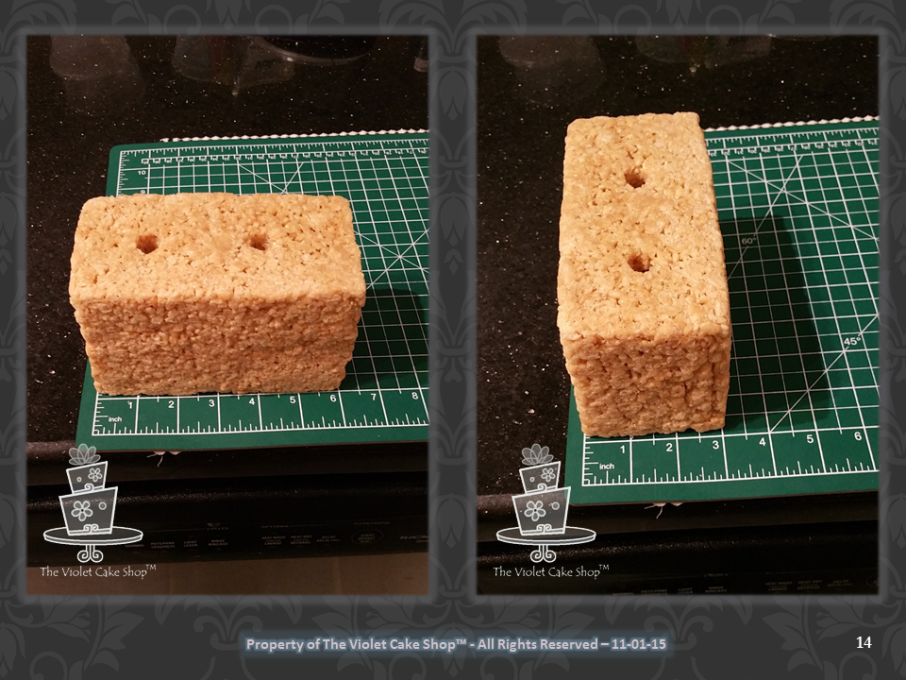
Slide 14: cereal treat leg section – which was 6″ wide and 3″ deep; after buttercream crumbcoat and fondant they ended up 6.5″ wide and 3.5″ deep
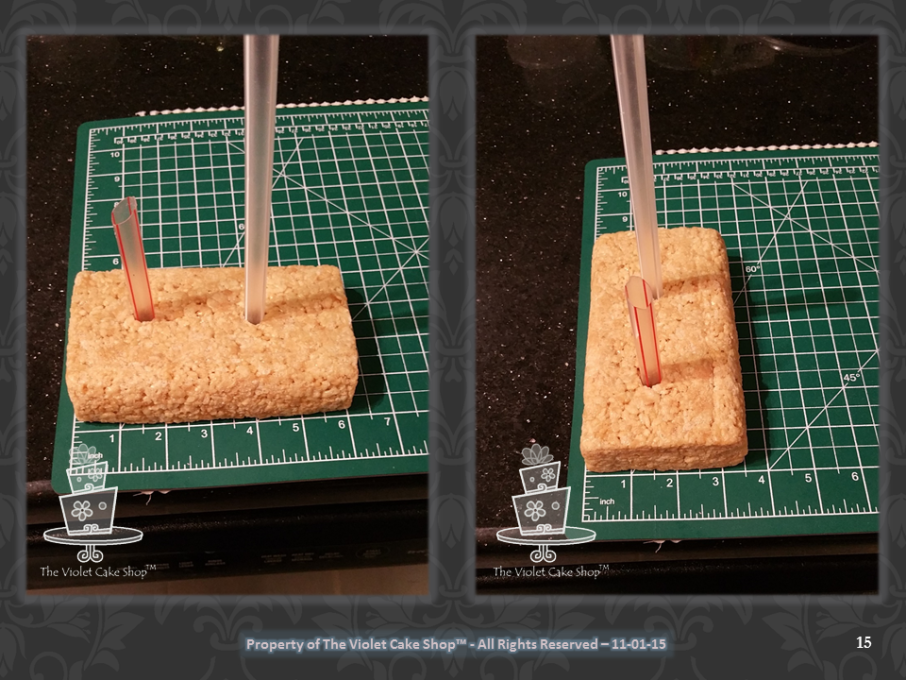
Slide 15: cereal treat hip section – which was 6″ wide and 3.5″ deep, and rounded on one end
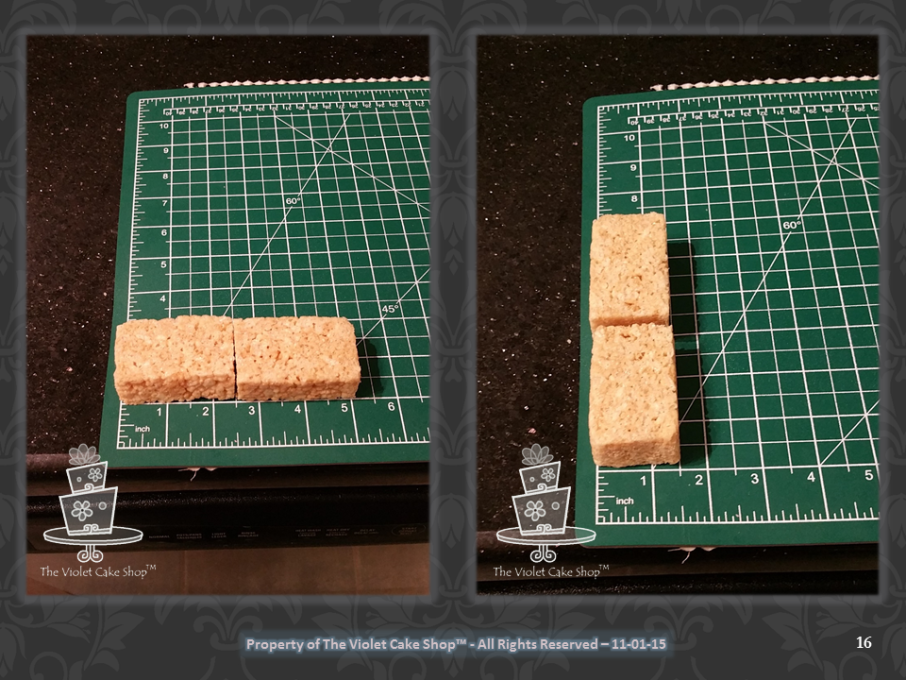
Slide 16: cereal treat feet – which were 2.5″ wide and 1.5″ deep and .5″ tall
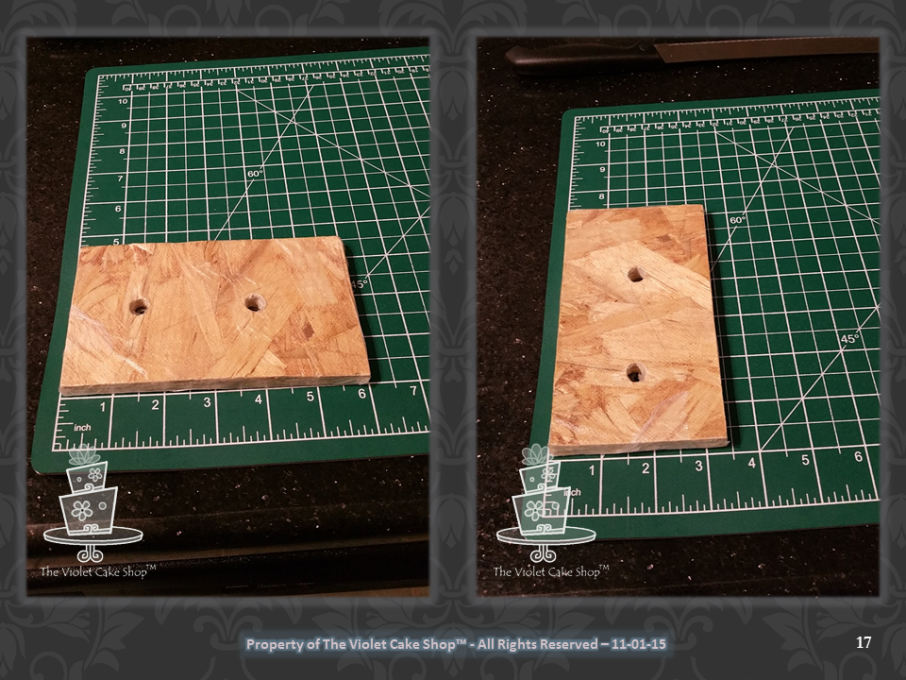
Slide 17: the 1/2″ thich board used between the cereal treat leg section and cereal treat hip section – which was 6″ wide and 3.5″ deep and ended up being part of the hip section after being ganached
(Note: these are my own techniques developed independently with my own ideas and shared for personal use ONLY. They are not to be used for monetary gain or to develop products, books, DVDs, downloads or lessons for sale or to be taught in classes or tutorials, whether hands-on, on-line, in video format or in print without express written consent.)

You must be logged in to post a comment.