Well, it has been just over 3 weeks since the launch of my V-Petal Ruffle Simpress® and I am overwhelmed by the positive response and excitement that the new mold has generated! I am so humbled to think that a technique I created and first shared here, over 6 years ago, has been turned into a mold and is being sold around the globe! I’m pinching myself as I still can’t believe it actually, finally, happened after 2 years of planning and a few set backs due to COVID.
I am incredibly touched, seeing SO many beautiful designs created with our new mold, and am constantly being ‘wowed’ and impressed by the creativity and versatility of the cakes being made. I’ve been sharing a lot of those cakes on my Instagram and Facebook Stories and will share a few of them here, in a future post. But first, a huge THANK YOU to all who have purchased the mold and to those who have shared what they’ve created with it! I am so proud, overwhelmed and full of all kinds of emotions right now, seeing how it’s being used and the great response so far.
So, I did promise a mini-tutorial for the Tropical Flamingo head from one of the two cakes I made to accompany the initial launch.
I filmed the individual elements, including how to create three varieties of tropical leaves and two blossoms, along with how to create the head and compiled it into a real-time video that is just over 30 minutes long, with some steps highlighted, which I’ve uploaded to my YouTube channel. You can view the video here. I also sped it up, and that shortened version has been posted on my Instagram and Facebook pages.
Along with the videos, I took a few shots of some of the steps which I am sharing below. You can also find the template for the Tropical Flamingo head at the end of this post. But for the full idea of how to shape the head, it’s best to view the videos since explaining it in a few images and words, does not do it justice.
I hope these steps are helpful if you decide to create your own Tropical Flamingo cake! Remember, the V-Petal Ruffle Simpress® is PERFECT for creating the body of the Flamingo. You can check out this video from Marvelous Molds® on how to use our new mold, which also contains great tips and their best practices. However, you can also always use any ruffle or textured technique, or mold, to mimic the idea for the Flamingo body.
And now for the Tropical Flamingo Mini-Tutorial – ENJOY!
Note: these are my own techniques developed independently with my own ideas and shared for personal use ONLY. They are not to be used for monetary gain or to develop products, books, DVDs, downloads or lessons for sale, or to be taught in classes or tutorials, whether hands-on, on-line, in video format or in print, without express written consent.)
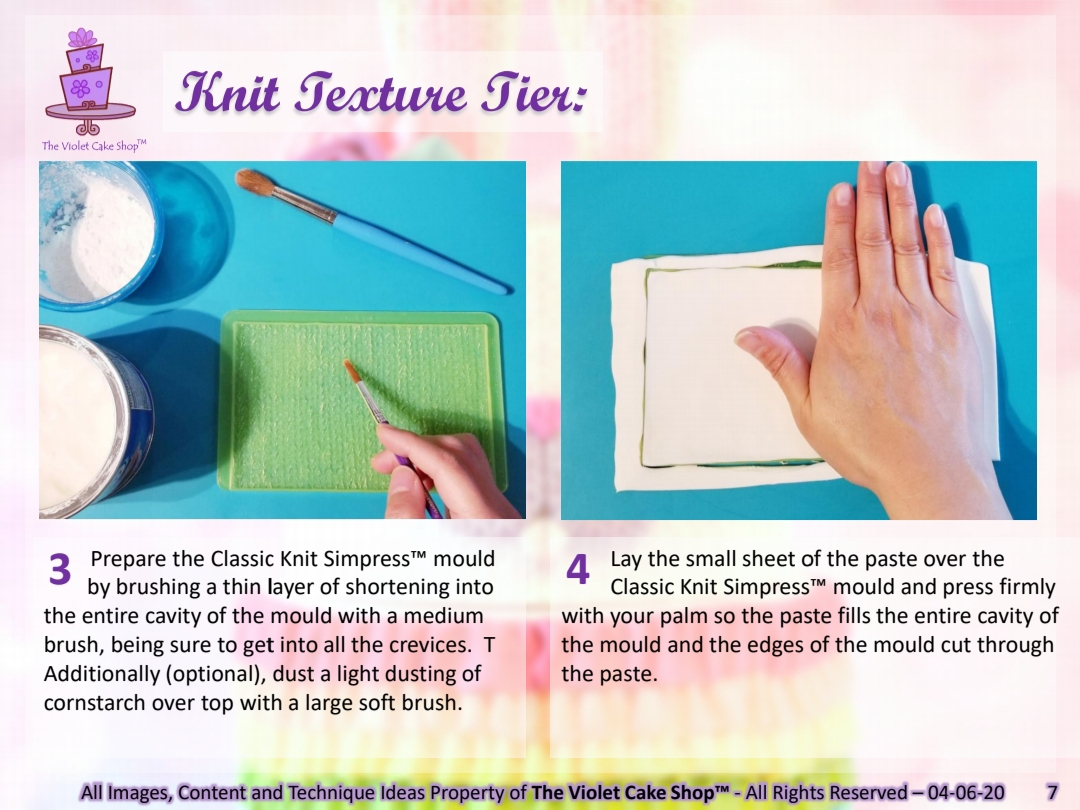
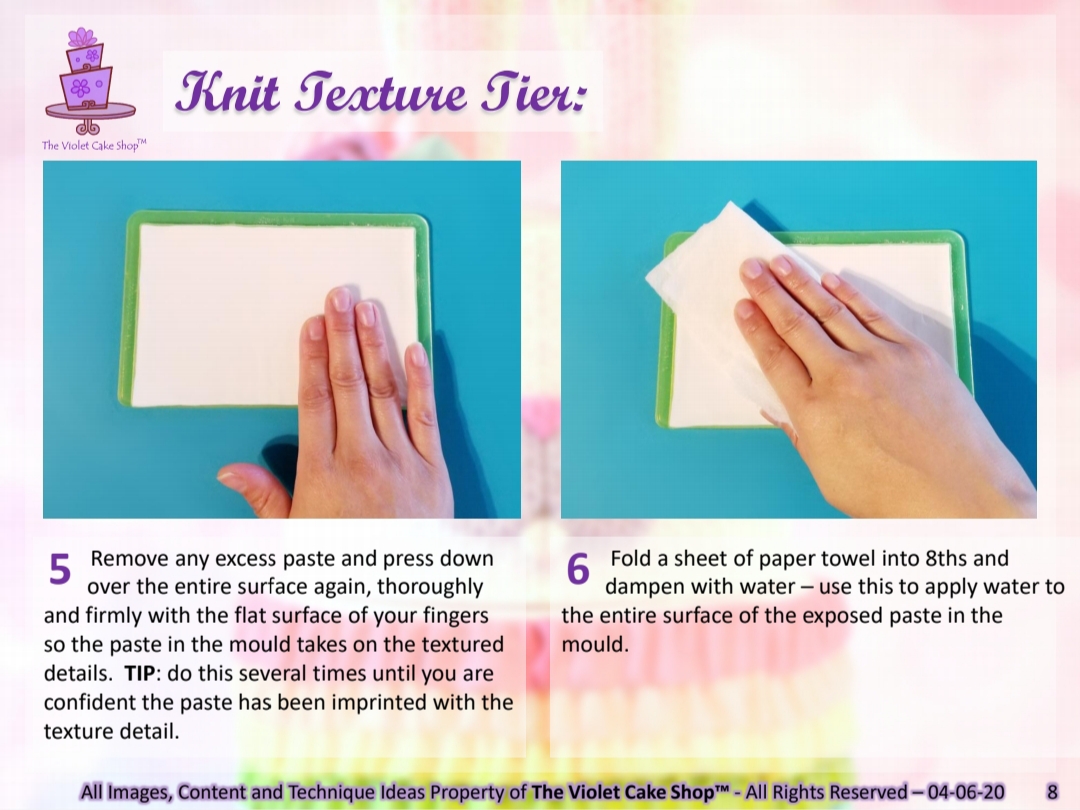
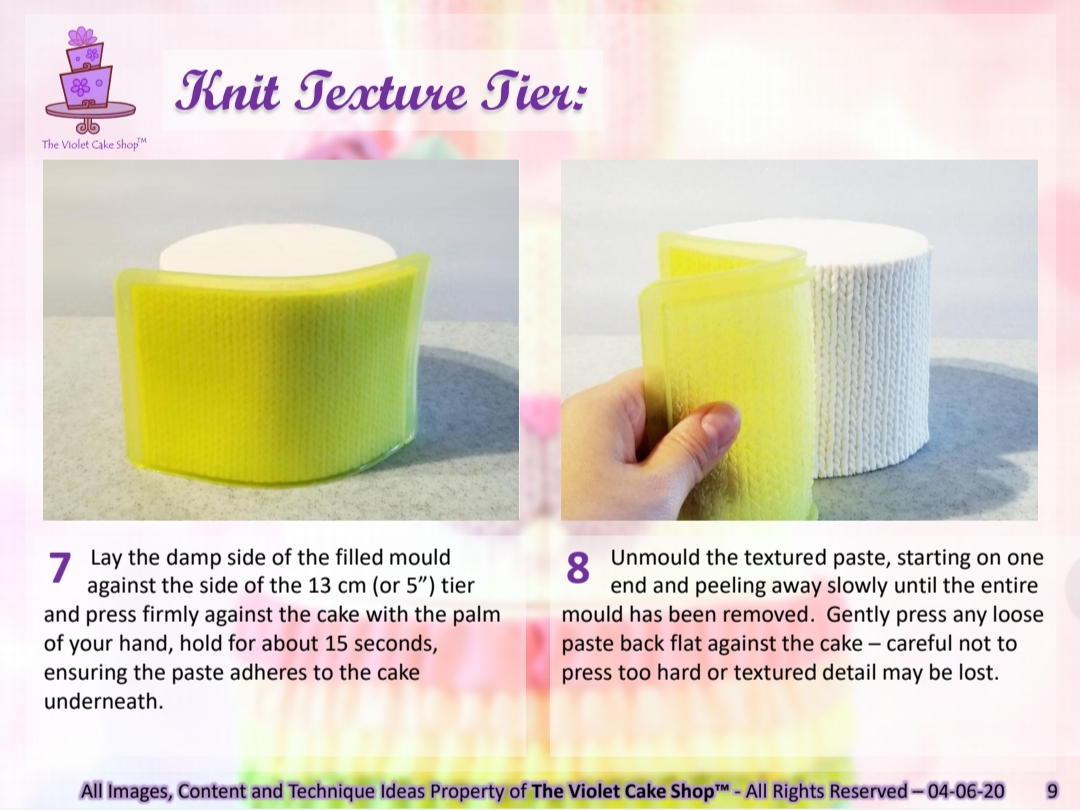
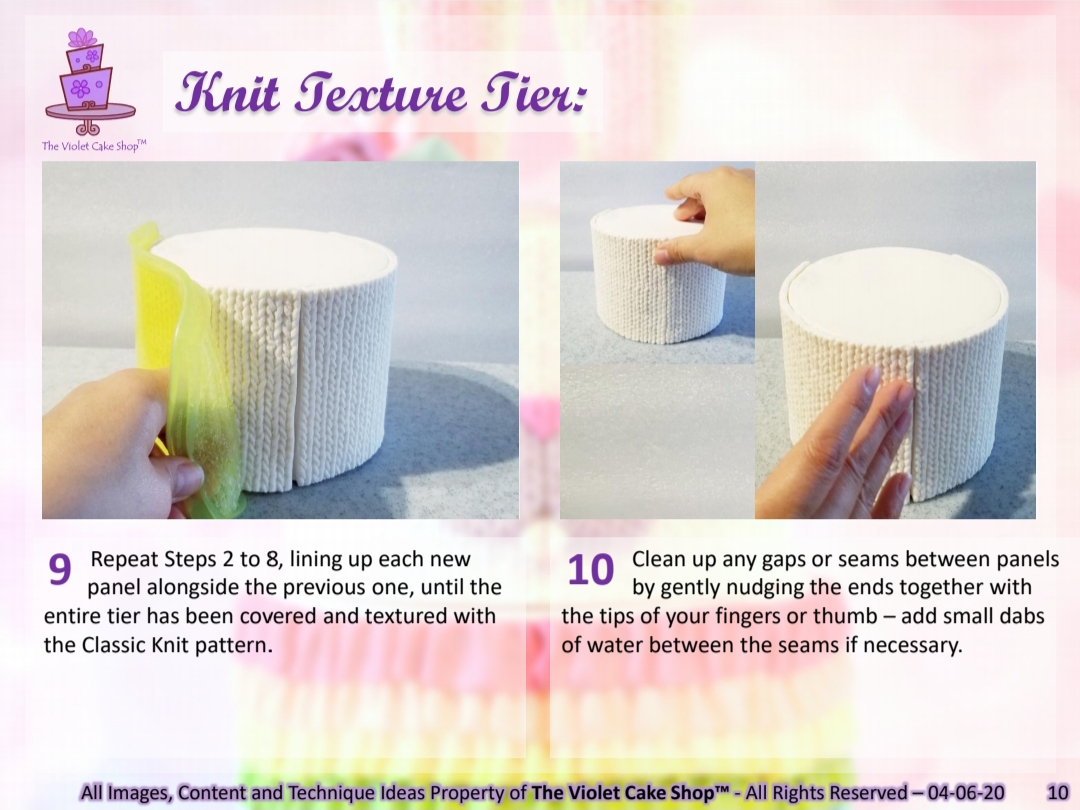
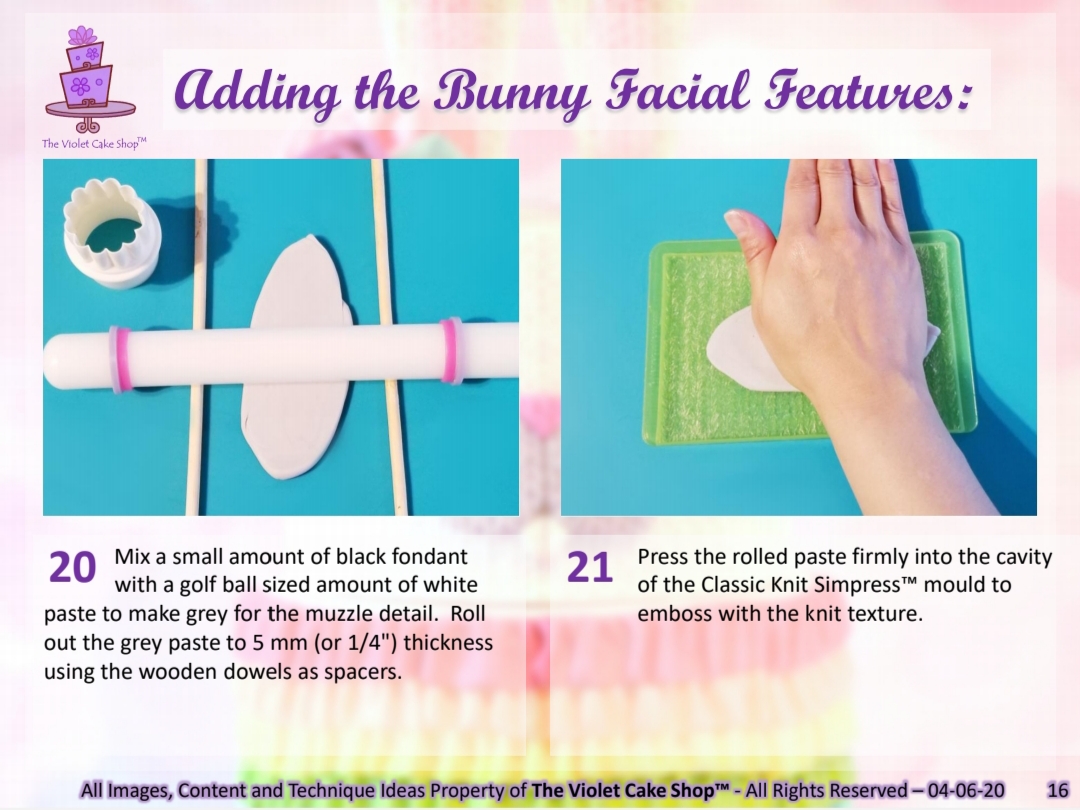
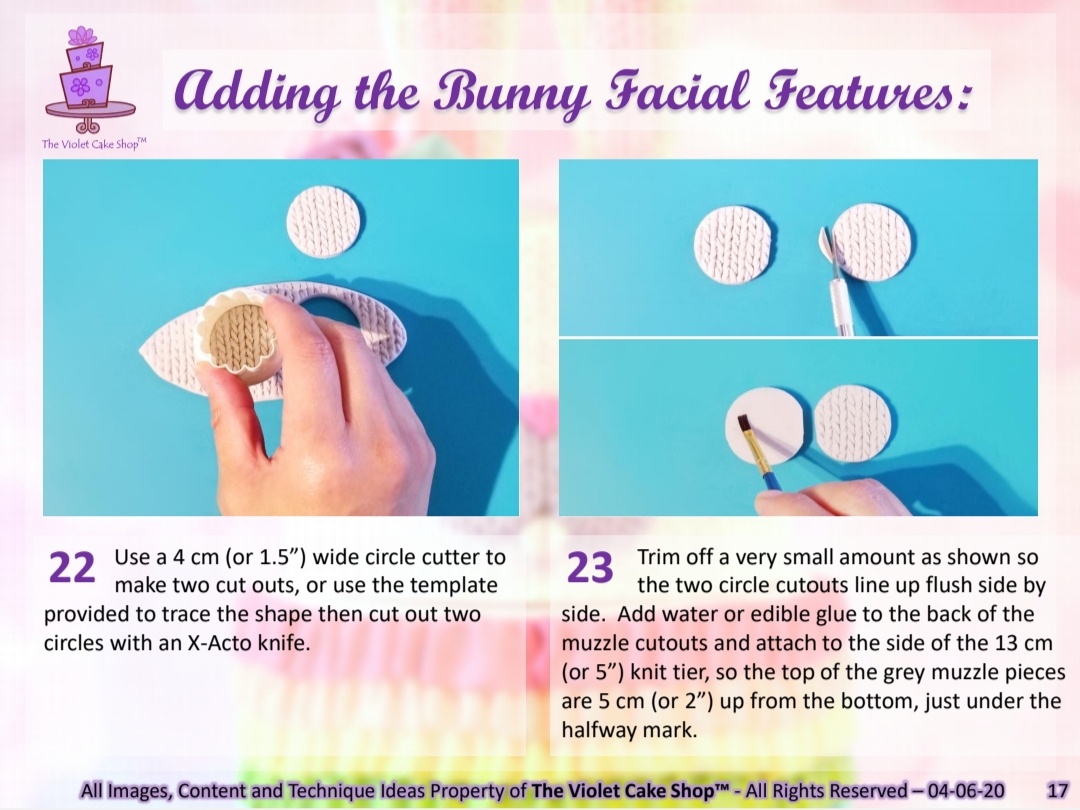
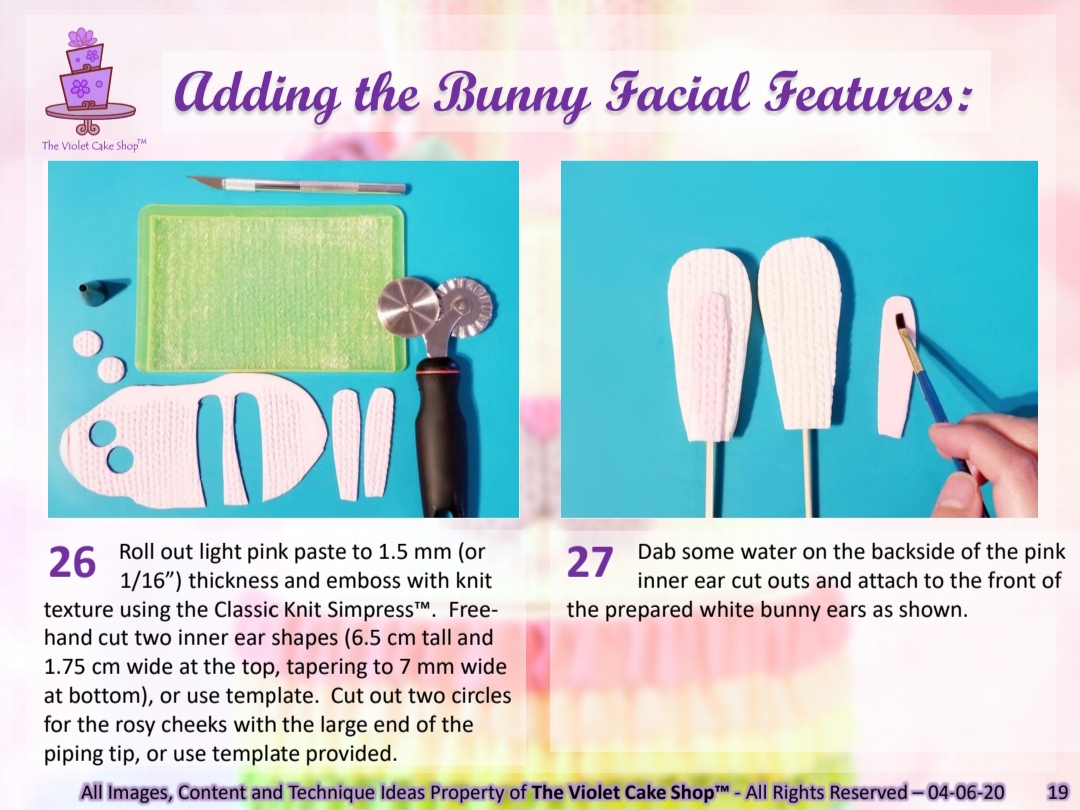
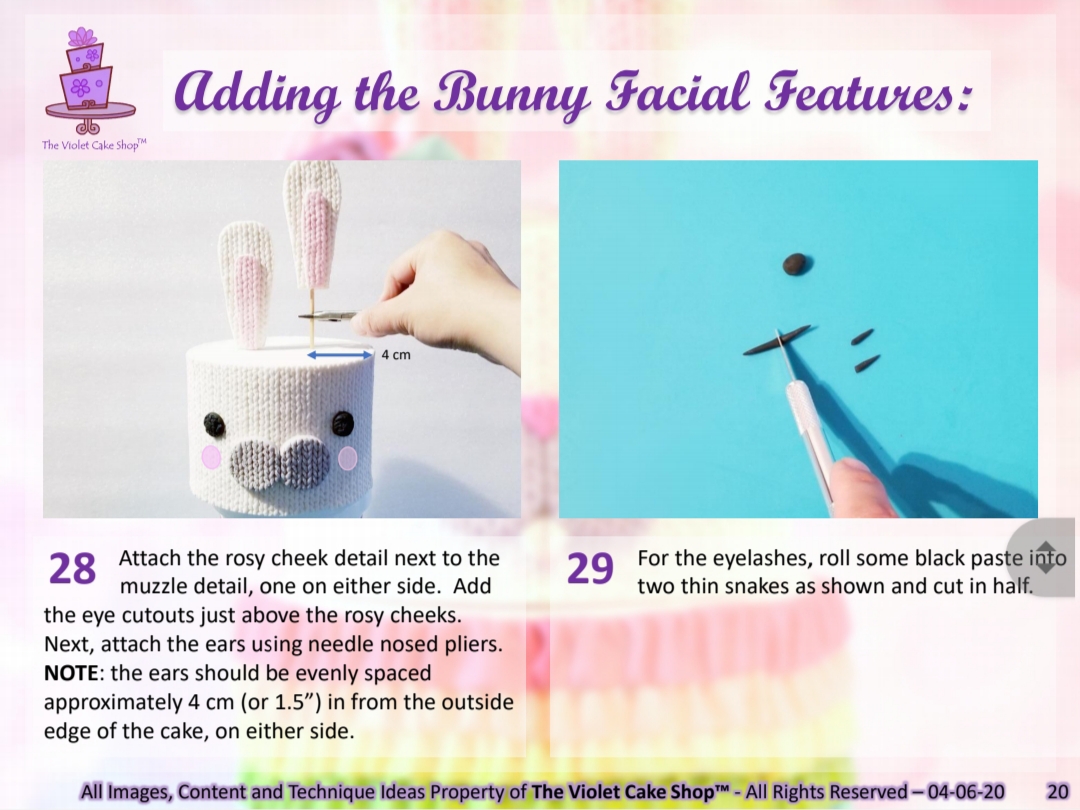
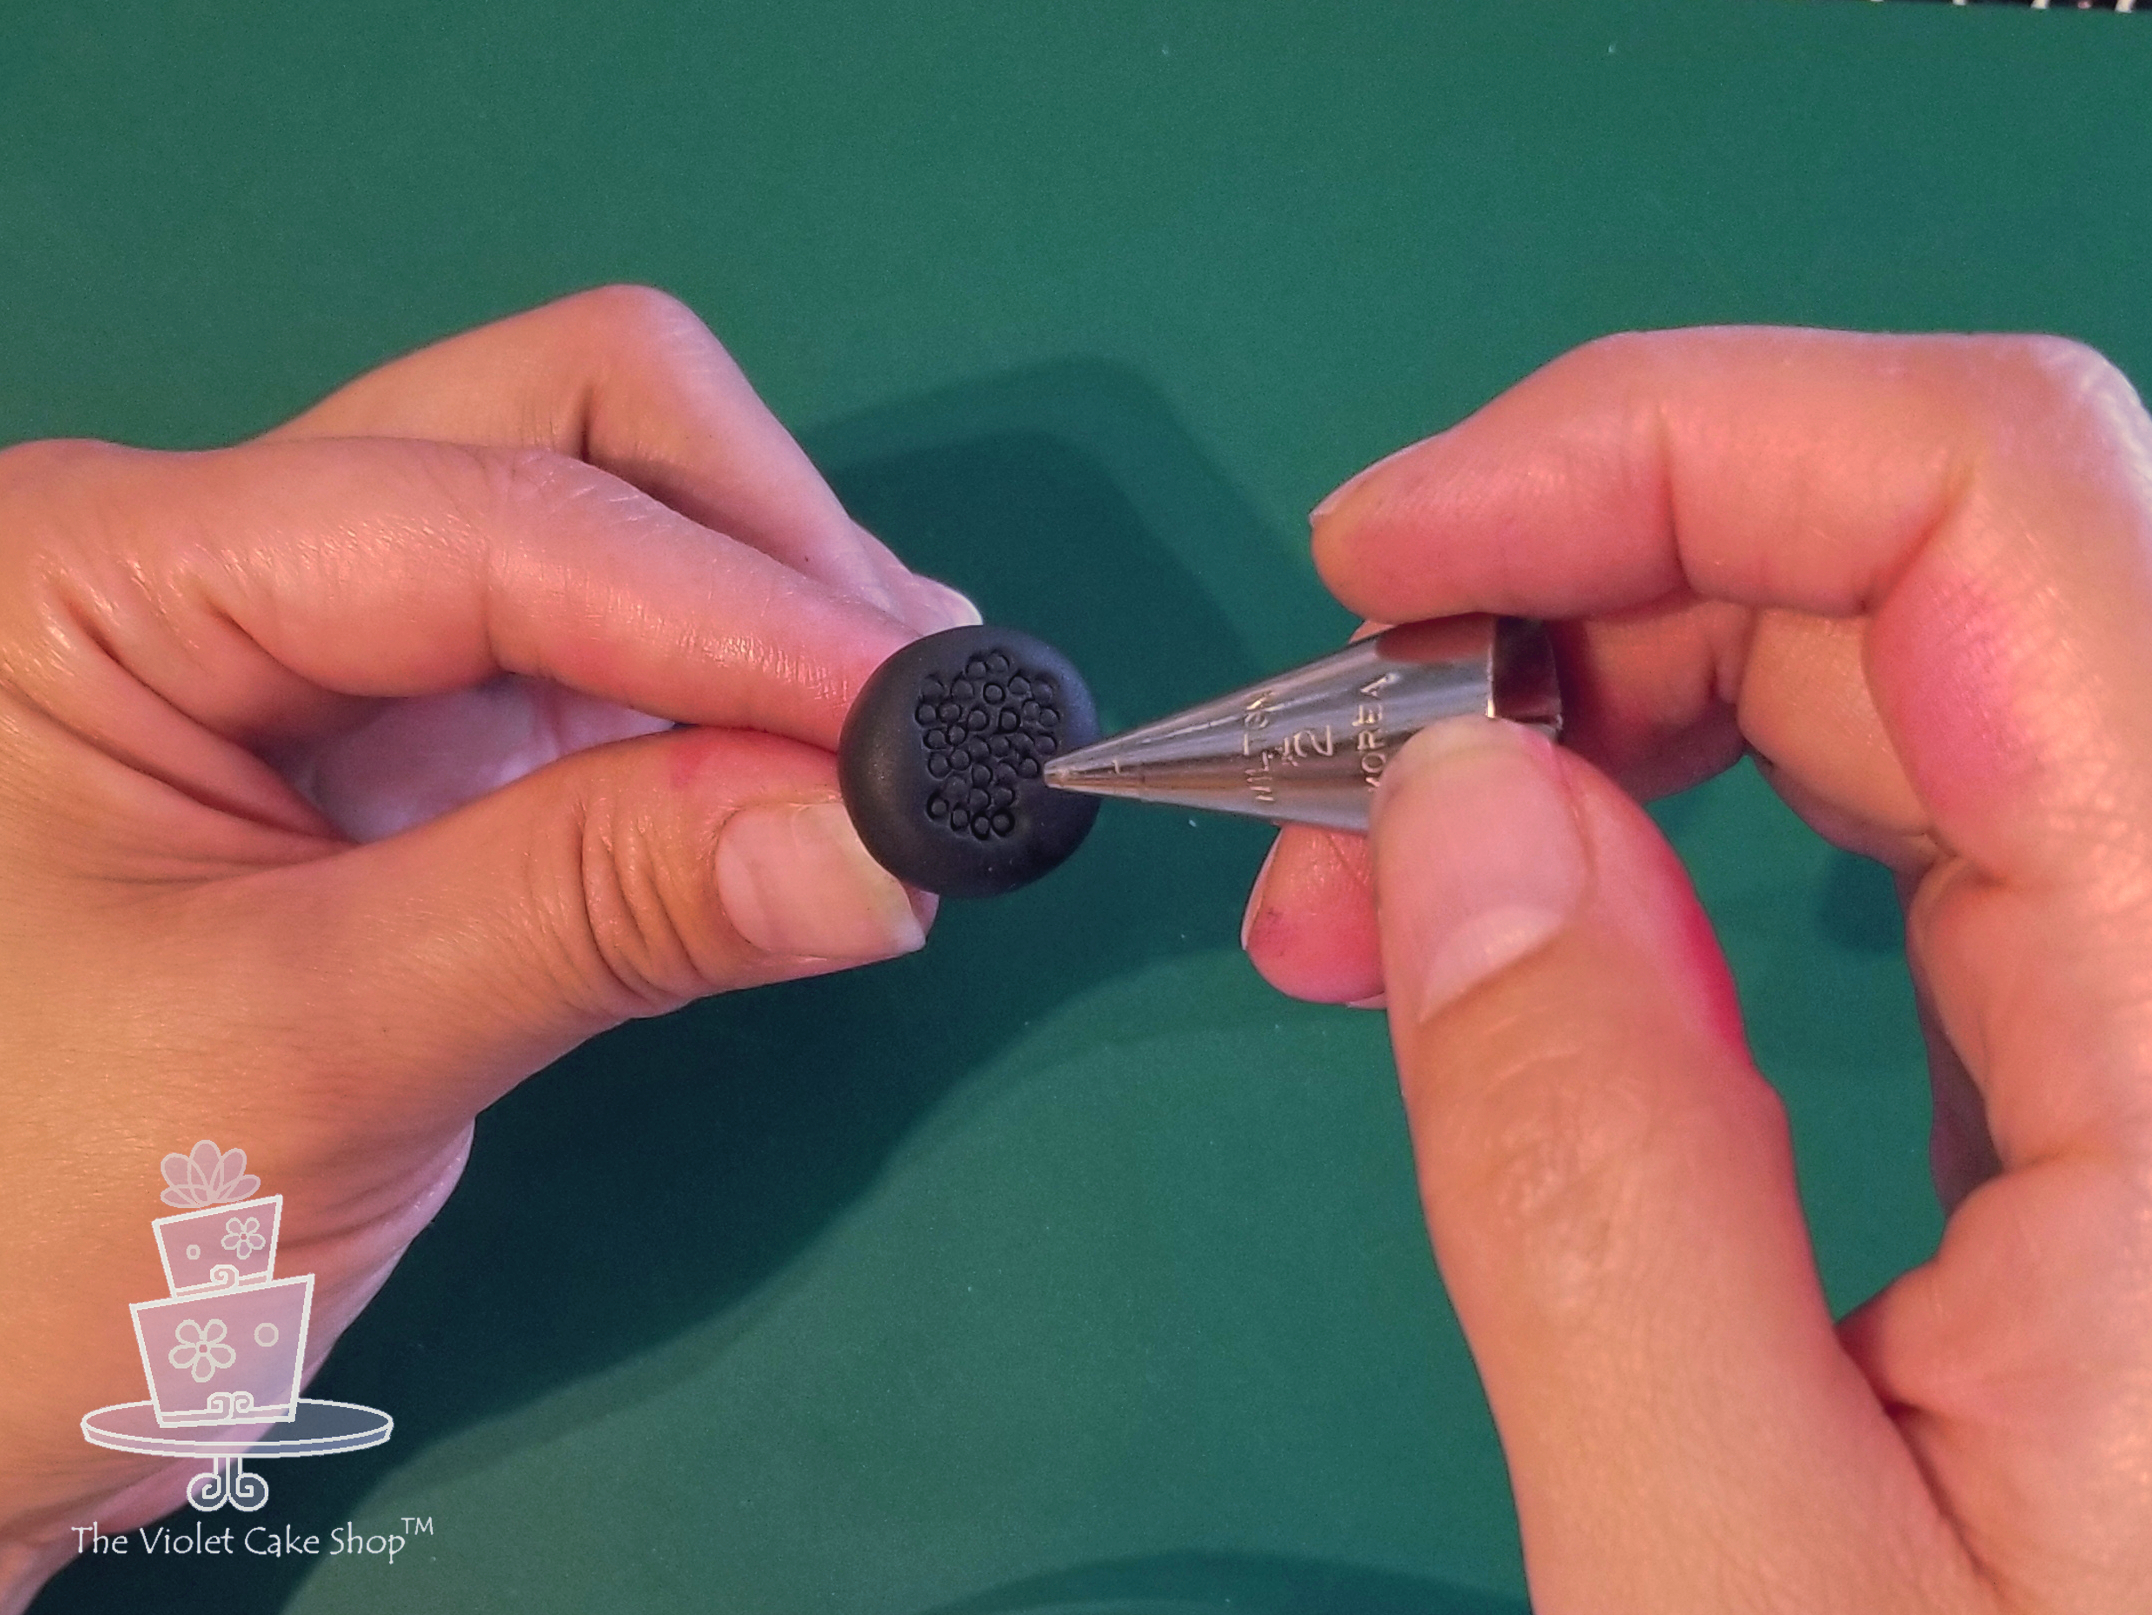
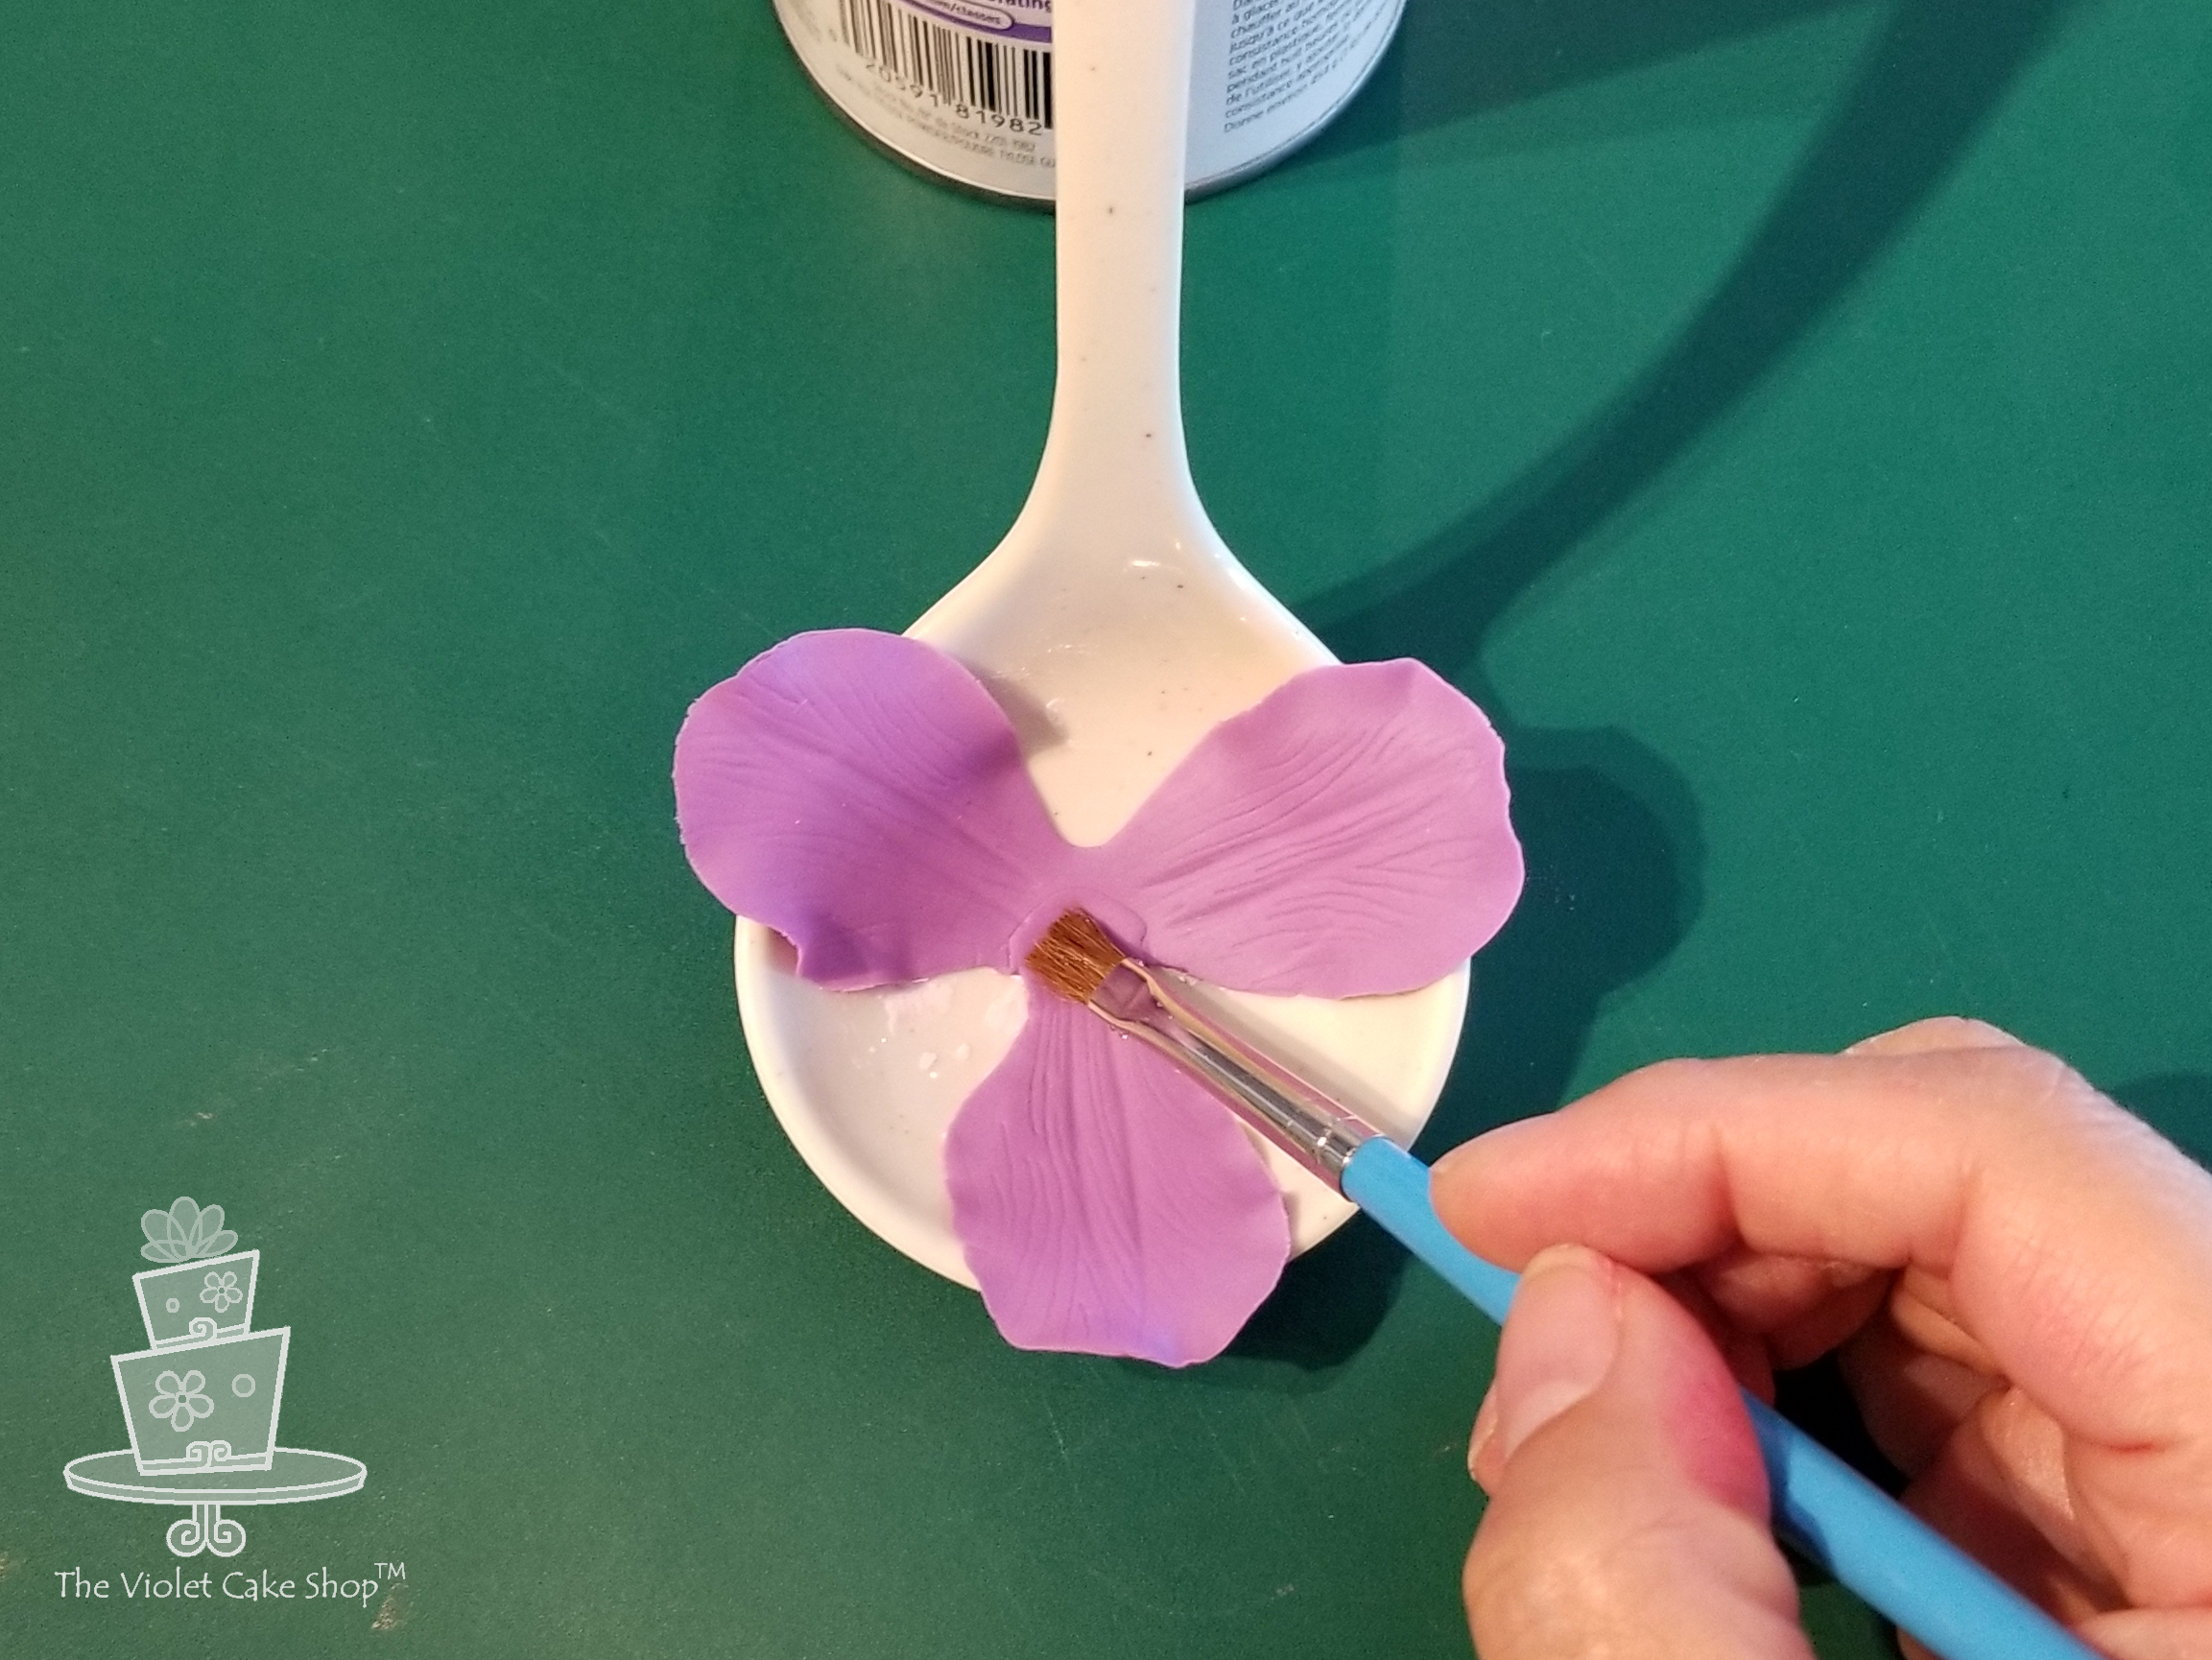
Before starting, treat your fondant with Tylose to make it easier to mold and shape, as well as to allow it to dry faster. You can also use 50/50 gumpaste/fondant mix instead.Roll the paste bewteen your palms to get a log shape with a thicker bulb on one end. Use fingers to shape and elongate the ‘neck’ area. Curve the neck using your fingers.Continue shaping with your hands to bring out the desired shape. Use the template as a guide once you have the initial shape formed.Lay the initial formed paste on the template to gauge size and continue shaping with a Dresden tool and your hands. Continue shaping and smoothing out the paste with fingers.Once the shape is where you want it, use your palms to flatten the head and neck a bit and continue to smooth out the paste. Next, add the eye and eyelashes and use a 1A piping tip to cut off the bottom where the beak will go.Next, take some lighter pink paste that has been treated with Tylose and create a cone shape that will be used as the top portion of the beak.Shape the paste between your palms to achieve the cone shape. Smooth out the wide end.Place the shaped beak to the end of the Flamingo head.Use the 1A piping tip to cut off the bottom portion of the beak.Take some black paste fortified with Tylose, and create a smaller cone shape than the pink one made earlier.Shape it as you did with the pink one made earlier. If necessary, remove excess paste until the desired size is achieved.Once happy, adhere the pieces with water or edible glue and set the head aside on wax paper, to dry, overnight or minimum 12 hours.
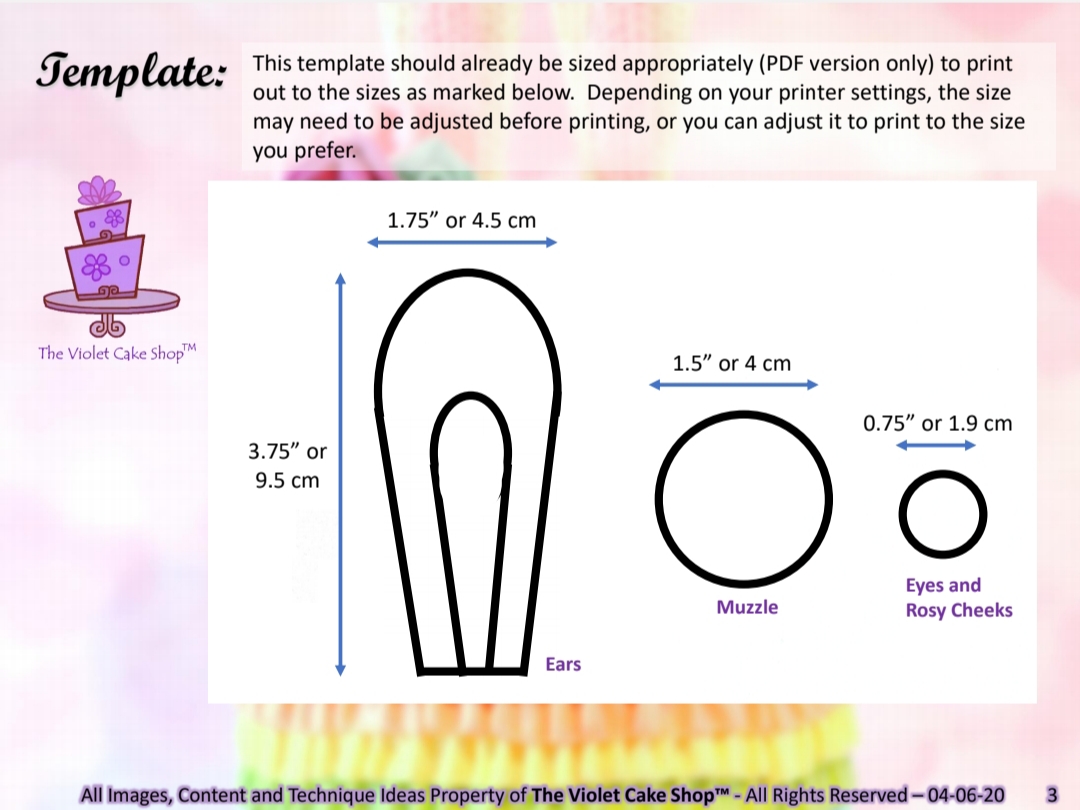
And here is the Flamingo Head Template below – after saving to your computer, you can resize it to the size you want, before printing.
The size of the head used on my cake was just over 6″ tall. My cake tiers were 5″ tall each and the 6″ height was perfect to just peek over the top edge of the top tier.
Here is a photo of the other elements covered in my video.
I hope you’ve enjoyed this tutorial. Please share if you use it. I would love to see what you create. You can always tag me or use #thevioletcakeshop on Facebook and Instagram.
And….HAPPY CAKING Y’ALL!!
Note: these are my own techniques developed independently with my own ideas and shared for personal use ONLY. They are not to be used for monetary gain or to develop products, books, DVDs, downloads or lessons for sale, or to be taught in classes or tutorials, whether hands-on, on-line, in video format or in print, without express written consent.)
It has been a LONG, LONG, LONG, LONG (ok, y’all get it lol!) LONG time since I’ve posted anything on my blog. My last post was in April 2020 when I shared a couple of tutorials that I made FREE for use, during the COVID pandemic. Well…the pandemic is still on-going, at different stages in different countries, almost 2.5 years later, but for the most part things are opening up or have opened back up now. Having gone through such a prolonged pandemic though, (as I’m sure is the case with everyone) SO much has changed!
For those who’ve not followed along on my Facebook and Instagram, I officially hung up my cake decorating hat/apron/rolling pin, last year, and moved on from creating new cake designs and tutorials, and from teaching. The worldwide shutdowns had a huge impact on SO many promising teaching opportunities, classes and demos that I already had planned and scheduled. During the ‘downtime’, I did a lot of reflecting and I realized that I really did not want to be travelling all the time and be away from my family as much as I would have had to, if COVID had not disrupted my plans. It also helped me realize that my level of creativity was at such a low-point, that cake decorating just wasn’t as satisfying, inspiring/invigorating (or more importantly) FUN for me as it was before, even to do as a hobby. I will of course make the odd cake here and there for personal occasions – like recently for my daughter’s big 10th birthday (see end of post for the pic) – but for the most part, my plan now, is to take a big, long break from decorating and spend my energy instead, taking care of the kiddos and trying to help grow the business my hubby started almost 19 years ago with a few business partners. We’ve recently restructured the business and made huge changes, so now we have lots of new ideas and big plans for where it will go from here. We were fortunate that the pandemic did not negatively affect our business for long, so at least I now have something to fall back on and redirect my focus to.
Though most of my plans involving cake were interrupted, there IS one opportunity that was already in the works just as the pandemic started, that luckily did not fall through, and it is the one I was most excited about! The parameters of our initial agreement did change a bit because of the impacts of the COVID shutdowns, but given my current situation, it was an opportunity I just could not pass up, as it would help cement my legacy in this industry that I spent over 13 years in.
The big news is already out on my Facebook and Instagram pages, but for those who haven’t heard yet, I have partnered with Marvelous Molds® (one of my most favourite companies) to bring you a new Simpress® mold that was inspired by my signature V-Petal Ruffles technique, a technique which has been shared SO many times on this blog! YIKES, I was so excited and stoked when they reached out to me saying they wanted to come up with their version of my ruffle technique and asked me if I would like to collaborate! How could I say no? It was super hard not to let the cat out of the bag before we launched it yesterday, especially since we had to put our initial plans on hold for almost 2 years!
Along with providing feedback and suggestions and testing out the prototype, I created two new designs using the mold, to showcase its versatility and for use in the packaging and product promo. After working with it, I have to say, it is AN ABSOLUTE TIME-SAVER and was such a pleasure to use! It almost makes me want to come out of ‘retirement’ hahaha! In all seriousness though, it was the first time in YEARS where I felt inspired to come up with new designs. It’s so easy to use and saved me so much time that I was able to devote more of my time to the actual act of designing. I couldn’t be happier with the quality and calibre of the the mold and it really makes decorating more pleasurable and such an ease!
For those who have used my V-Petal Ruffle technique, you will know that it is a very time-consuming process that does require a bit of patience to execute. The results are so gratifying though, that it makes the time spent, well worth it. But it does often mean HOURS spent hand-folding the ruffles and applying them all individually. Well, this new mold cuts that down to a FRACTION of the time, while maintaining the intricate details! I was able to cover a 7″ tier in less than an hour, which would have taken almost 5 hours using my original method.
Even better, it is the first of their molds that is 6″ in height, which was one of my suggestions, and which is perfect for those taller cakes! But it still works for shorter cakes too – you just fill the mold with a shorter panel of fondant and trim any excess off the top edge, after you panel it onto your cake.
I already shared one of the new cakes I designed using the new V-Petal Ruffle Simpress® on my social platforms, but I am sharing the second one here first!
This flamingo design has been an idea floating in my brain for years, but it never cemented into an actual design until I thought of what creative way I could use the new mold for.
As you can see, I’ve used the ruffled tier as the ‘body’ of the flamingo. This new V-Petal Ruffle Simpress® is PERFECT for simulating the feathers of any bird design you might have in mind. This same idea can be used for swan or peacock themes as well, just to name a few! It would be great too to use as the background for foliage in any tropical cake. SO many ideas popping into my head for how to use this mold. As I said before, it ALMOST makes me want to come out of retirement lol.
If you would like to get this new mold, you can check out my affiliate link here or look for it at your local decorating store that carries Marvelous Mold® products. If your favourite local decorating spot doesn’t have it yet, you can always ask them to stock it.
This is the other design I created to showcase the versatility of the new V-Petal Ruffle Simpress®. As you can see, this mold can be used for elegant designs, to fun designs, to anything you can come up with in between!
Look at those AMAZING details!!
I hope you guys love this mold as much as I do! I would love to see what you create using it. You can always share them with me by tagging my page in your posts. Who knows, I might just share some!
I also wanted to take this time to THANK EVERYONE from the bottom of my heart for your love and support over the years that I’ve been sharing my work. You have all made me feel LOVED, appreciated and like an important part of the cake community. Without your support, comments, likes and engagement, I NEVER would have had the opportunities I’ve had, nor the nerve to put my work out there and embark on these adventures! Thanks again and LOVE to you ALL!
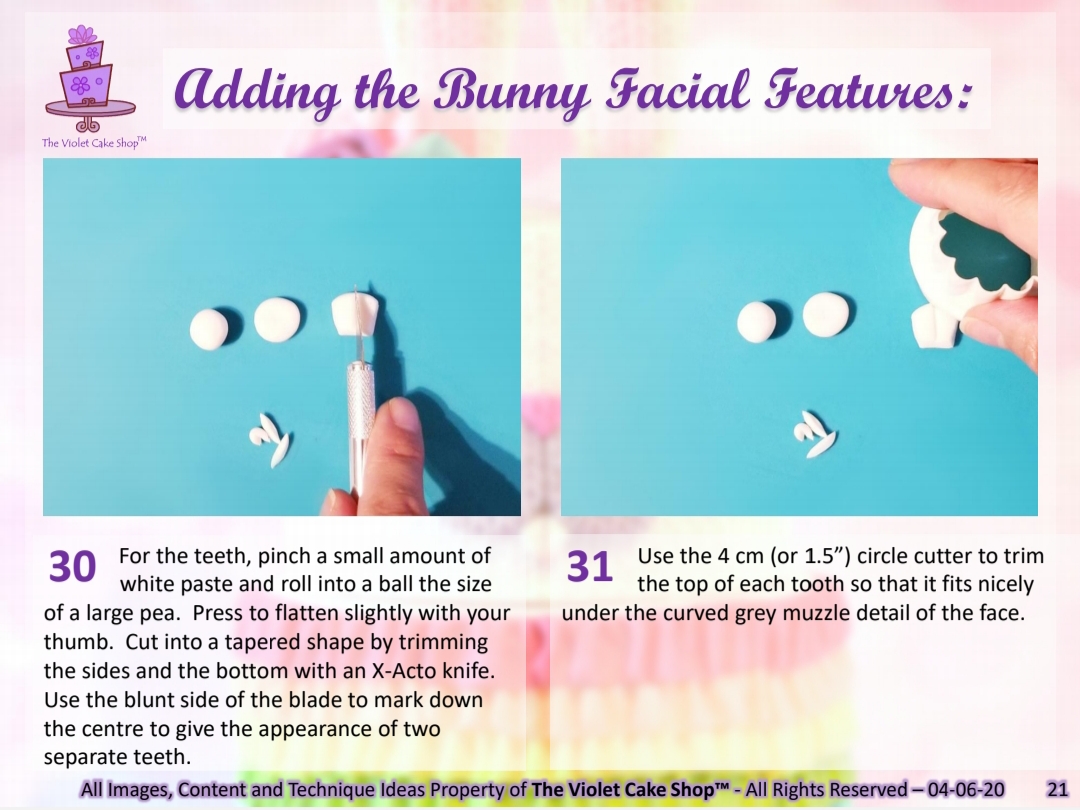
Stay tuned, as I plan to do a mini-tutorial on the flamingo head…just need to find some time to sit down and get it filmed…
In the meantime, HAPPY CAKING Y’ALL!
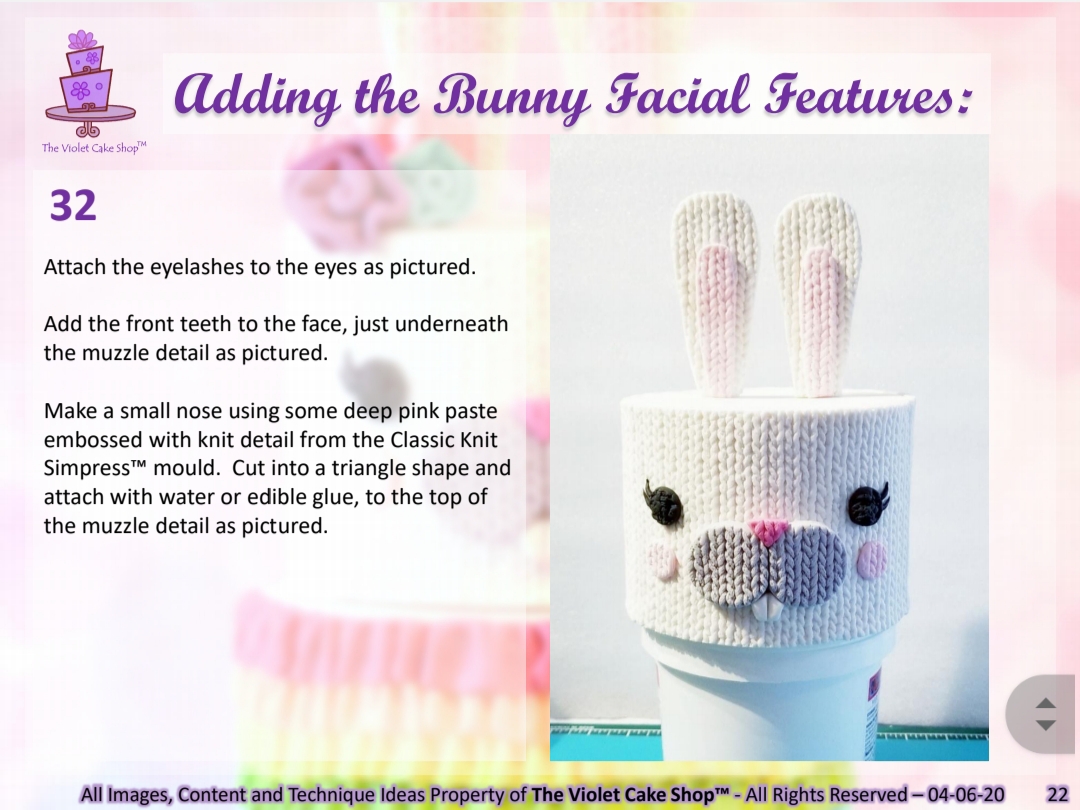
Oh and finally, as promised….my daughter’s cake…
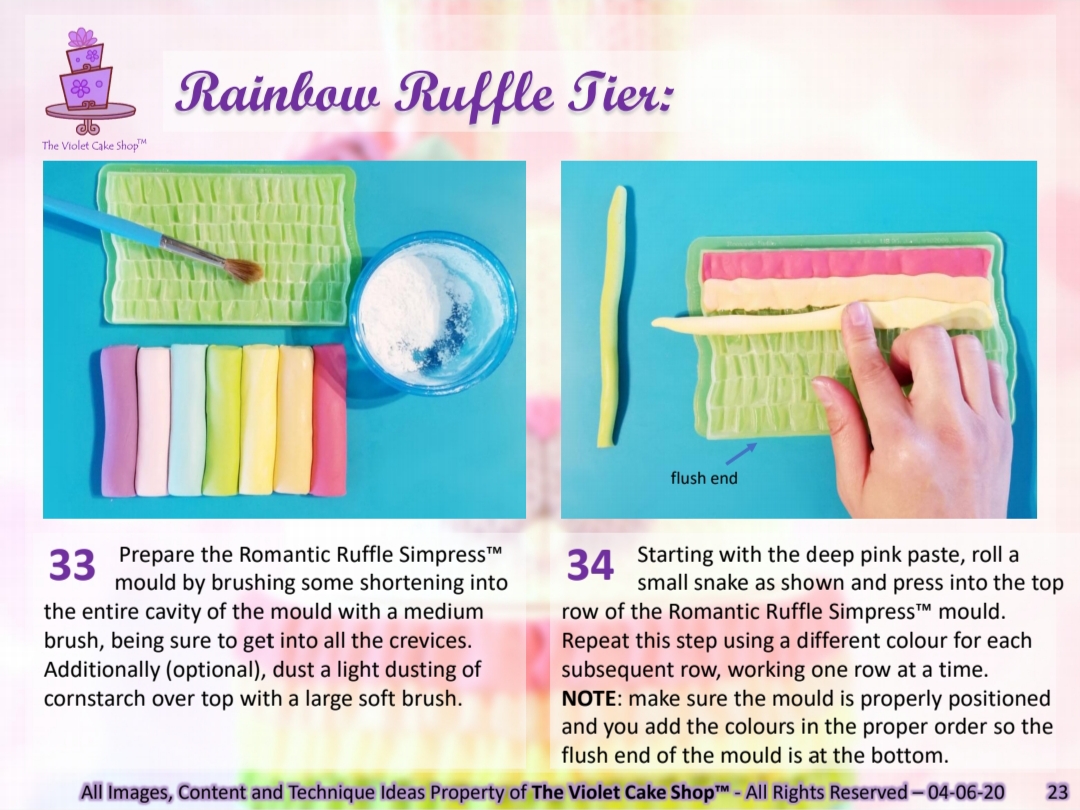
She turned the BIG double digits 10!!! in July, and this is her cake. Ya know, I still have to make her her custom cakes even though I’ve officially ‘retired’ from caking…AND as you can see, she STILL loves Tsum Tsums! She helped me design this in every aspect – colours, placement of ruffles, style of name and age, and which Minnie Tsum Tsum should be the star! She chose Royal Minnie from the Tsum Tsum game.
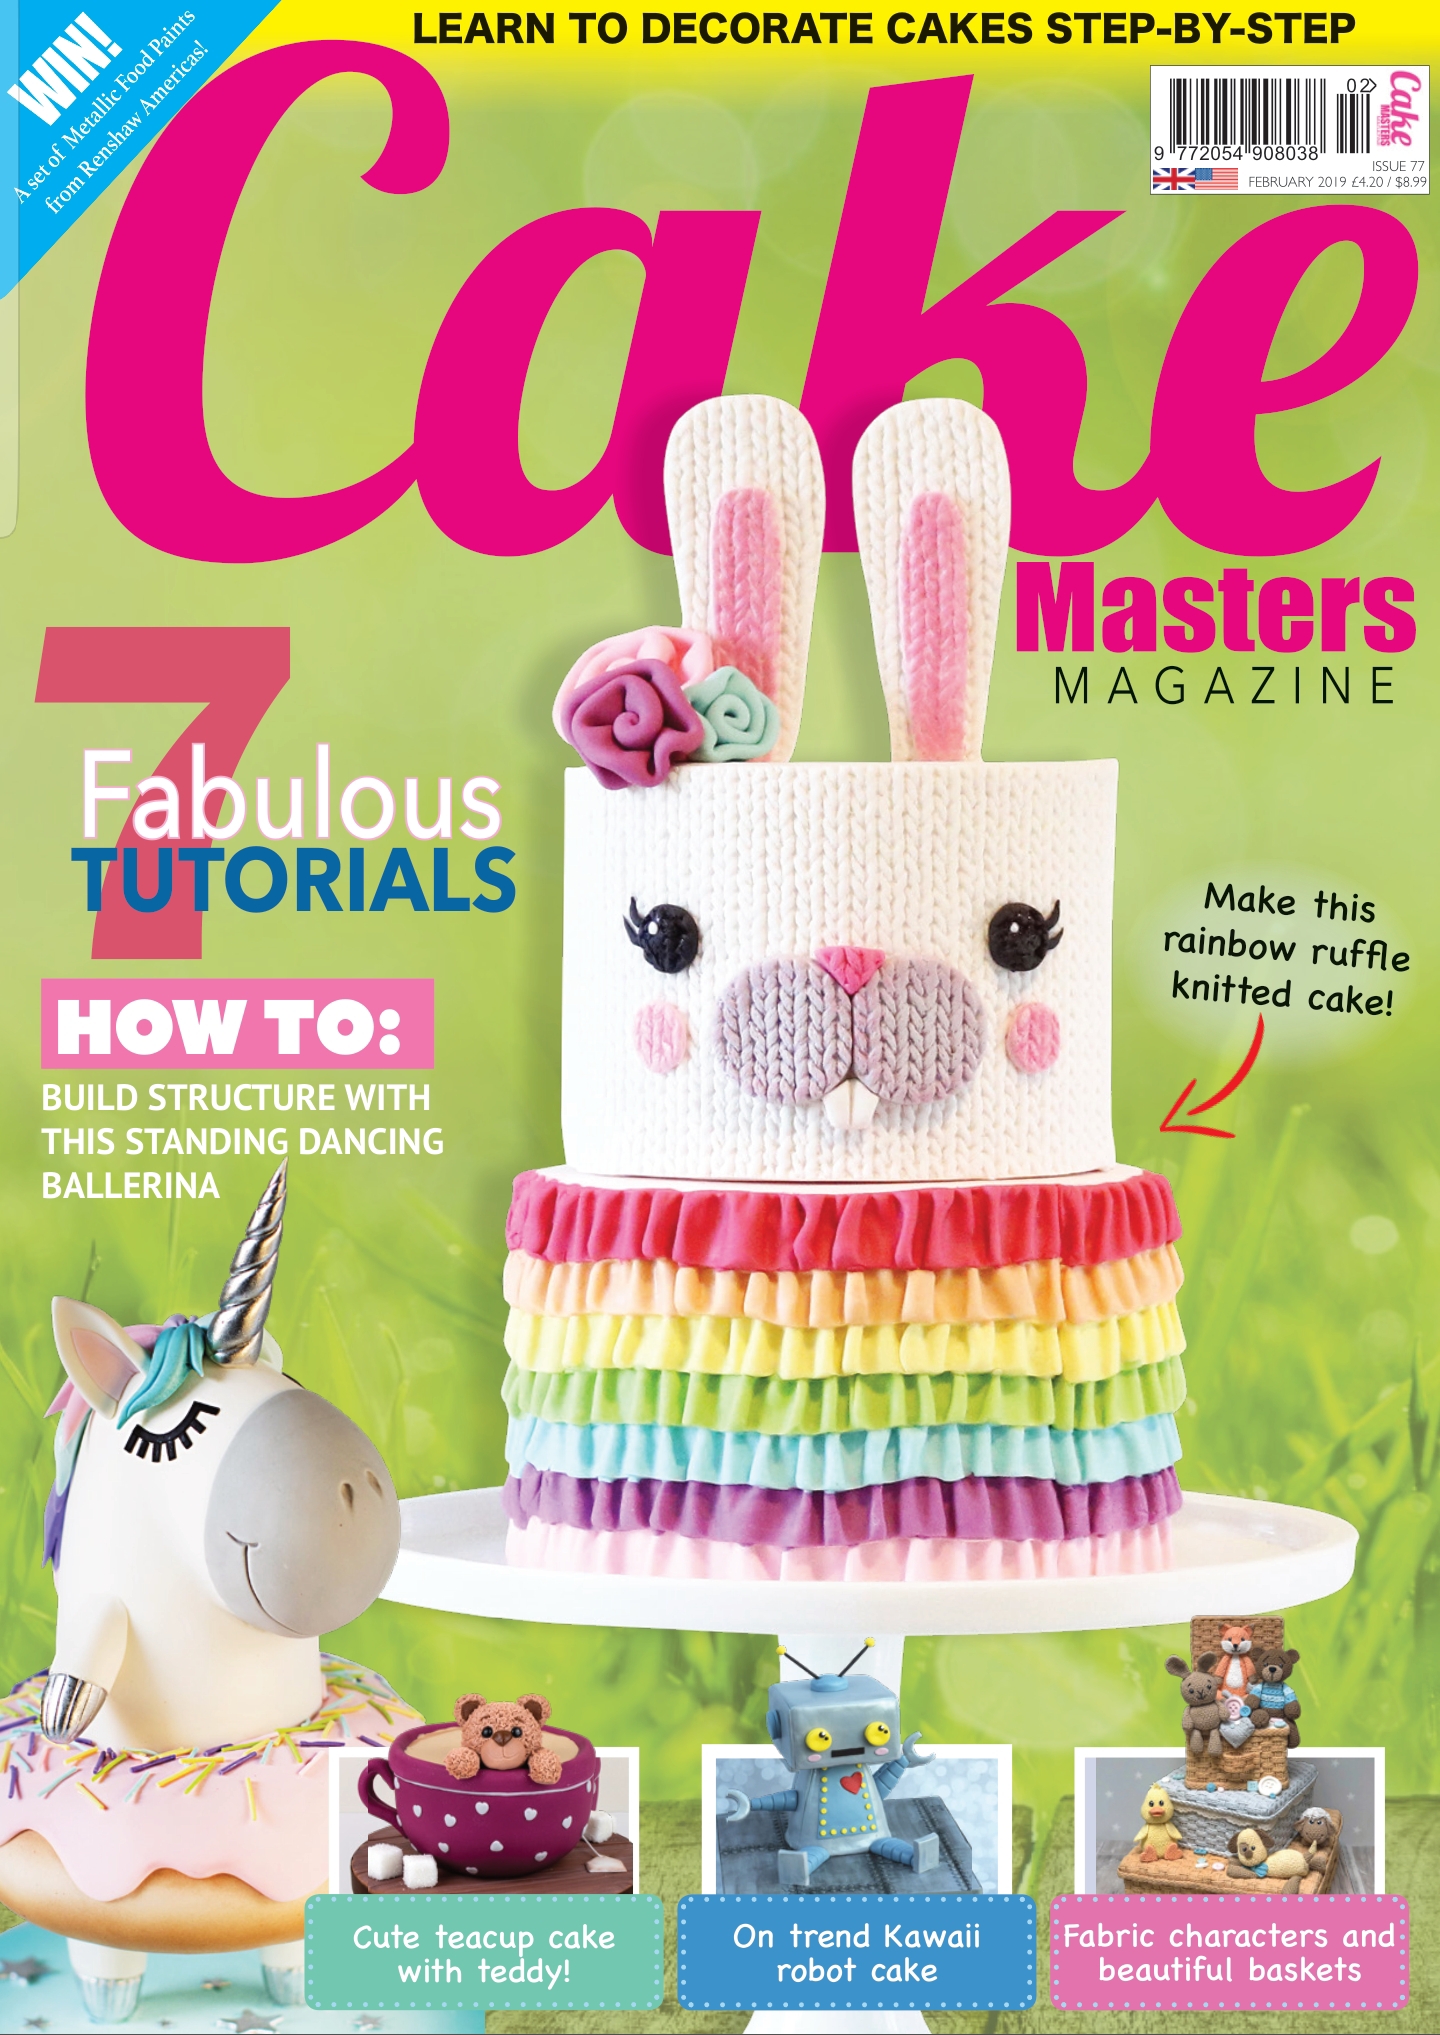
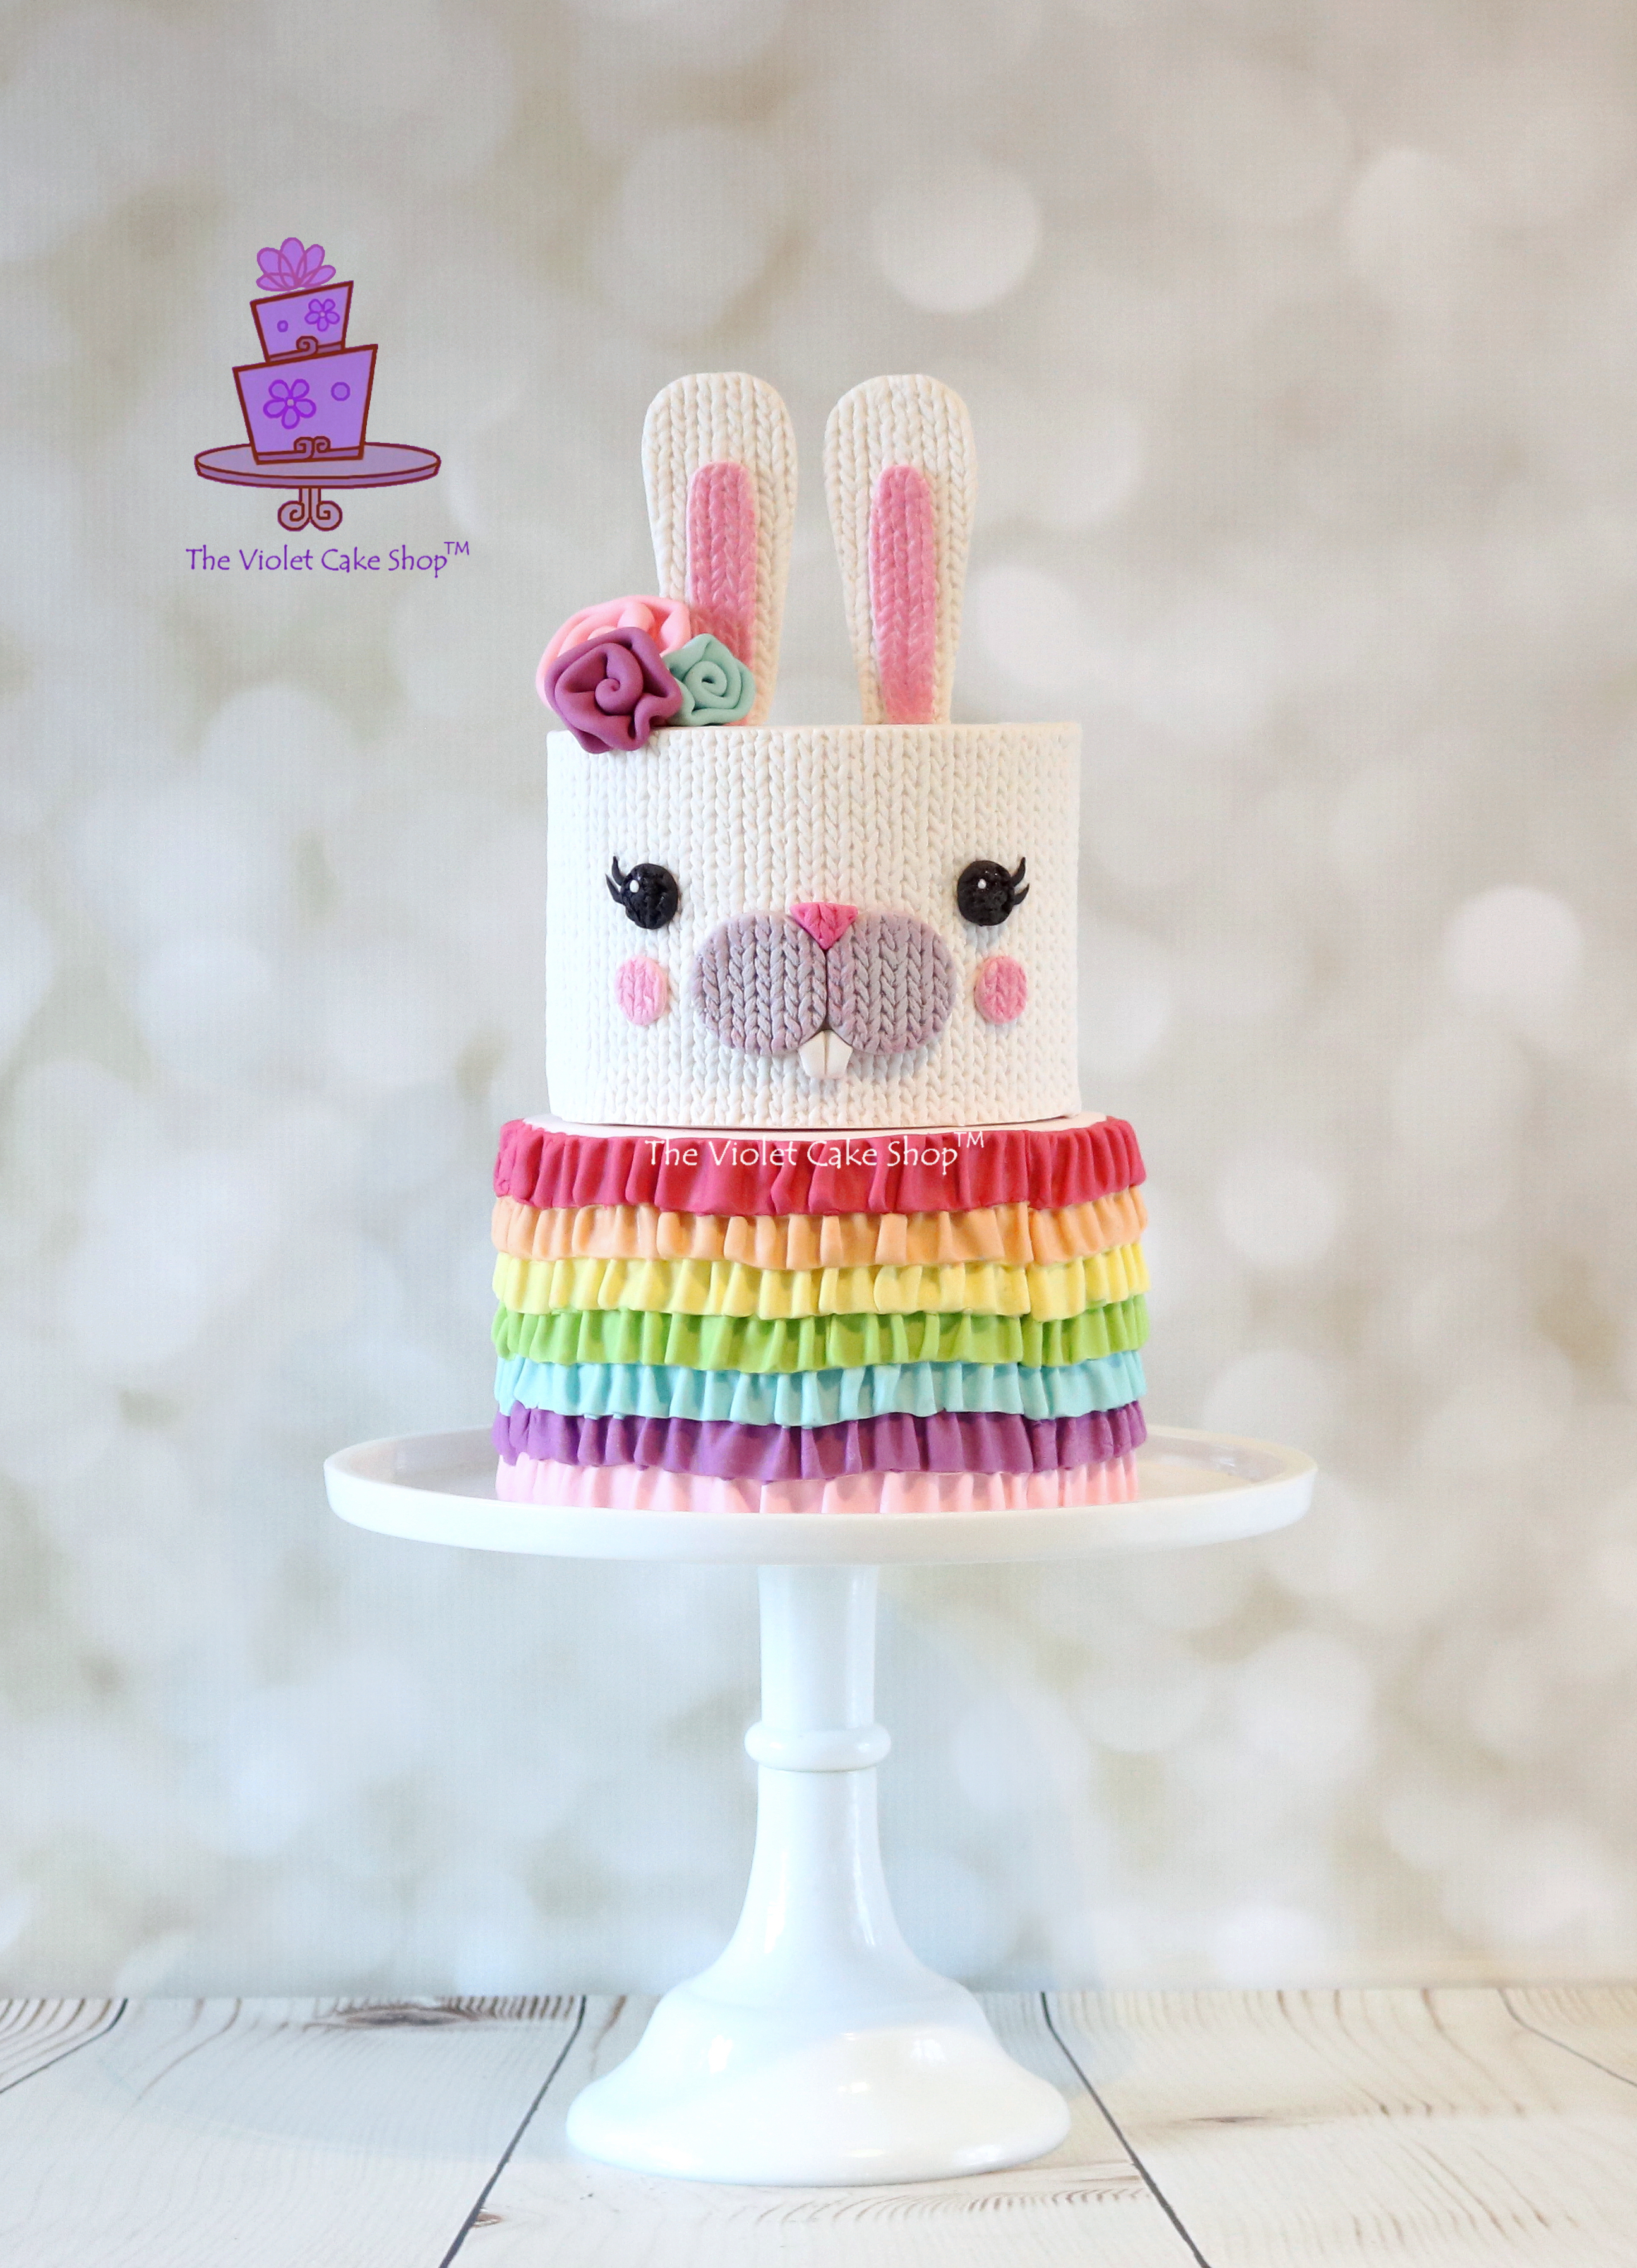
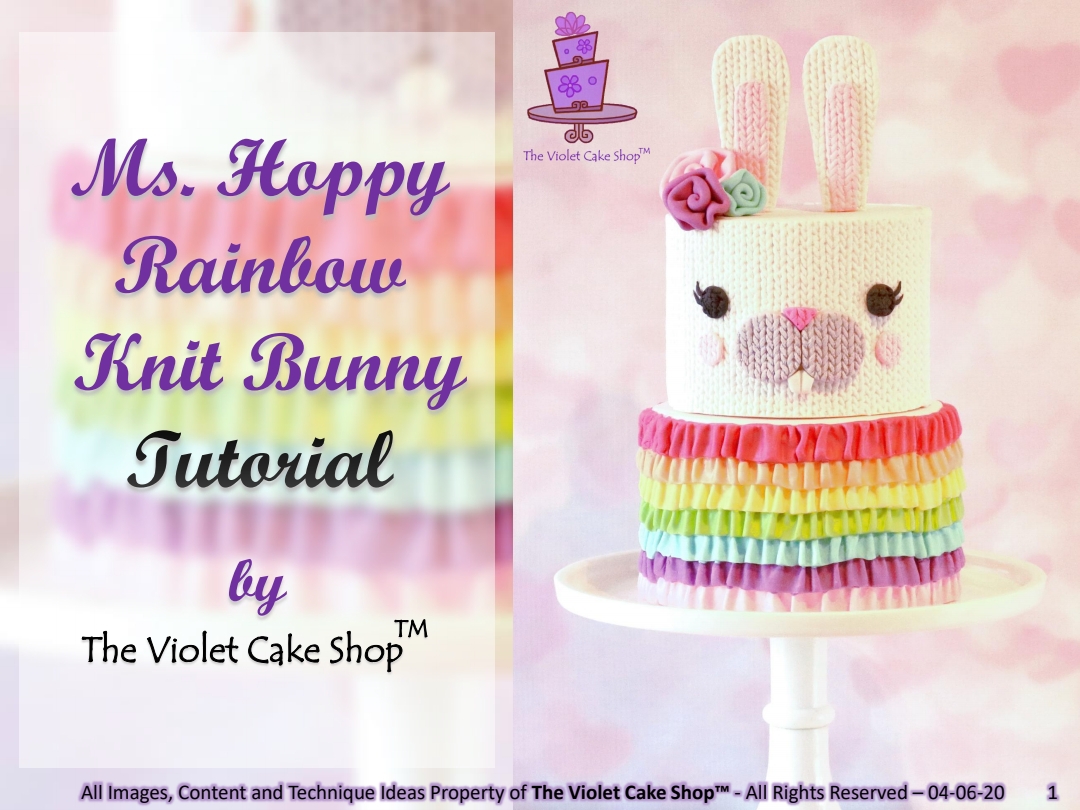
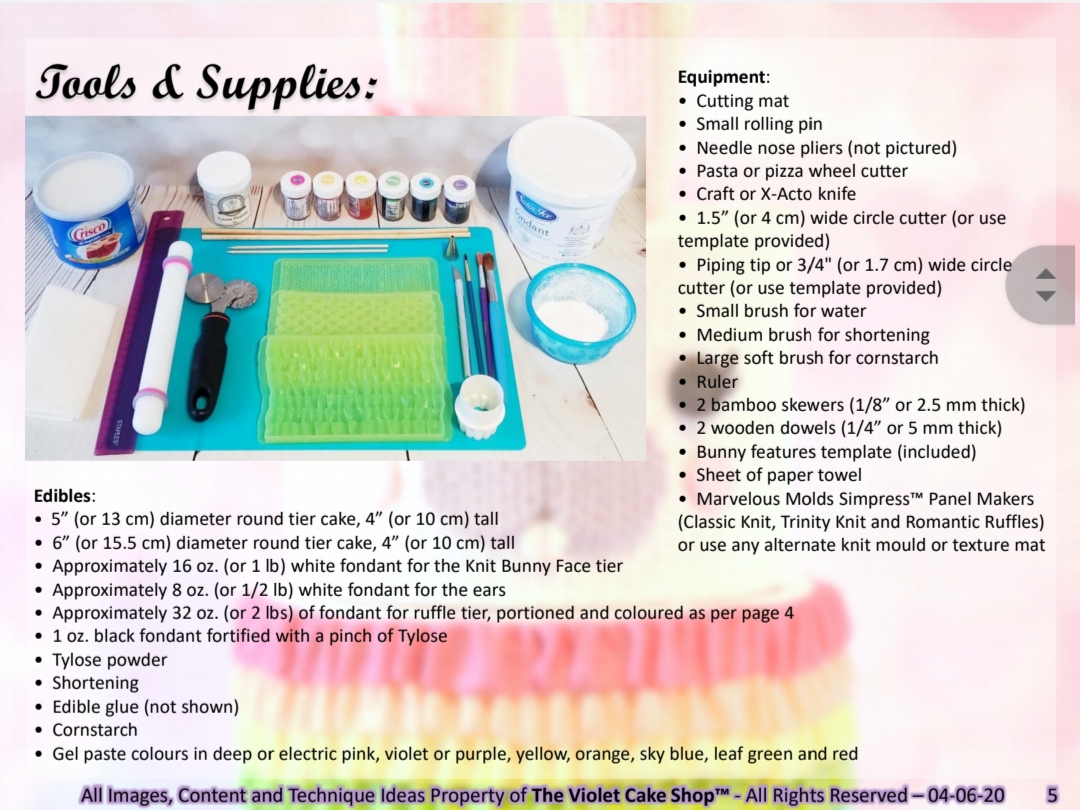
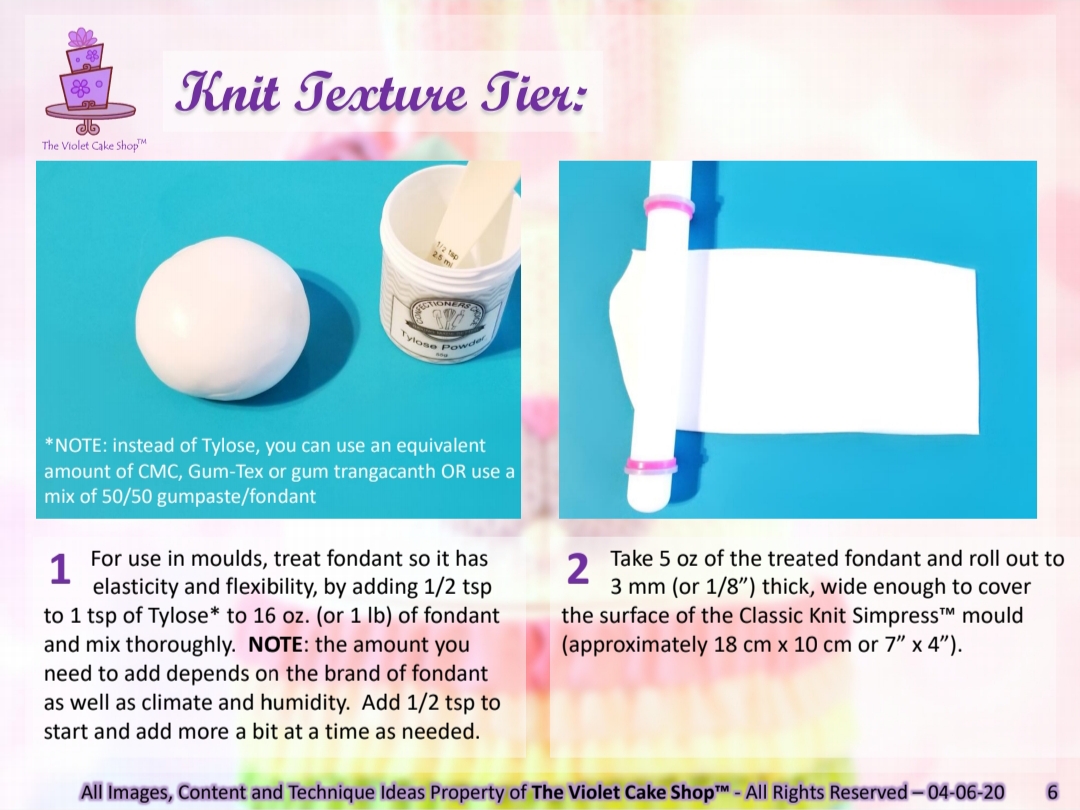
Well, all this time practicing social distancing recently, has given me plenty of free-time to work on some of my previous magazine tutorials that have long been on my ‘To Do’ list to format into PDFs for my e-Shop. The latest tutorial I finally put together is for my Rainbow Knit Bunny, Ms. Hoppy, who graced the cover of Cake Masters’ February 2019 issue.
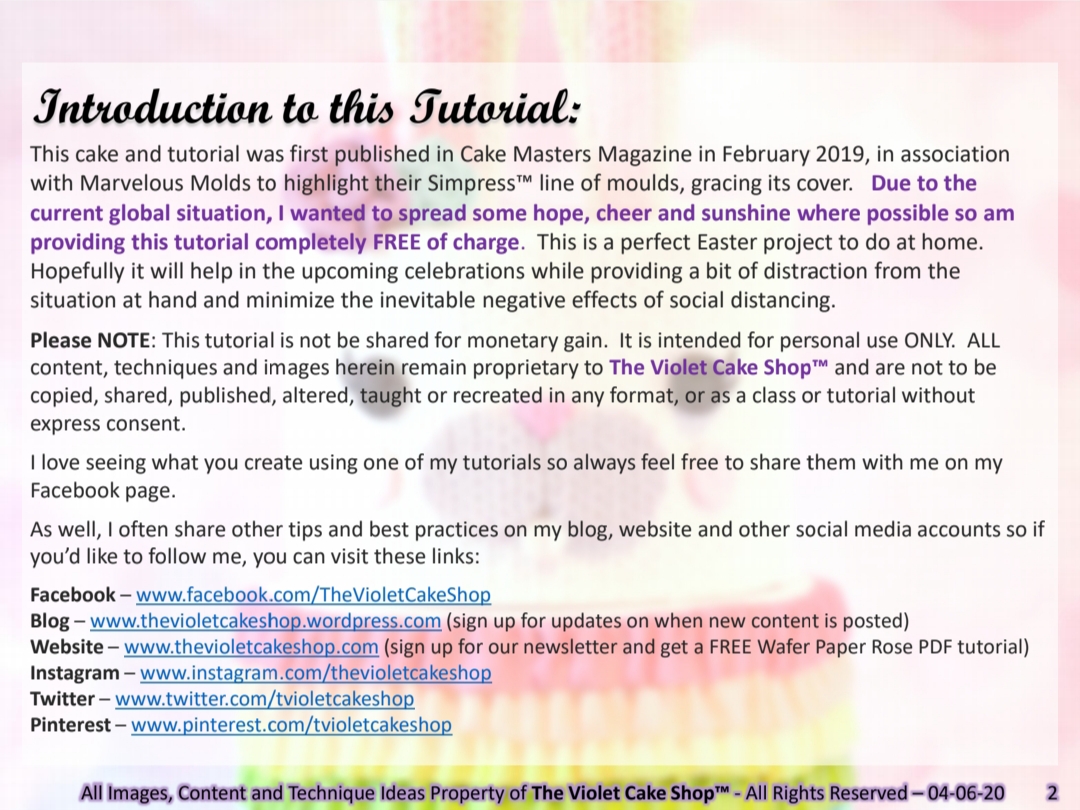
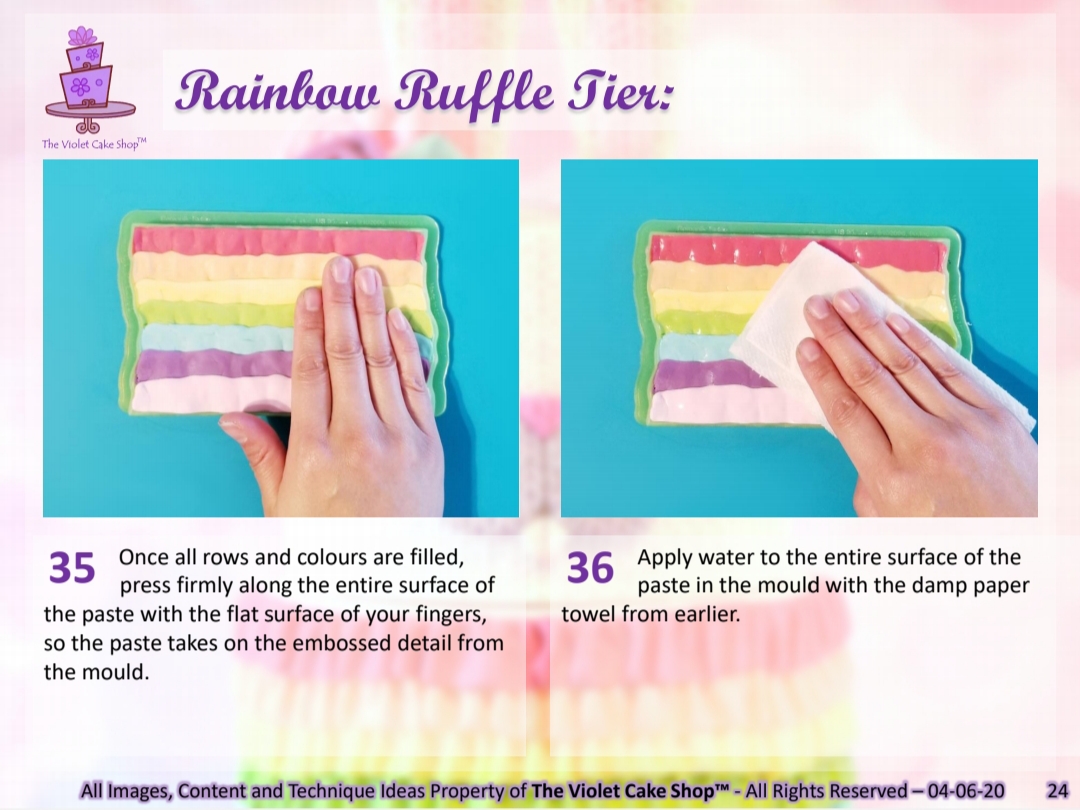
Again, this was intended to be a paid tutorial. But we are still in the midst of the COVID-19 pandemic and I know lots of us out there are struggling with the massive shift in our ‘normal’. Kids not being in school and having to either homeschool them or entertain them/keep them busy. We are also dealing with, amongst other things, financial struggles because of not being able to work or open our shops, or having cancelled orders left, right and centre. We worry too for our health and that of others. It’s a lot to take in.
So to continue in the spirit of sharing that I’ve been doing the last couple of weeks, I decided to share this tutorial for free as well, for a limited time, as long as we are dealing with this pandemic.
Timing is perfect too as Easter is this weekend, so it makes for a great Easter project to dive into, to take your mind off your troubles.
If you would like the high resolution downloadable PDF version, which makes it easier to save, find, view and print, you can get it in my e-Shop for a minimal fee (just $2.99 Canadian).
So I hope Ms. Hoppy puts a smile on your face like she does mine and she gives you hours of distraction! HAPPY CAKING Y’ALL and Stay Safe and healthy!
Oh and REMINDER! ALL my other paid tutorials are ON SALE for as long as COVID-19 is still wreaking havoc, and they are now reduced to 50% to 75% OFF.
FREE Ms. Hoppy Rainbow Knit Bunny Full Cake Tutorial:
(Note: these are my own techniques developed independently with my own ideas and shared for personal use ONLY. They are not to be used for monetary gain or to develop products, books, DVDs, downloads or lessons for sale or to be taught in classes or tutorials, whether hands-on, on-line, in video format or in print without express written consent.)
(Note: these are my own techniques developed independently with my own ideas and shared for personal use ONLY. They are not to be used for monetary gain or to develop products, books, DVDs, downloads or lessons for sale or to be taught in classes or tutorials, whether hands-on, on-line, in video format or in print without express written consent.)
It has been more than 10 days since my last post. In that post, I shared a free tutorial for a popular design and technique, as my gift to everyone during these trying times. I had hopes that by now, the global situation would be much better off than where we were then, and most definitely better off than where we are now. Unfortunately, that is not to be the case. Perhaps I was a bit too optimistic, maybe even a bit naive and most certainly I can see it was an unrealistic hope. Like many, I just had NO true idea of what we are up against and severely underestimated the impact of this virus.
But that last post got me started on sharing my old tutorials on Facebook and Instagram, in an attempt to spread some love and joy, and provide much needed diversions from the constant stream of depressing stats. I have a few more left to share but figured it’s a good time to add a new one to the line-up.
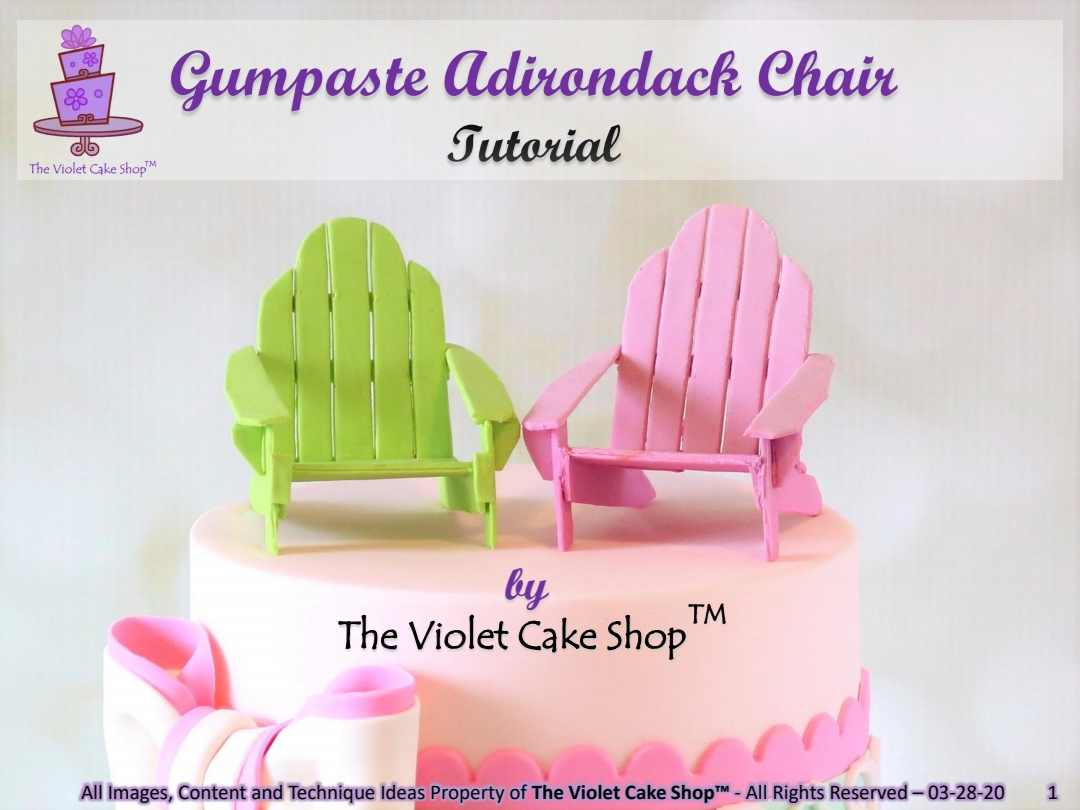
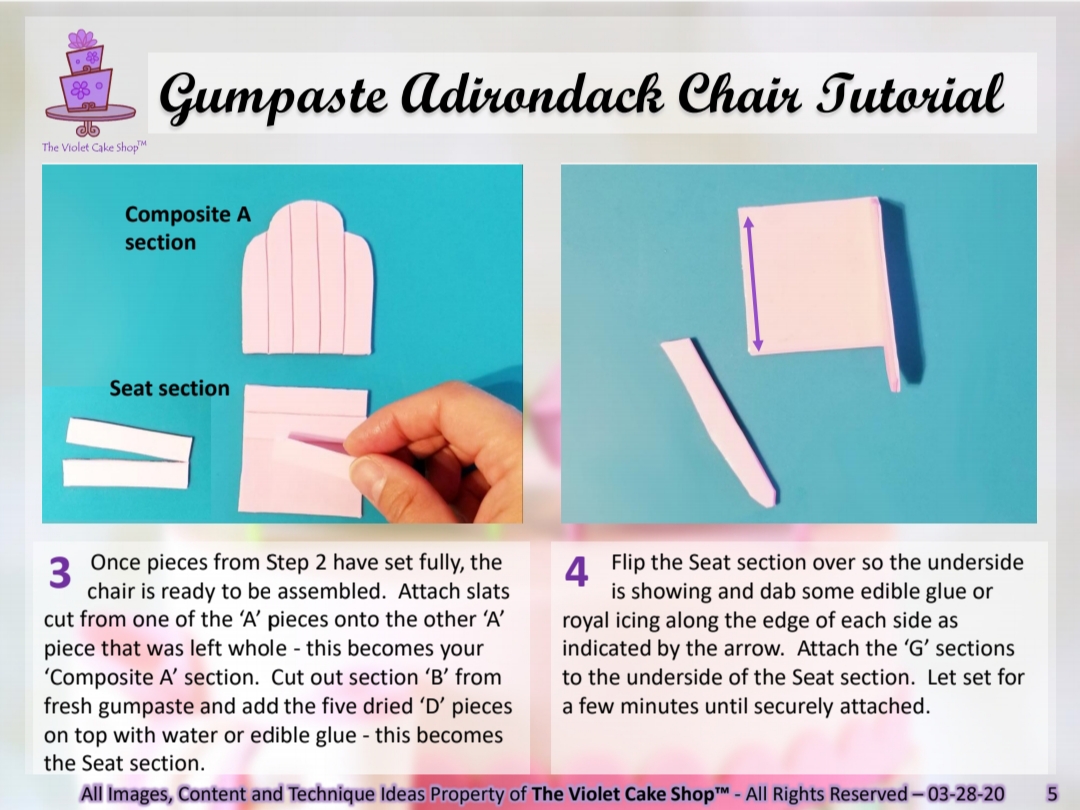
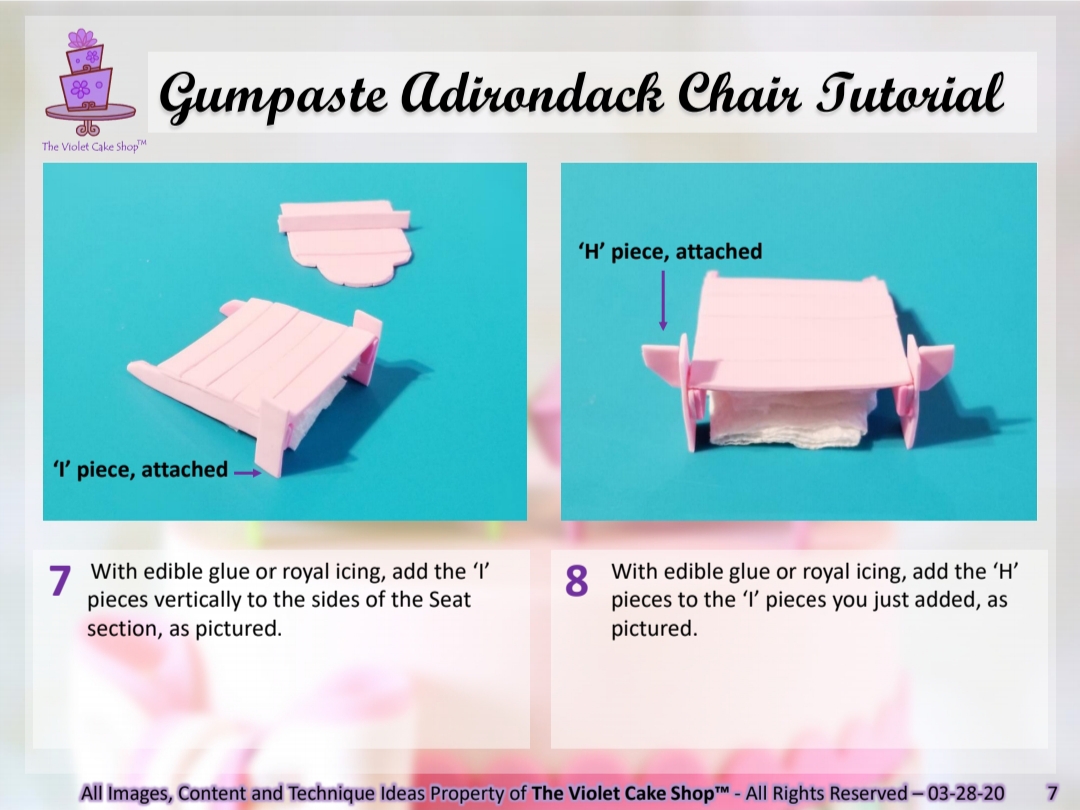
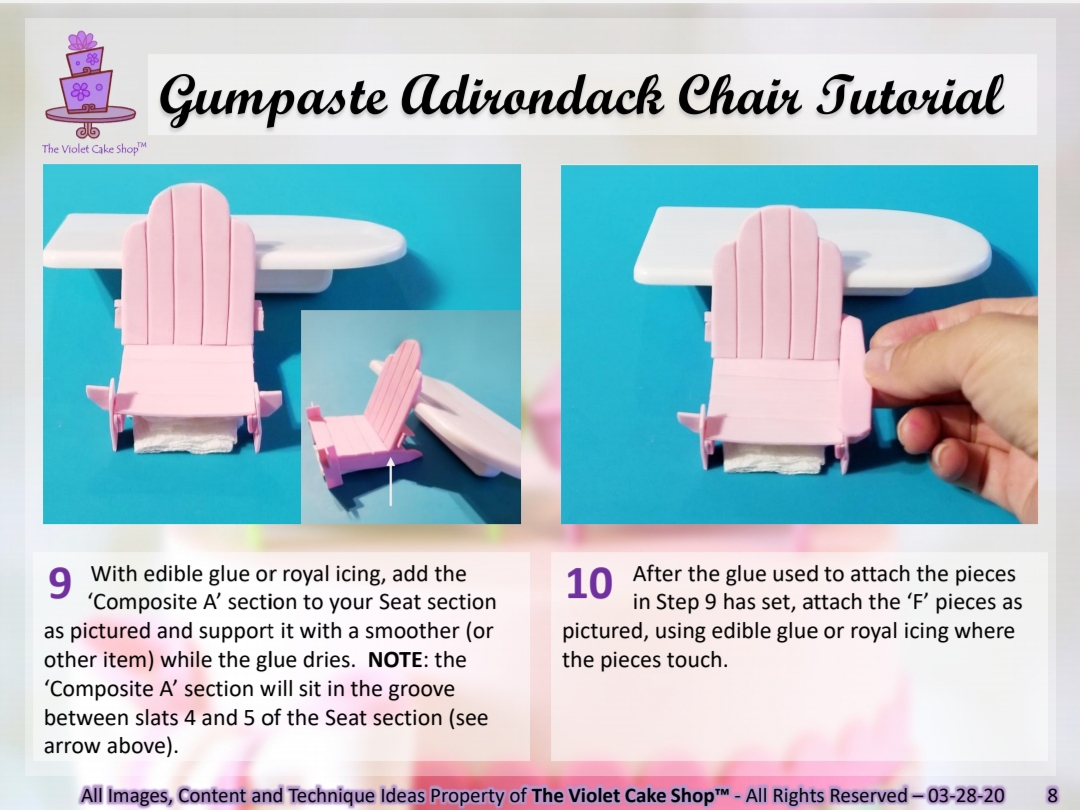
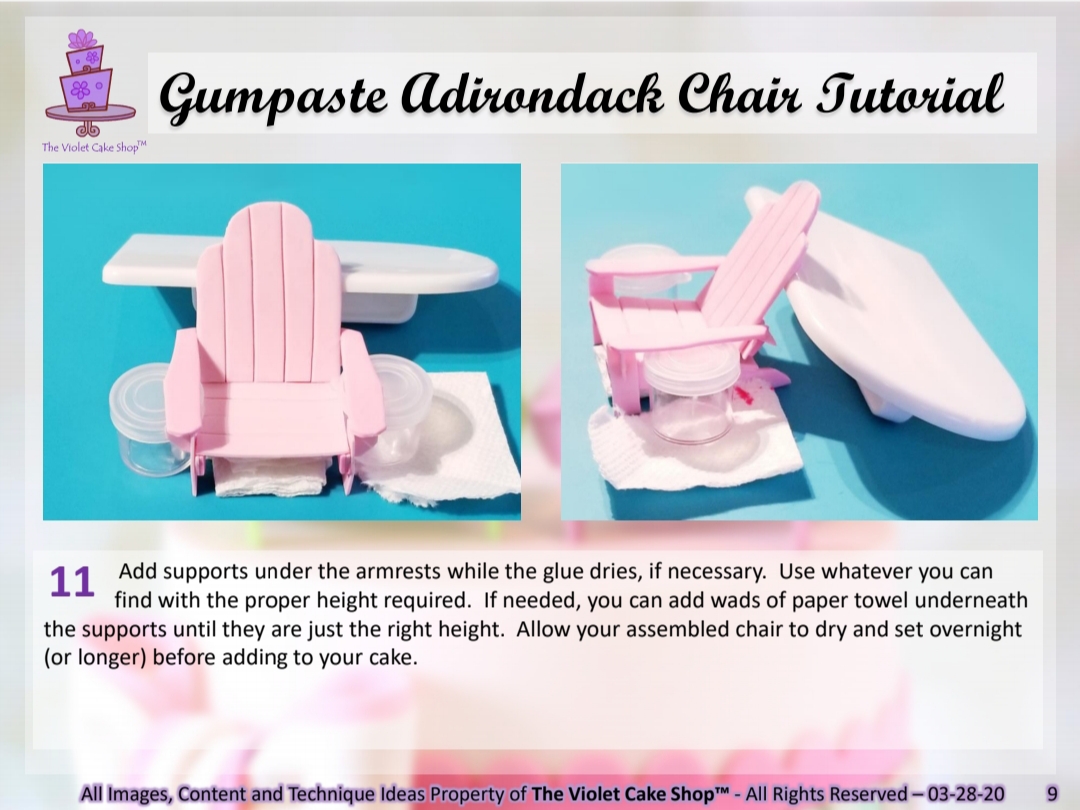
As it happens, I have some extra time on my hands right now and a need to distract myself from the only topic that seems to air non-stop on TV. So I put together a tutorial, for these gumpaste Adirondack chairs as seen on this cake below, which was featured in the August 2018 issue of Cake Decoration & Sugarcraft Magazine.
It also answers one of the questions I get asked the most, which is how I made the beach chairs on my Icing Smiles Calendar cake from 2015.
As with all my other tutorials, I am sharing this newest one here on my blog first. If you would like the downloadable PDF version, which is a great option because it’s easier to save, find, view and print, you can get it in my e-Shop for a minimal fee (just $1.99 Canadian for a limited time). GOOD NEWS! All other tutorials will be ON SALE as long as we are dealing with this pandemic.
So finally, here it is, the FREE version! Please enjoy and I hope it helps to take your mind off the seriousness that is the world we are living in today.
HAPPY CAKING Y’ALL – and remember, wash your hands and Stay Safe and Healthy!
FREE GUMPASTE ADIRONDACK CHAIR TUTORIAL:
(Note: these are my own techniques developed independently with my own ideas and shared for personal use ONLY. They are not to be used for monetary gain or to develop products, books, DVDs, downloads or lessons for sale or to be taught in classes or tutorials, whether hands-on, on-line, in video format or in print without express written consent.)
(Note: these are my own techniques developed independently with my own ideas and shared for personal use ONLY. They are not to be used for monetary gain or to develop products, books, DVDs, downloads or lessons for sale or to be taught in classes or tutorials, whether hands-on, on-line, in video format or in print without express written consent.)
This is an unprecedented time we are in right now. We are all being swept up in the uncertainty, anxiety, fear and unknown that this Covid-19 pandemic has placed upon us. Many countries are in some form of lockdown or being asked to actively practice social distancing. We are experiencing panic-buying and increased price-gouging and even Covid-19 related scams. But we are also experiencing acts of kindness and compassion.
This impacts all of us in immeasurable ways. Each one of us are dealing with it differently but one thing is for sure, there are many that are anxious because this is a time of the COMPLETE unknown.
So to hopefully provide some cheer, distraction and bring a bit of sunshine, I have finally put together a long-intended paid PDF tutorial. But I am sharing it for FREE here on my blog and in an Album on my Facebook page. I also will have it available as a downloadable PDF in my e-Shop for those who would prefer an easy to print and save version, for a minimal fee.
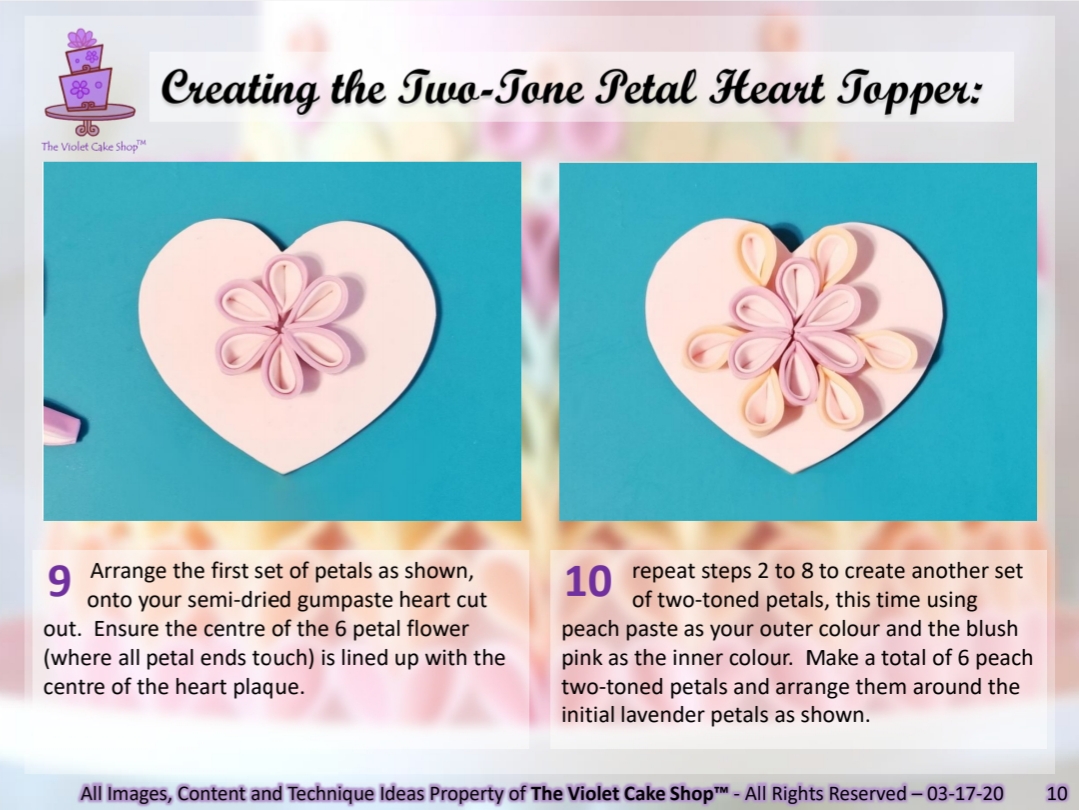
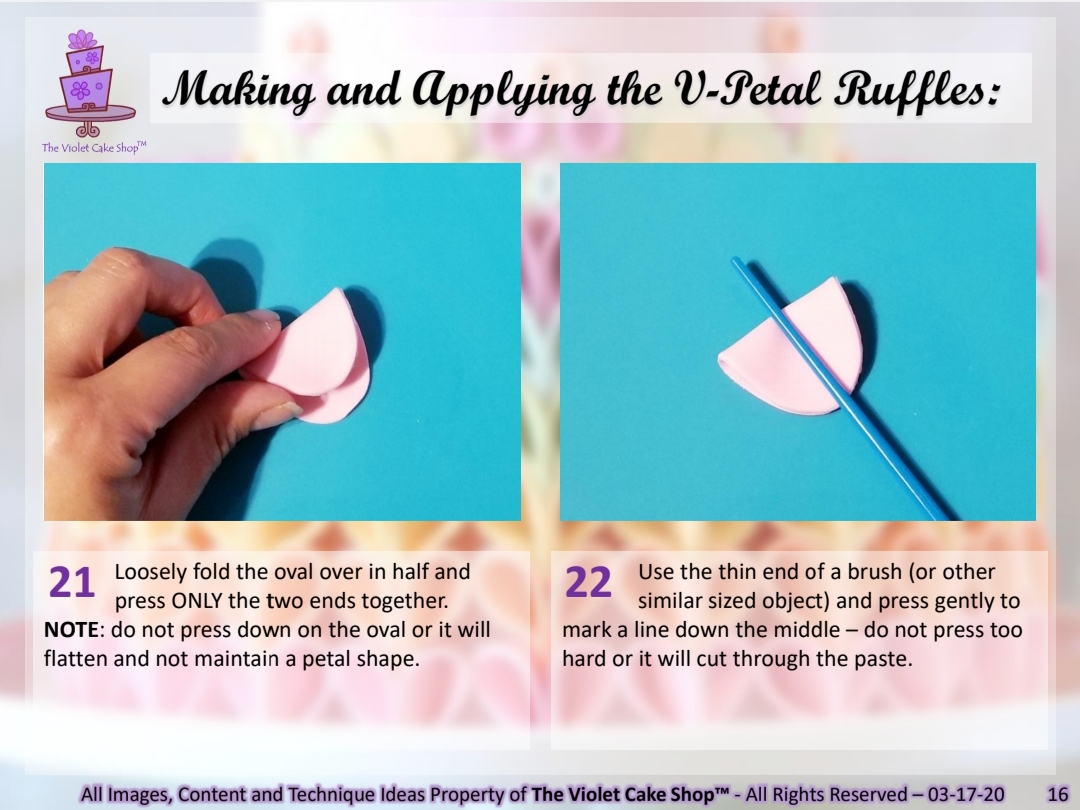
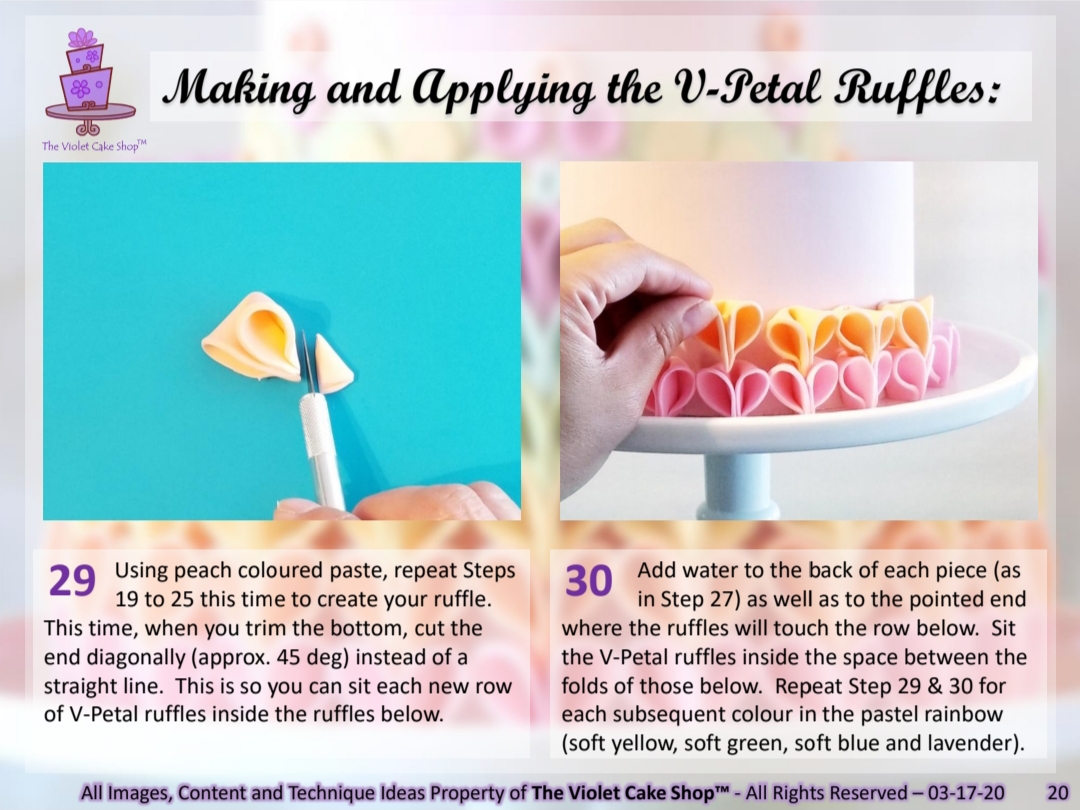
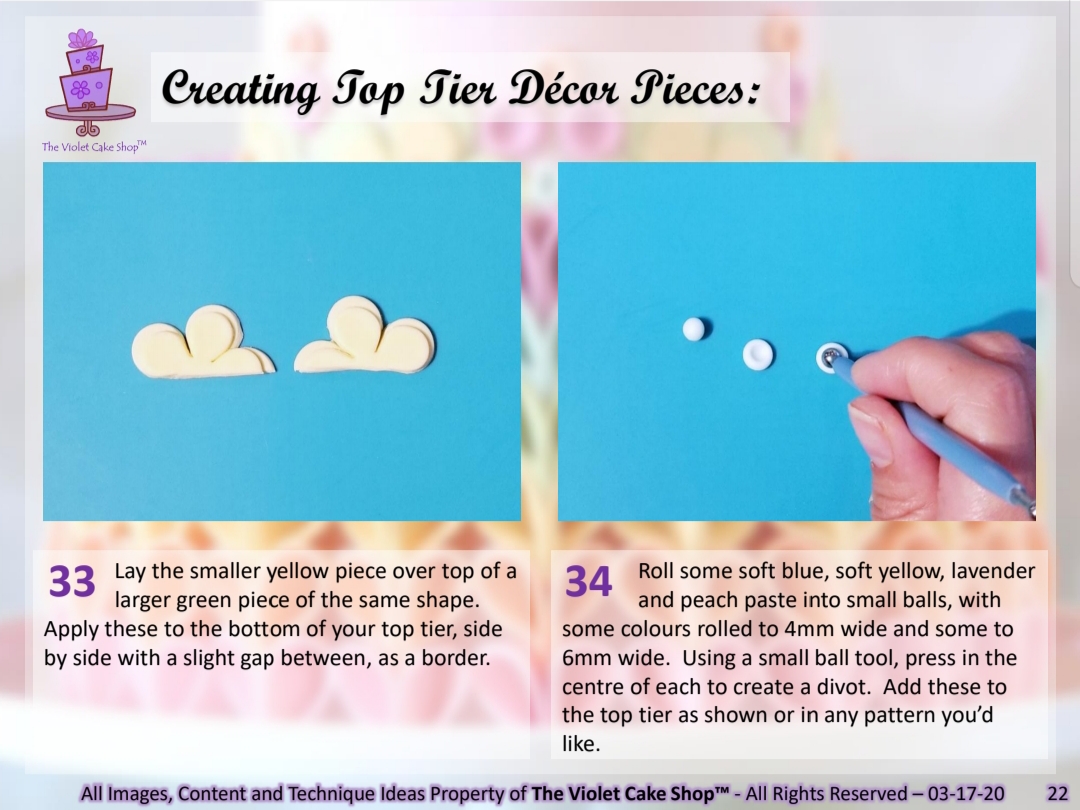
It goes through one of my most popular and well-liked cake designs which also happens to be one that has fun and happy colours. It features my signature V-Petal ruffles which can be used in so many ways. I have shared another mini-tutorial of this technique here on this blog but this tutorial also covers a versatile technique for creating a standing heart topper.
I hope this brings some cheer and joy and maybe hours of distraction.
STAY SAFE my friends, BE KIND and remember to do your part and WASH your hands. Much love to all! And most importantly, HAPPY CAKING Y’ALL!
Tutorial below:
(Note: these are my own techniques developed independently with my own ideas and shared for personal use ONLY. They are not to be used for monetary gain or to develop products, books, DVDs, downloads or lessons for sale or to be taught in classes or tutorials, whether hands-on, on-line, in video format or in print without express written consent.)
(Note: these are my own techniques developed independently with my own ideas and shared for personal use ONLY. They are not to be used for monetary gain or to develop products, books, DVDs, downloads or lessons for sale or to be taught in classes or tutorials, whether hands-on, on-line, in video format or in print without express written consent.)
OMG…these new Simpress moulds by Marvelous Molds are a total TIMESAVER, not to mention game-changer in cake decorating! (I show you how to use them below in the mini-tutorial)
If you’ve ever done a fully ruffled tier in any of your designs, even as small as 4″, you KNOW that they are absolutely TIME-CONSUMING, wow! I used to avoid including full ruffle tiers in my designs and almost NEVER used them for a celebration cake order because quite frankly, the client would cringe at the cost lol.
A single 7″ tier (at standard height of 4″) could take up to 11 hours or more depending on the type of ruffling you’re doing. Even with my innovative standup ruffling technique, which saves a bunch of time, it would still take upwards of 7 hours. With these new Simpress moulds by Marvelous Molds, it took me just 1.5 hours for the bottom of my niece’s recent wedding cake. And that included redoing one of the panels because I had a brain-fart and forgot to press firmly to pick up the details of the mould.
Full view of the cake I made for my niece’s rustic chic wedding
I could not have been happier with the results! Normally, I only use moulds if they add clean, ornate detailing that cannot be achieved manually. So ruffles, because I can make them by hand, would normally not be something I would consider using a mould for. Especially because I always felt the details on those I’ve seen made using other moulds, rarely looked natural or authentic.
The original plan for my niece’s wedding cake was to use my standup ruffling technique on the bottom tier. But when Marvelous Molds sent me their new line to review, I decided to test out the Scrunch Ruffle mould on a dummy and see if I liked it better. Well, I was SO happy with how natural and custom the ruffling looked, that I decided to go ahead and use it on her cake, which saved me hours and hours of work! Serious TIMESAVER I tell ya!! Now you KNOW, if I am using it on a cake for my niece’s most special day, it HAS to be fabulous.
On a side note, here is a rare pic of me with one of my cakes. I usually look like total crap after I finish a cake because I’m totally exhausted and disheveled after pulling an all-nighter, so never take pics with my creations. As you can see, I cleaned myself up enough to attend the wedding hence how I was able to take a pic, but if you look closely, my eyes are a bit glazed because I’m literally a walking zombie at this point haha!
So here is the promised mini-tutorial. It shows you my tried and tested way of using the Simpress line by Marvelous Molds and which actually works for any of their moulds including the Onlays. Enjoy and Happy Caking Y’ALL!!
Top: new Scrunch Ruffle Simpress, Bottom: new Rosette Ruffle Simpress
~~
Mini-Tutorial on how to use the new Scrunch Ruffle Simpress (and any other mould actually)…
Add 1/4 tsp of CMC or Tylose powder to 4 oz of fondant to fortify it so it can be used more easily in the mould. ALTERNATIVELY, you can use a 50/50 paste of gumpaste and fondant. NOTE: for the 7″ tier pictured on the wedding cake above, I used approximately 1 pound or 16 oz of fondant and added a full tsp of Tylose powder.
Use cornstarch to dust the crevices of the moulds to prevent the paste from sticking. Make sure to dust into all creases, grooves and crevices, especially the borders of the mould. ALTERNATIVELY, you can use shortening if you prefer. PRO TIP: I like to use BOTH shortening and cornstarch just to be on the safe side though either one works well on their own.
Roll out some of the paste so it’s large enough to fit over the mould, approximately 7″ long and 4.5″ wide. The thickness you roll it to will vary depending on the mould you are using. For the Scrunch Ruffle mould, 3-4 mm is a good thickness.
Lay the sheet of paste over the mould and press firmly downward with the palm and heel of your hand so the paste fills the mould beneath. Gently lift your hand and move to another area of the mould and repeat until the entire surface has been pressed into the mould below. Try not to slide the fondant around or push it side to side as this can mess up the impression. PRO TIP: dust some cornstarch on the surface before you start pressing the paste into the mould – this prevents the paste from sticking to your palm.
After pressing all areas firmly into the mould, you can now press more firmly so the blades of the mould cut through the paste and so the paste can pick up more of the impression from the mould. PRO TIP: I like to go over the entire surface, pressing firmly, two to three times.
Take a sheet of paper towel and fold into quarters. Wet the paper towel so it is damp but not dripping, and use it to wet the back of the paste.
Take the panel and lay it against your cake so the entire back surface of the paste touches the side of the cake. Press along the entire panel with your hands so that the paste starts to adhere to the cake underneath – this can take a few seconds, up to one minute if necessary. TIP: the cake should be iced already in either buttercream, ganache or covered with a thin layer of fondant before applying the panels.
Starting on one end, start peeling away the mould slowly, revealing the paste below. PRO TIP: if any of the paste sticks to the mould, you can ease it out with a thin brush that has some shortening on it.
Repeat all previous steps to create another panel. Line up the second panel with one end of the first panel as shown, and unmould.
Gently press the edges together to clean up any gaps between the panels.
WOW! I can’t believe it’s been almost a year and a half since I’ve made a blog post! I have NO idea where all the time went. I have been in quite a prolonged decorating and creative funk lately, not feeling motivated, but I HAVE still been making cakes here and there, just not posting much and I guess blogging NONE, lol!
Some of my latest cakes:
Each time I think I want to post something about a cake I’ve made, I feel overwhelmed or have doubts that anything I post would be worth reading. So I don’t. But then I get a lovely comment on an Instagram or Facebook post and am reminded of the many times people have said I’ve inspired them with what I share – even when it’s about my struggles – and then instantly it seems worthwhile.
I guess I really need to just push through despite my doubts or I fear I may end up losing all interest in sharing my caking journey altogether (insert frowny face emoji here). So today, I’ve chosen to share a quick mini-tutorial on how I made this princess tiara using the new Satin Ice Shimmer Gold fondant and hopefully, it will be helpful to someone out there.
Now to preface, you can make this with any type of fondant. It just so happened that the idea for this tiara came when I was deciding what I could make with the new Shimmer fondant that I was sent to try out (which by the way comes in Gold, Silver and Pearl and can be mixed with their regular colours to make all kinds of shimmer shades). This new line from Satin Ice is such a game-changer and serious time-saver. I can see them being super useful and convenient for making all kinds of birthday cakes, including Carousel, Unicorn, Princess, Mermaid and even Outer Space themes…the list goes on. It adds that extra bit of magic to any design!
I had a hard time narrowing down what idea I wanted to try it out on first. I finally decided that a tiara would be the perfect way to showcase the gold shimmer. It’s hard to see in the daylight pics, but the shimmer in the fondant is amazing and would work equally well for wedding or glamour cakes.
Here are a couple of cell phone pics of the cake under flash setting.
As I was making the tiara, I decided I HAD to take progress pics. Mostly, I do this when I want to remember what I did, for next time, just in case there is a next time – haha! But once in a while I think to myself, I might as well share them with my followers since it might be super helpful. Also it’s been a while since I’ve shared anything, and it really is too cute not to share.
So hope you all enjoy this quickie tutorial and remember, HAPPY CAKING Y’ALL =D
~~
How to make a Shimmer Fondant Princess Tiara:
(Note: these are my own techniques developed independently with my own ideas and shared for personal use ONLY. They are not to be used for monetary gain or to develop products, books, DVDs, downloads or lessons for sale or to be taught in classes or tutorials, whether hands-on, on-line, in video format or in print without express written consent.)
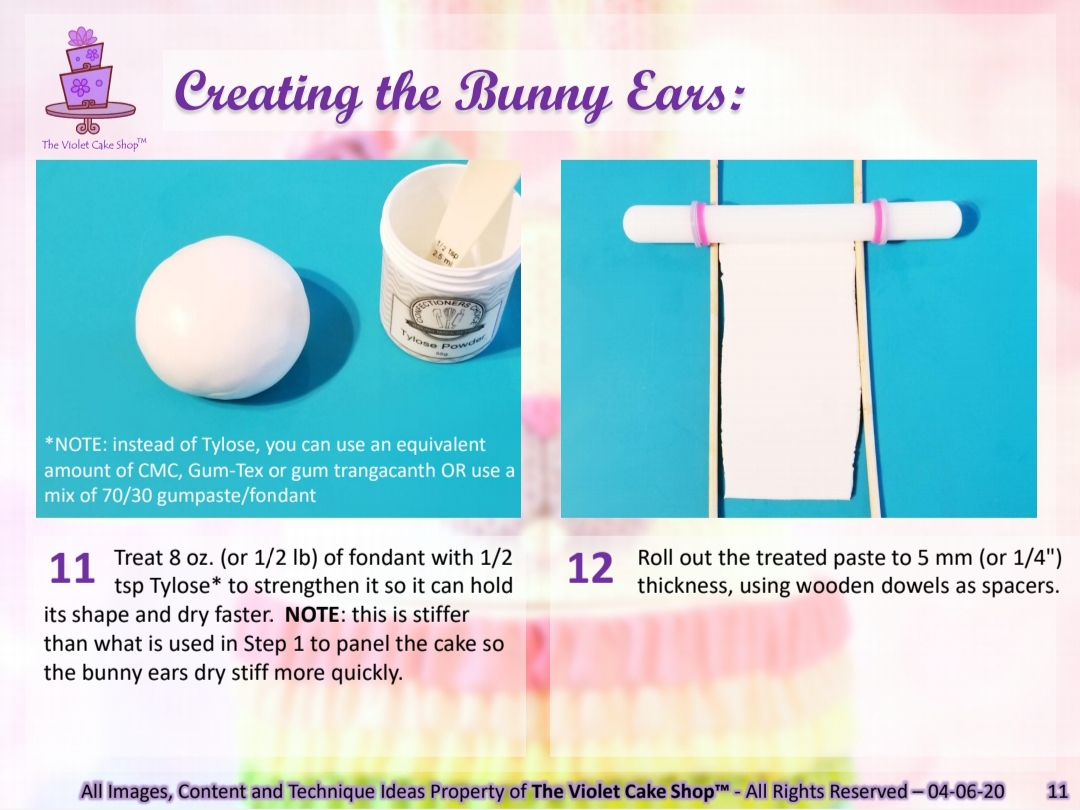
Treat your paste so it can dry stiff and sturdy enough to hold its shape on its own. To strengthen your fondant (this works for all kinds), add 1/4 tsp Tylose to 4 oz. paste and knead well. Use more if you feel your paste is still too soft.
Roll paste to 2 mm thickness, approximately 11″ long and 3″ wide.
Trim your paste to 10″ long and 2.5″ wide. TIP: it’s helpful to use a crafting mat with grid measurements imprinted.
Mark the halfway point (5″ mark) using your craft knife.
Next, mark the point 3.25″ over to the right of the midway mark (or 1.75″ in from the outer right edge).
Now, mark the mirror point on the opposite side – 3.25″ to the left of the midway point, or 1.75″ in from the outer left side.
Line up a circle cutter (that is approximately 3.5″ or 88 mm wide) so that one side touches the midway mark and the other side touches the mark on the right side, and cut. Do the same with the marks on the left side.
Next, using the grids on the mat as a guide, mark the point that is 2.25″ to the left of the midway point. Do the same on the other side (2.25″ to the right of the midway point).
Using a ruler to confirm, mark the point that is 1″ up from the bottom edge and 1″ in from the right edge.
Do the same on the left side.
Line up an edge of the cutter with each of the marks and cut, as shown.
Mark the point that is 1/2″ up from the bottom edge as shown and line up the edges of the cutter with that mark and the one marked previously (the one that was 1″ up and 1″ in), and cut.
Cut an angle that connects the point that is 1/2″ up on the left edge with the point that is 1/2″ in from the left on the bottom edge. Do the same on the right side.
Using a small leaf cutter, make cut outs under the three middle points as shown.
With a small heart cutter, make a cut out as shown.
Using a number 8 piping tip, make a few marks as shown to dress up the design.
Wrap the paste around a 4″ dummy or similar size tub and allow to dry overnight or until completely stiff.
Add some small blossom cut outs to further dress up the tiara.
Finished tiara embellished with blossoms.
(Note: these are my own techniques developed independently with my own ideas and shared for personal use ONLY. They are not to be used for monetary gain or to develop products, books, DVDs, downloads or lessons for sale or to be taught in classes or tutorials, whether hands-on, on-line, in video format or in print without express written consent.)
Time sure does fly by so fast sometimes! It’s been a while since my last post and so much has been going on both with cakes and home life and the recent holidays, that I haven’t had a chance to blog until now.
I still have so much to share and will have more time soon to share more, but for now, I wanted to let everyone know some great news from Marvelous Molds. Their new Flexabets line has been such a successful addition to their offerings that they’ve had requests for more and more font styles. Well good news!! They just released two new fonts – WESTERN and ACTION COMIC.
I am lucky ’cause they send me prototypes of some of their new lines to try out and I have to say, I was so excited when I got these and just love the new styles! They are so needed in the cake themes that we cakers get asked for today. And the Flexabets system is SO easy to use. Much better than struggling with the old hard plastic style alphabet cutters from when I first started decorating.
I’ve put together a quick mini-tutorial for making a birthday plaque using the new Western font. It’s a great way to dress up your cakeboard. Or just add it to the front of a western or steampunk style cake and voila! I hope you enjoy the tutorial and if so, you can get your own moulds here.
(Note: these are my own techniques developed independently with my own ideas and shared for personal use ONLY. They are not to be used for monetary gain or to develop products, books, DVDs, downloads or lessons for sale or to be taught in classes or tutorials, whether hands-on, on-line, in video format or in print without express written consent.)
Roll out some brown coloured paste made from 50/50 fondant and gumpaste to 1/32″ thickness (you can also use fondant with CMC added to make it stiffer instead of adding gumpaste). Brush some shortening into the cavities of the mould.
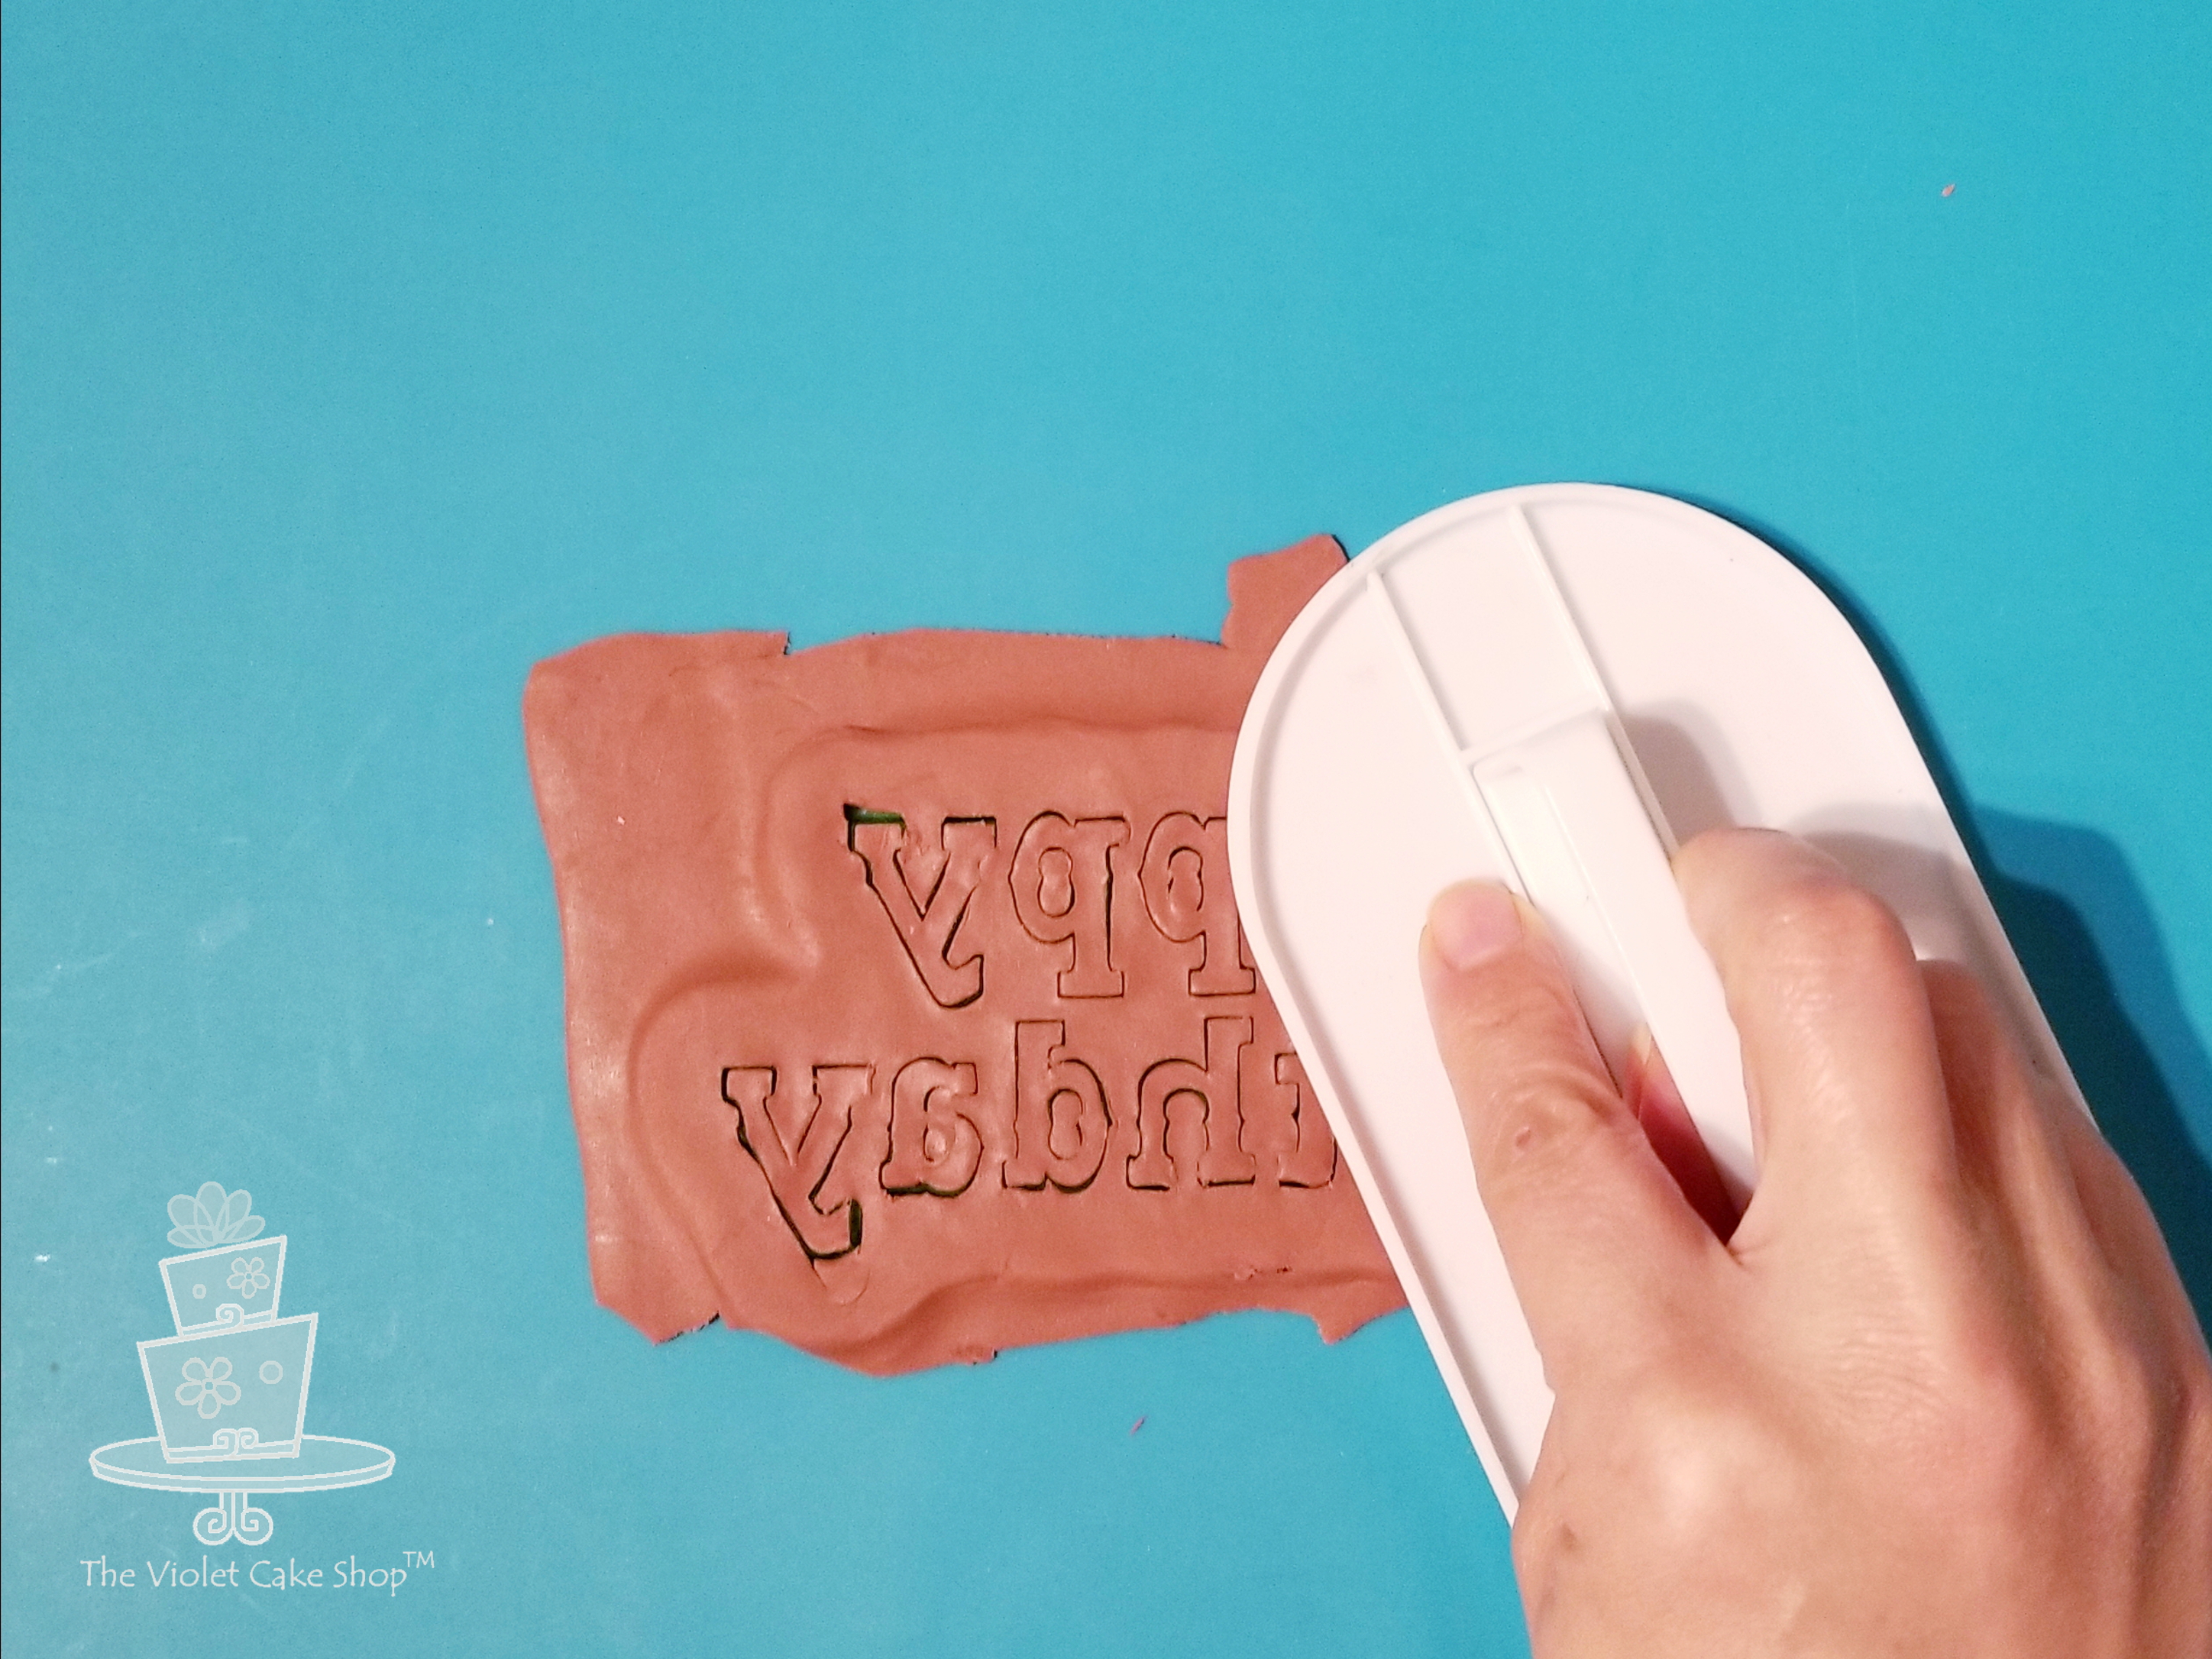
Lay the brown paste over the letters of the mould and press into the grooves with the palm of your hand.
Once firmly in the grooves, go over the back of the mould with a smoother until the cutting blades cut through the fondant.
Here the blades have cut through the paste. Continue until all lines are clear and clean.
Once all lines are clean, remove the excess paste. Remove the excess cutouts inside the letters with an exacto knife.
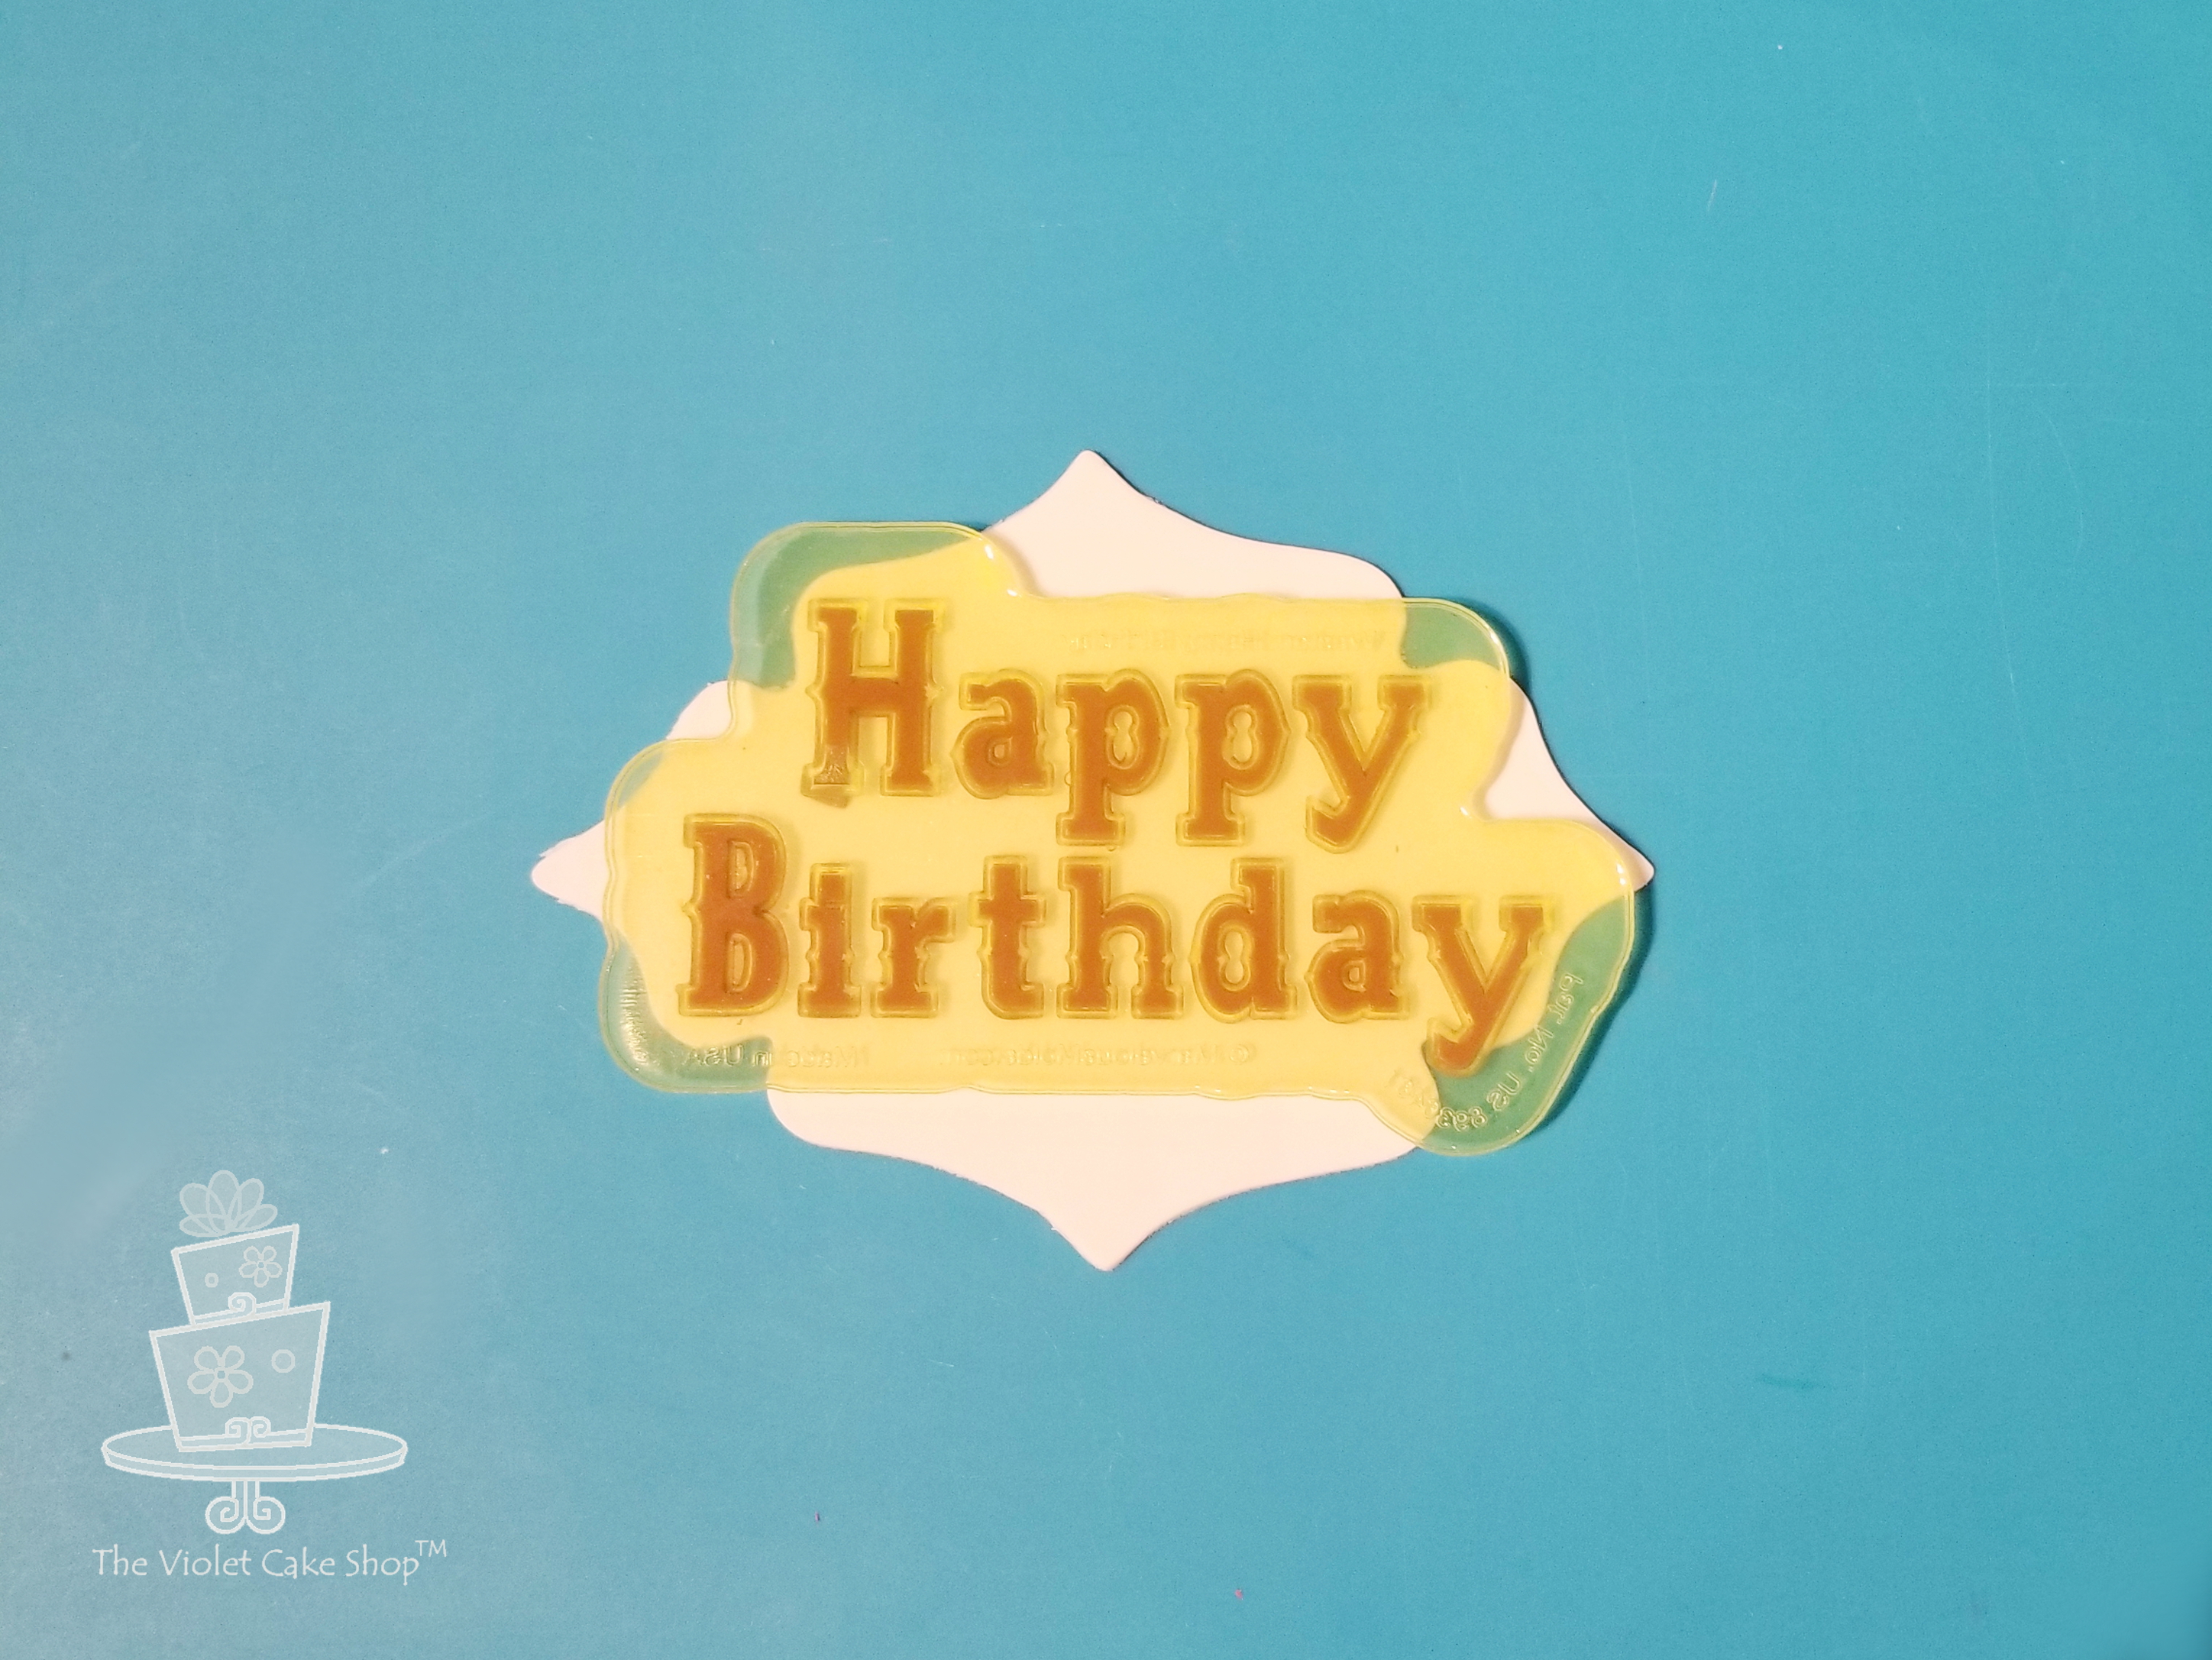
Roll out some white or ivory paste to 1/32″ thickness and using a large cookie cutter, cut out a shape for your plaque base.
Wet the back of the paste in the mould with some water or edible glue. Remove any excess with a paper towel.
Position the onlay over the plaque base, ensuring it is centered.
Press the back of the onlay with your palm so the letters adhere to the plaque below. Use your fingers to go over the letters again.
Once the paste has adhered to the plaque below, lift away the onlay carefully.
Roll out some brown fondant, large enough to fit the plaque. Add some water to the back of the ivory plaque base and attach to the brown paste. Using an exacto knife, cut out a border around the plaque.
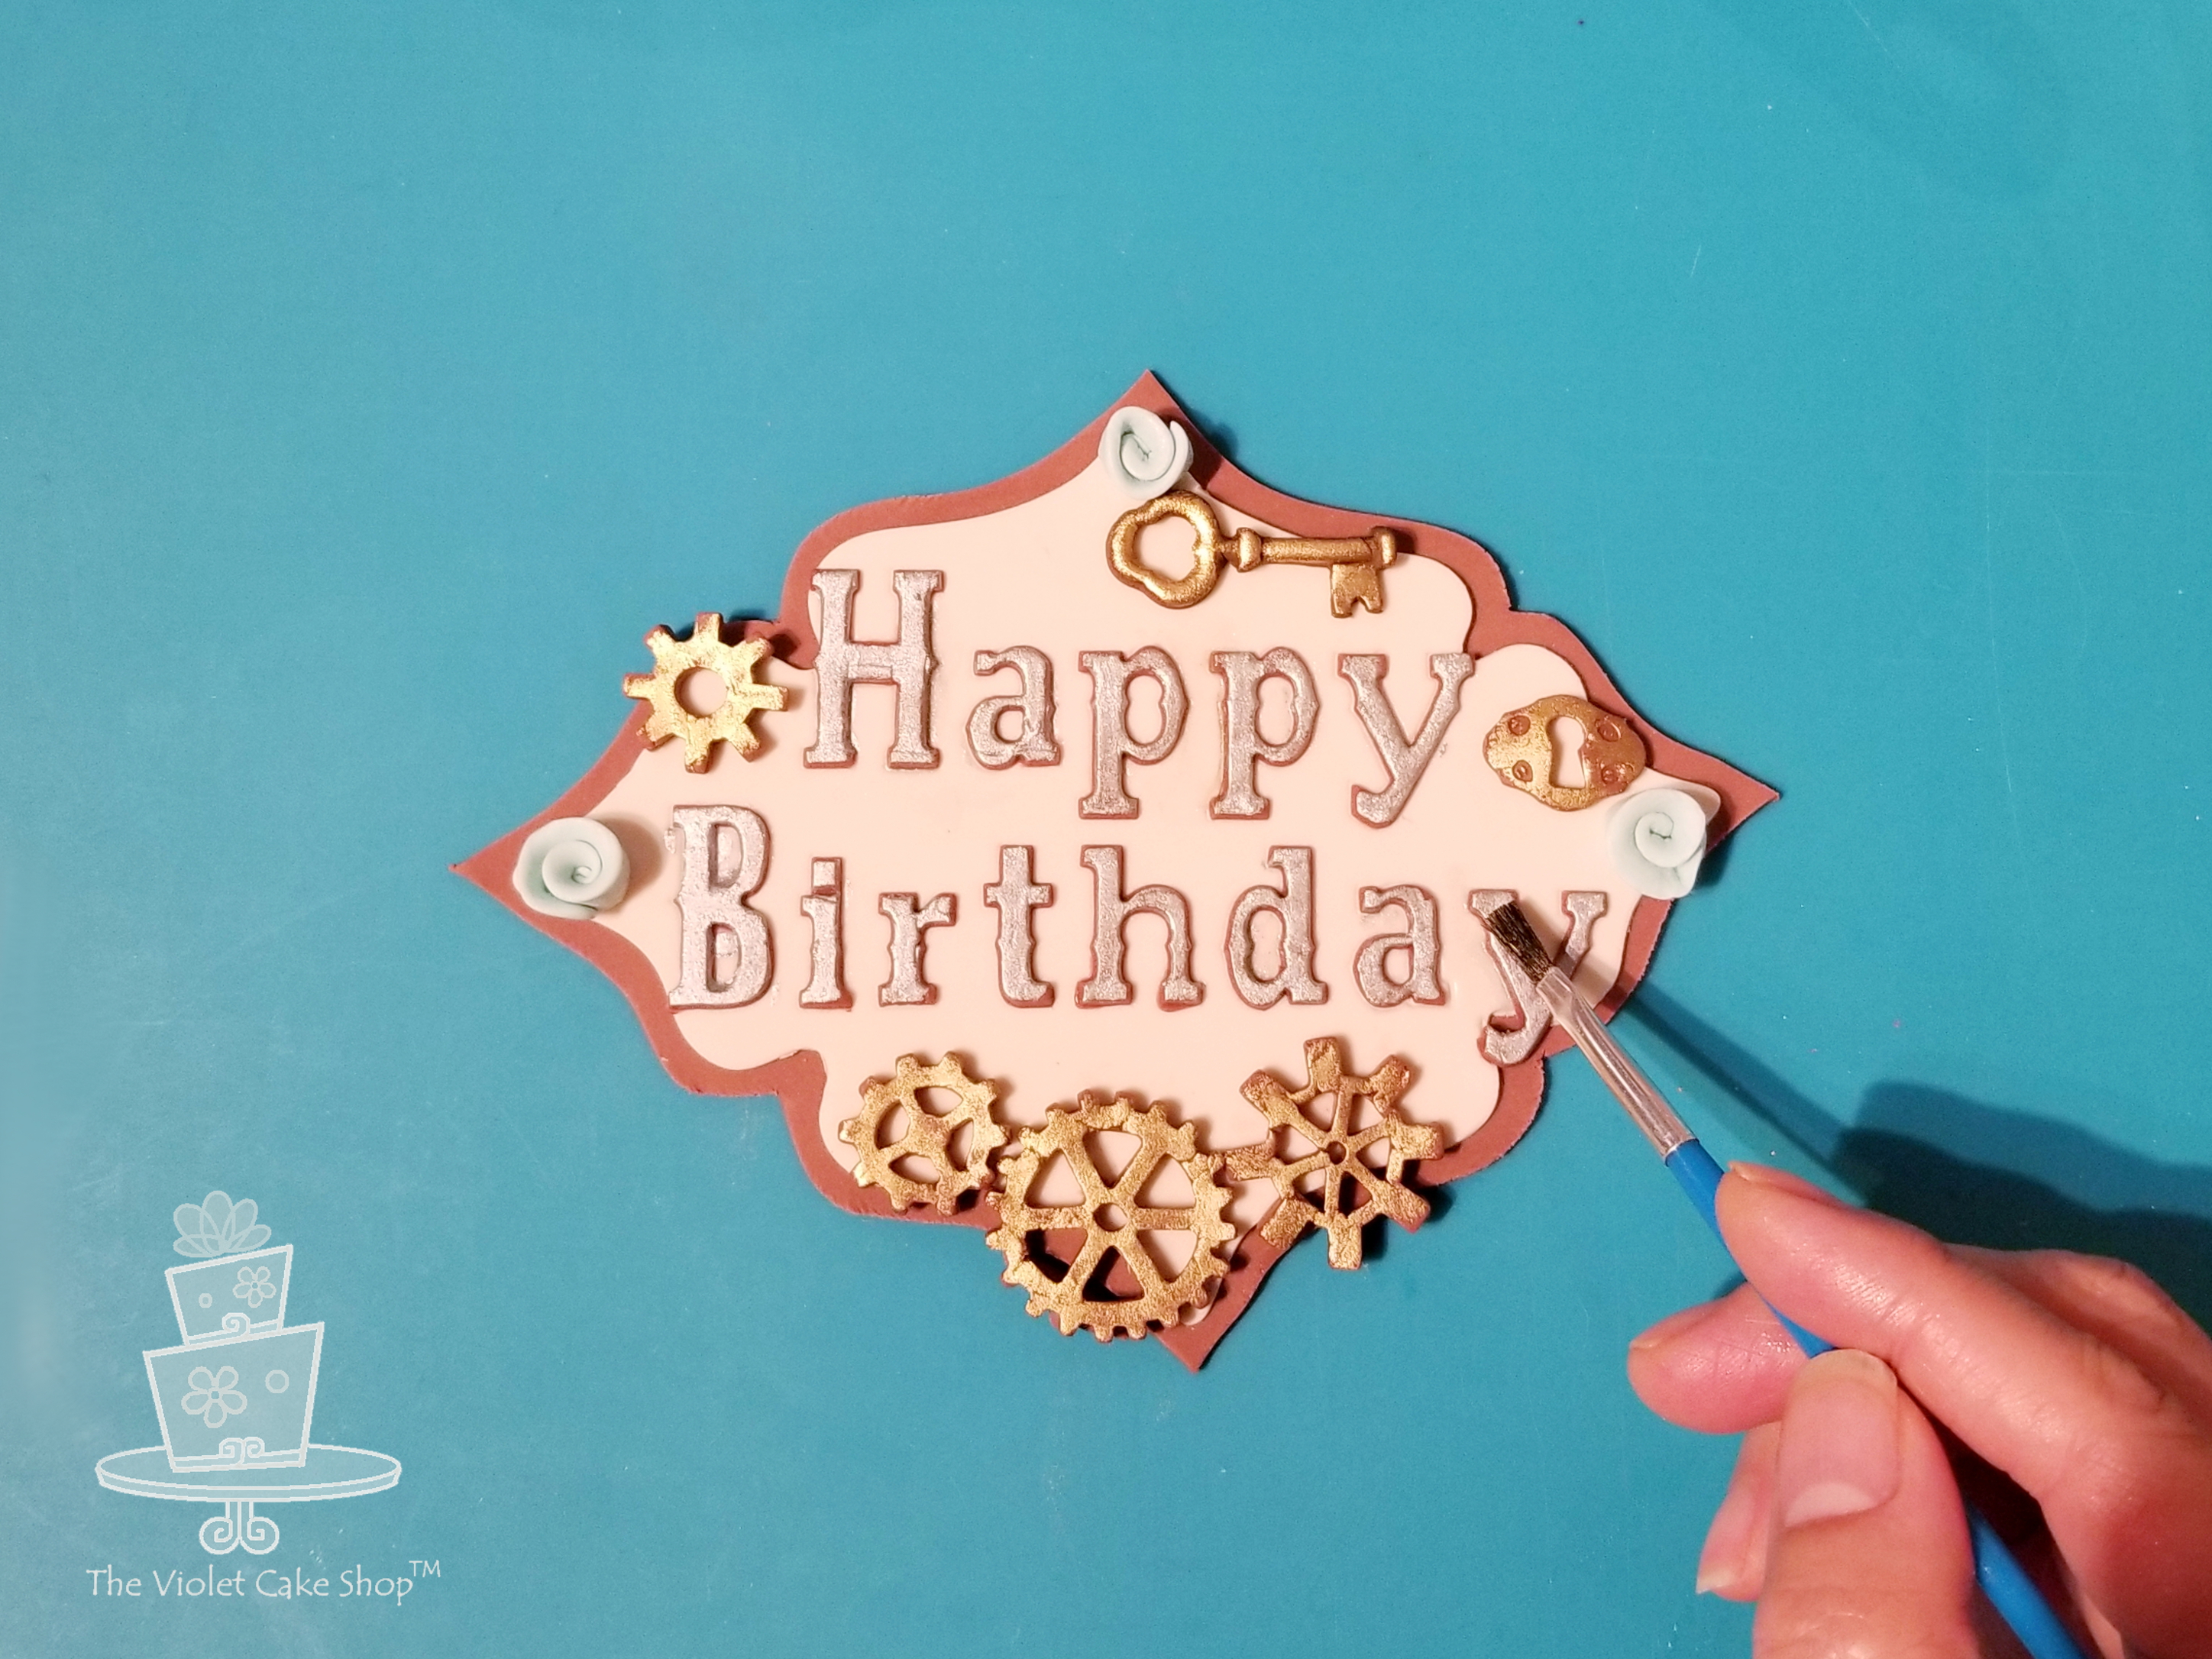
Now it’s time to embellish your plaque. You can add any decorations you like, to style it to the theme of your cake. Here, we will style it in a Western Steampunk style.
Brush some shortening into the cavities of a mould with gears, keys and other Steampunk decor. Add some 50/50 fondant/gumpaste into the cavities to create some moulded pieces. Allow the pieces to dry at least 10 to 15 minutes before adding to your plaque.
Mix some gold lustre dust with lemon extract to create gold lustre paint and brush some onto the moulded pieces.
Mix some silver lustre dust with lemon extract to create silver lustre paint and brush onto the letters. Add some rolled roses and voila! You have a beautiful plaque to adorn your cake!
(Note: these are my own techniques developed independently with my own ideas and shared for personal use ONLY. They are not to be used for monetary gain or to develop products, books, DVDs, downloads or lessons for sale or to be taught in classes or tutorials, whether hands-on, on-line, in video format or in print without express written consent.)
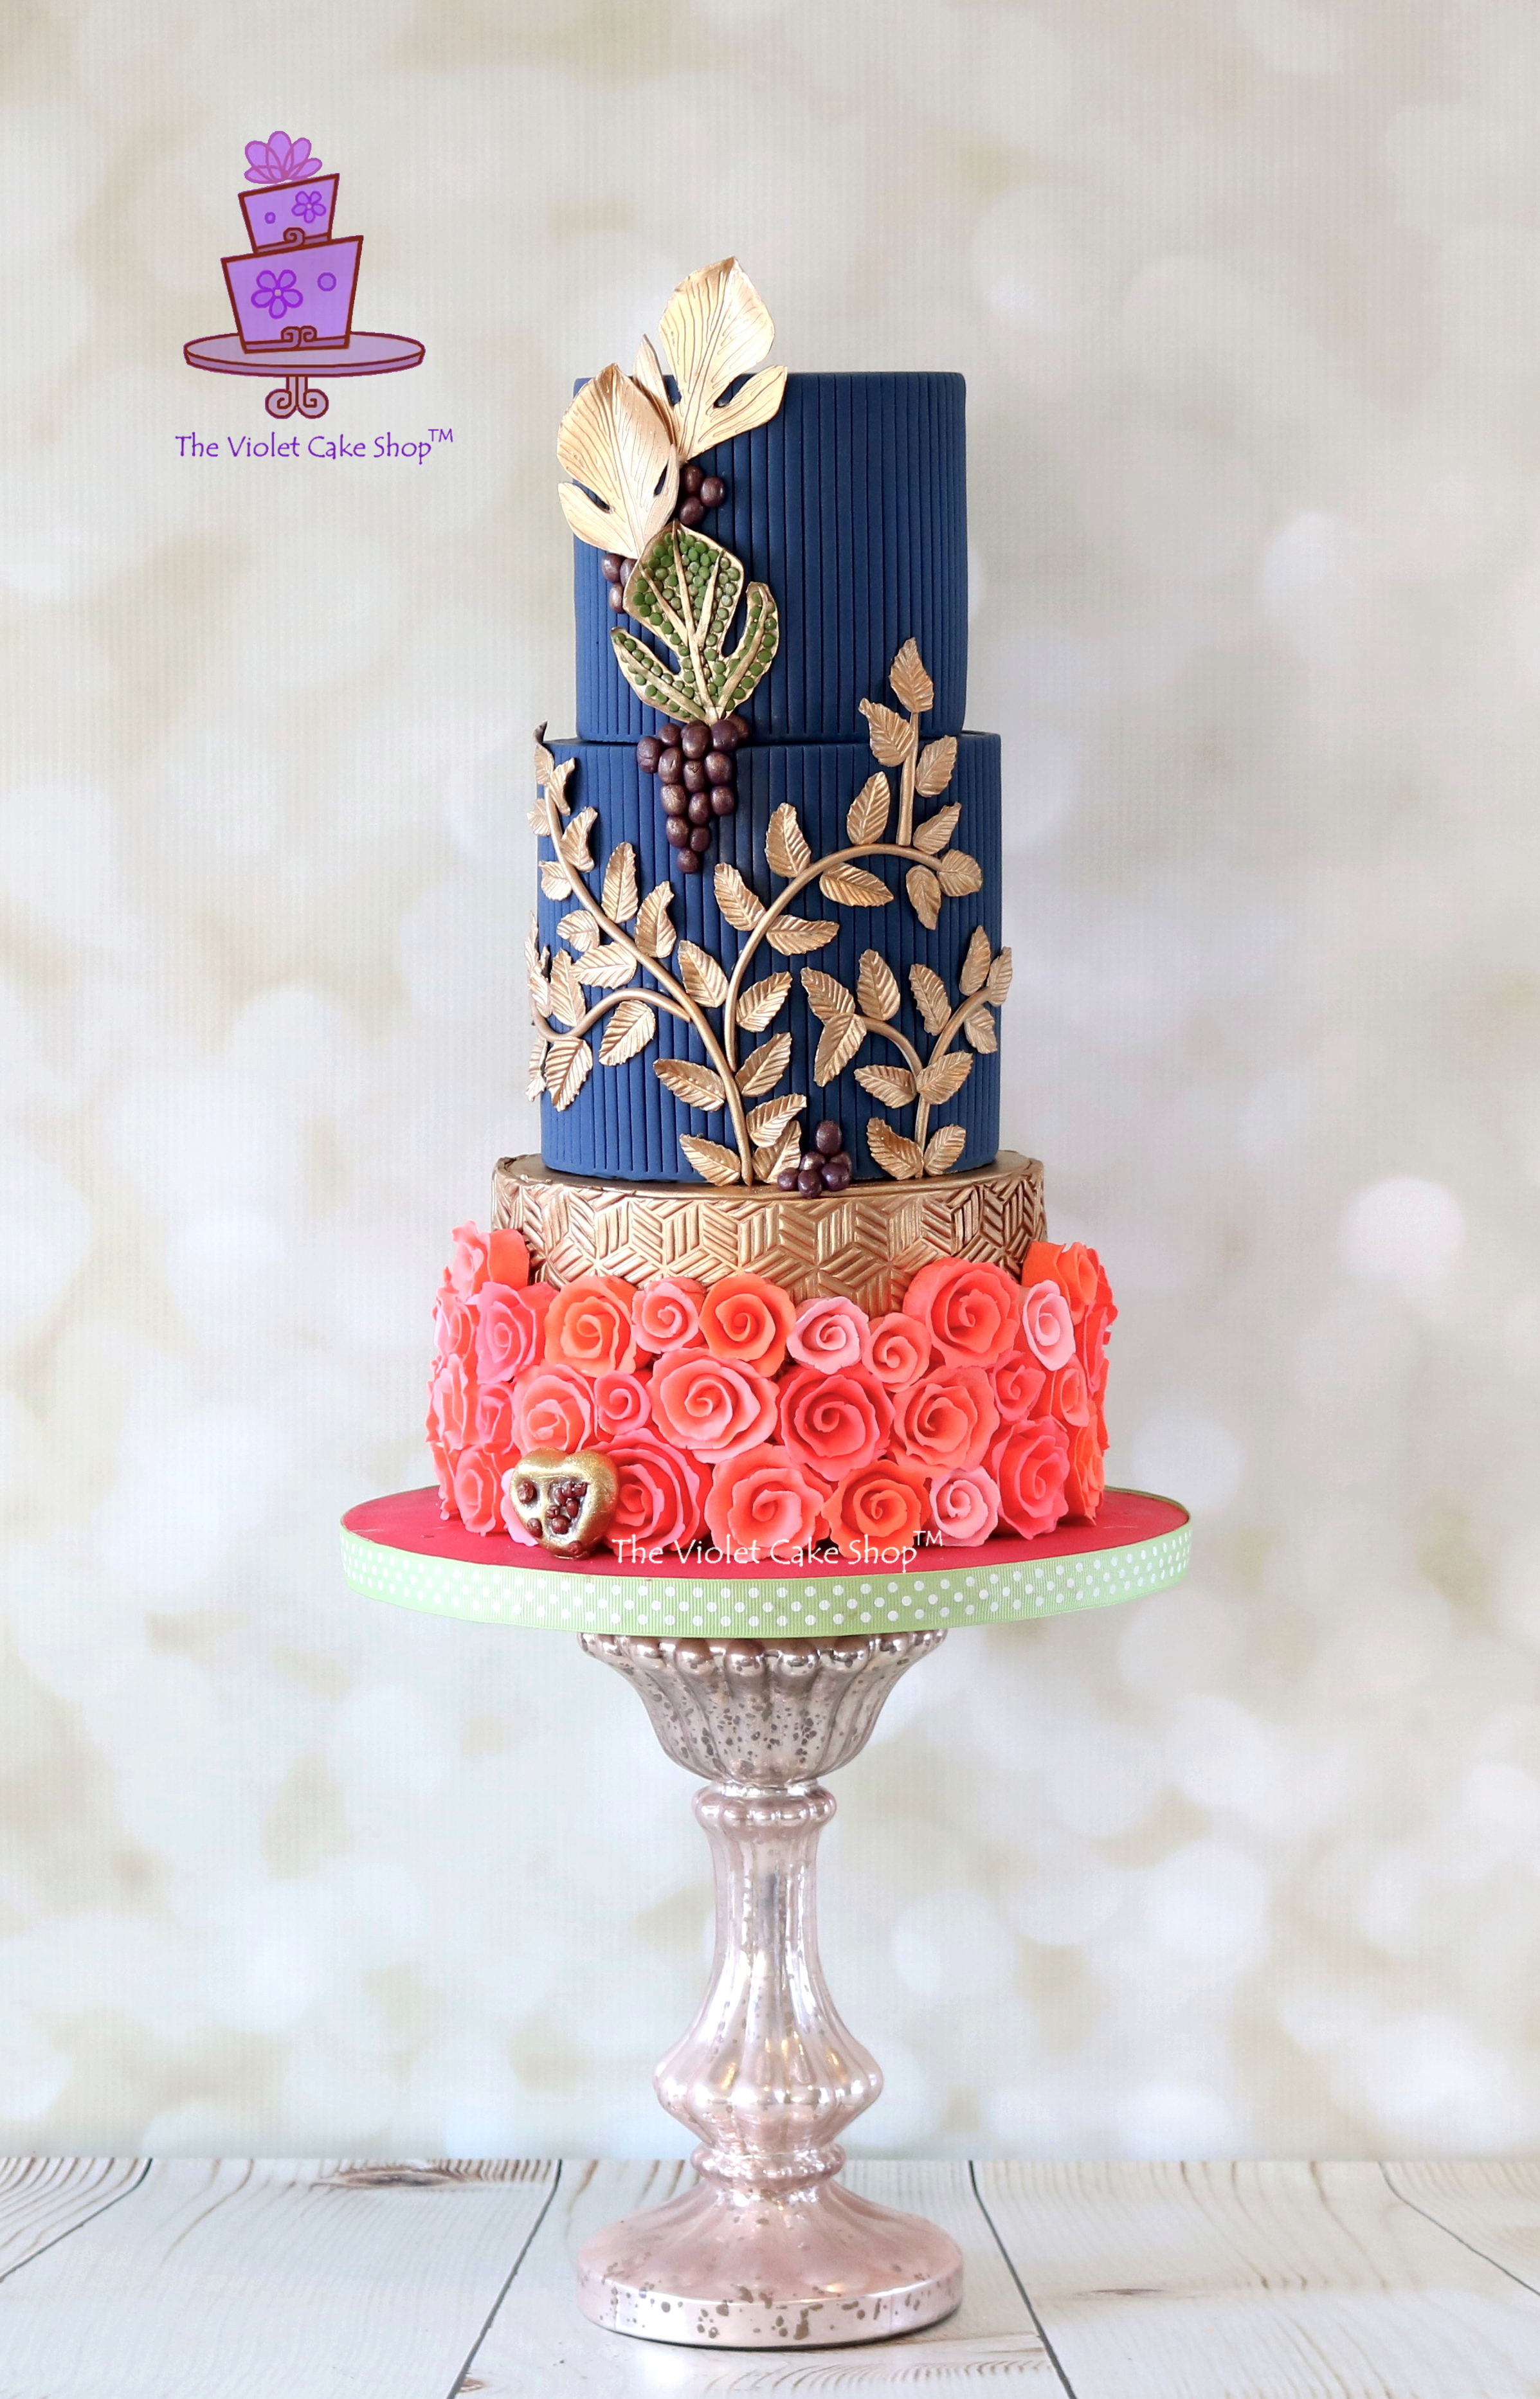
Recently, I created a tutorial for my Industrial Steampunk Chic cake (a cake designed originally for the Steam Cakes Collaboration) that appeared in the October issue of Cake Masters Magazine, UK.
The original cake featured an orchid coloured anemone flower in the design, sitting between the two tiers, but the flower was not included in the print tutorial since it would have added at least 28 more steps to an already lengthy tutorial. This was communicated to my contact at Cake Masters and passed along to the editors when the tutorial was submitted.
Unfortunately, there was a miscommunication or misunderstanding somewhere along the line when the magazine went to print, so although the printed tutorial did not have those steps included, there was promotional material created and posted that indicated the flower was part of that tutorial in the print issue. Of course, a few people were a bit disappointed to find out it was not in the magazine.
As a happy solution, I created a free tutorial for the anemone flower that I posted on my Facebook page, to share with Cake Masters, their readers, and anyone else that was hoping it was part of the tutorial. I am also adding it permanently here to my blog so it will be easier to find later on for those looking! See below for the step-by-steps details and pics…but first…
GREAT NEWS: A few people sent me messages when the magazine first came out, asking if the full Steampunk Chic Cake tutorial would be available to download in PDF file format and I’m happy to say that it is finally now available for sale in my Facebook SHOP. It’s on for an introductory price of 50% OFF, for a limited time. So that’s just $11 CAD for over 135 high quality pics and 85 pages of step-by-step instructions, tips and best practices, which works out to less than $9 USD (reg. $22 CAD or $17 USD). It also includes a printable version of this Gumpaste Anemone tutorial as a BONUS.
Here is what the tutorial covers…
I’m also putting ALL my other tutorials on SALE for 40% OFF in celebration of the release of this latest tutorial.
So now on to the good stuff, the free stuff…😉
The Violet Cake Shop™’s FREE GUMPASTE ANEMONE TUTORIAL:
(Note: these are my own techniques developed independently with my own ideas and shared for personal use ONLY. They are not to be used for monetary gain or to develop products, books, DVDs, downloads or lessons for sale or to be taught in classes or tutorials, whether hands-on, on-line, in video format or in print without express written consent.)
Tools and supplies you will need: – 3 petal flower cutter (alternatively, you can use an oval cutter – pictured) – floral tape – #2 piping tip and #12 piping tip – 5 petal flower cutter – small silicone rolling pin – dresden tool – ball tool – craft or exacto knife – needle nose pliers/wire cutter – wide mouth Japanese soup spoon – 1 oz (large gumball size) gumpaste coloured black – 2 oz (golf ball size) gumpaste coloured orchid/magenta (2.5 parts deep pink to 1 part purple) – thin foam pad – flower veiner – 20 or 24 gauge floral wire cut to 3″ length – lily stamen (if cannot find long black stamen) – black gel colour for dyeing stamen – aluminum foil – paper towels (not pictured) **All Images, Content and Technique Ideas Property of The Violet Cake Shop™ – All Rights Reserved – 10/25/17**
STEP 1 – If you cannot find black stamen (which I could not find readily), you will have to dye stamen of similar size and length as those found on anemones, which I find lily stamen work well. You can dilute the black gel colour with some vodka before dipping your stamen, or you can paint the colour on with a standard brush dipped in the colouring.… Let your stamen dry on some paper towel. Wipe off excess colour if necessary. **All Images, Content and Technique Ideas Property of The Violet Cake Shop™ – All Rights Reserved – 10/25/17**
STEP 2 – Spread out the stamen with your fingers, into a line, so they are not so bunched together. **All Images, Content and Technique Ideas Property of The Violet Cake Shop™ – All Rights Reserved – 10/25/17**
STEP 3 – Roll out a small ball of black gumpaste approximately 2/3″ or 1.5 cm wide, to create the centre. Flatten the top slightly against your work surface. Use the needle nose pliers to make a hook at the end of the 20 or 24 gauge floral wire.… Insert the hook end of the wire into the gumpaste ball, approximately halfway up. **All Images, Content and Technique Ideas Property of The Violet Cake Shop™ – All Rights Reserved – 10/25/17**
STEP 4 – Use the small end of a #2 piping tip to mark small circle details on the top surface of your centre. TIP: hold the wire just under the gumpaste ball, to prevent the ball from slipping down the wire as you mark the top. **All Images, Content and Technique Ideas Property of The Violet Cake Shop™ – All Rights Reserved – 10/25/17**
STEP 5 – Insert into a styrofoam dummy to dry a few hours, until the gumpaste ball is set fairly firmly onto the wire. **All Images, Content and Technique Ideas Property of The Violet Cake Shop™ – All Rights Reserved – 10/25/17**
STEP 6 – After a few hours, your centre should have set a bit and your dyed stamen should be fully dried. Add your stamen bunches to your centre, one or two at a time, wrapping well with floral tape before adding the next bunches.… You will need approximately 6 to 7 bunches to go around your centre nicely. **All Images, Content and Technique Ideas Property of The Violet Cake Shop™ – All Rights Reserved – 10/25/17**
STEP 7 – Once all the stamen are added, wrap the stem of your centre all the way down. Set aside to dry fully, overnight. **All Images, Content and Technique Ideas Property of The Violet Cake Shop™ – All Rights Reserved – 10/25/17**
STEP 8 – To create your petals, use a 3 petal cutter OR use a small oval cutter, 1.75″ long (refer to alternative steps 20 and 21). First, colour your gumpaste with 2.5 parts deep pink to 1 part purple colouring. Next, roll out the gumpaste to 1/32″ or 1 mm thickness. … Next, cut out two cut outs using the three petal cutter. You will need four cut outs overall but work with two first, to prevent the petals drying out. If using oval cutters, you will need two sets of 6 cut outs for a total of 12. **All Images, Content and Technique Ideas Property of The Violet Cake Shop™ – All Rights Reserved – 10/25/17**
STEP 9 – Using the large end of the ball tool and pressing gently, thin out the sides of the petals slightly, with the ball half on the paste and half on the foam pad. **All Images, Content and Technique Ideas Property of The Violet Cake Shop™ – All Rights Reserved – 10/25/17**
STEP 10 – Use the veiner to imprint vein detail onto each of the 3 petals. **All Images, Content and Technique Ideas Property of The Violet Cake Shop™ – All Rights Reserved – 10/25/17**
STEP 11 – Frill the edges of your petals with the large end of your ball tool and mark two lines down the centre with the thin end of your dresden tool. **All Images, Content and Technique Ideas Property of The Violet Cake Shop™ – All Rights Reserved – 10/25/17**
STEP 12 – Use a Japanese soup spoon as a flower former. It is deep enough to create a lovely cupped shape and is the perfect size for the anemone flower. Dust the cavity of your Japanese soup spoon with some cornstarch to prevent the gumpaste from sticking to the spoon as the petals dry. **All Images, Content and Technique Ideas Property of The Violet Cake Shop™ – All Rights Reserved – 10/25/17**
STEP 13 – Lay the first frilled and veined 3 petal cut out into the cavity of the spoon. Using a brush, dab some water onto the very centre. **All Images, Content and Technique Ideas Property of The Violet Cake Shop™ – All Rights Reserved – 10/25/17**
STEP 14 – Place the second prepared 3 petal cut out on top of the first one, with the petals of the second set, in between those of the first set. **All Images, Content and Technique Ideas Property of The Violet Cake Shop™ – All Rights Reserved – 10/25/17**
STEP 15 – Repeat STEPS 8 to 11, to prepare a second set of petals. But for this set, you will need to cut the petals as shown so they are small enough that they can lay inside the petals of the first two sets. **All Images, Content and Technique Ideas Property of The Violet Cake Shop™ – All Rights Reserved – 10/25/17**
STEP 16 – Add the petals individually. First, dab some water with a brush onto the centre, brushing slightly towards the petals, approximately 1/3 of the way up. **All Images, Content and Technique Ideas Property of The Violet Cake Shop™ – All Rights Reserved – 10/25/17**
STEP 17 – Position the first set of three petals evenly, in a trillium shape, in between two petals of those from the first set. **All Images, Content and Technique Ideas Property of The Violet Cake Shop™ – All Rights Reserved – 10/25/17**
STEP 18 – Position the second set of three petals evenly on top of the first set. **All Images, Content and Technique Ideas Property of The Violet Cake Shop™ – All Rights Reserved – 10/25/17**
STEP 19 – Add some small pieces of paper towel in between the petals to add some movement and shape to the petals. Using a #12 piping tip, cut out a small circle in the very centre of all the petals and set aside to set for about half an hour. **All Images, Content and Technique Ideas Property of The Violet Cake Shop™ – All Rights Reserved – 10/25/17**
(ALTERNATIVE) STEP 20 – If you do not have a 3 petal cutter as shown, use STEPS 20 and 21 instead to create petals. Use a 1.75″ long oval cutter to cut out 12 petals total. Work with 6 at time, to vein and frill the petals. **All Images, Content and Technique Ideas Property of The Violet Cake Shop™ – All Rights Reserved – 10/25/17**
(ALTERNATIVE) STEP 21 – If you do not have a 3 petal cutter as shown, use STEPS 20 and 21 instead to create petals. Frill and vein the petals as shown. The first petal is untouched. Thin the sides with the ball tool, vein with the veiner, mark the centre details and frill the edges. Cut out a small circle of gumpaste to sit under the petals. Add each petal on top of the circle gumpaste in a similar position as that shown in STEPS 13, 14, 17 and 18. **All Images, Content and Technique Ideas Property of The Violet Cake Shop™ – All Rights Reserved – 10/25/17**
STEP 22 – After the flower petals have had a chance to set, start making your calyx. Create the calyx using a 5 petal cutter.… Roll out some green gumpaste to 1/32″ or 1 mm thickness. Use the 5 petal cutter to cut out one shape. **All Images, Content and Technique Ideas Property of The Violet Cake Shop™ – All Rights Reserved – 10/25/17**
STEP 23 – Using your craft or exacto knife, cut out slits in the petals as shown. **All Images, Content and Technique Ideas Property of The Violet Cake Shop™ – All Rights Reserved – 10/25/17**
STEP 24 – Use the #12 piping tip to cut out a hole in the centre. **All Images, Content and Technique Ideas Property of The Violet Cake Shop™ – All Rights Reserved – 10/25/17**
STEP 25 – Shape some folded aluminum foil into the same cupped shape as a Japanese soup spoon and place on top of a cup. Poke a hole in the centre with something pointed, like a skewer. **All Images, Content and Technique Ideas Property of The Violet Cake Shop™ – All Rights Reserved – 10/25/17**
STEP 26 – Dab some water around the centre of the prepared calyx cut out, brushing outwards. **All Images, Content and Technique Ideas Property of The Violet Cake Shop™ – All Rights Reserved – 10/25/17**
STEP 27 – Place the calyx in the foil cavity. Gently remove your flower petals from the Japanese spoon former. The petals may still be a bit soft but that’s ok so long as you are gentle. Place the flower petals on top of the calyx where the water was dabbed and ensure the petals adhere to the calyx. … Add some water to the centre of the semi-set petals and insert your prepared flower centre. You may need to add some fresh fondant if the petals are too dry. **All Images, Content and Technique Ideas Property of The Violet Cake Shop™ – All Rights Reserved – 10/25/17**
STEP 28 – Reposition the paper towel bits between the petals and leave to dry overnight. Once fully dried, dust as desired to bring more life to your flower. **All Images, Content and Technique Ideas Property of The Violet Cake Shop™ – All Rights Reserved – 10/25/17**
(Note: these are my own techniques developed independently with my own ideas and shared for personal use ONLY. They are not to be used for monetary gain or to develop products, books, DVDs, downloads or lessons for sale or to be taught in classes or tutorials, whether hands-on, on-line, in video format or in print without express written consent.)
I hope this will come in handy for those of you out there that are new to decorating and sugar flowers! Please keep in mind that I tend to try things out on my own so these techniques are ones I’ve come up with and are not the only way to create this flower, nor are they necessarily the best. But they are shared for those who might not have other resources or who just want to use what is easily available.
So please use for your own pleasure and I hope you ENJOY! Remember, you can always share your creations with me on my Facebook page. I love seeing what you create using one of my tutorials!
It’s almost Hallowe’en and we just revealed a new cake collaboration. My newest creation has been getting lots of love on Facebook and Instagram and I’ve gotten a few questions and lots of amazing comments, so I thought I’d introduce him here and answer a few of those questions at the same time…
Meet Sir Jacques Steampunkin! 🎃🎃🎃
He is my contribution to the 5th installment of our Sugar Spooks collaboration. 😈👿👹👺💀☠👻👽👾🤡
He is a culmination of my love of the Steampunk genre and what I imagined a creepy old jack o’lantern would look like. I wanted to do something not seen before. As I was creating him, he started to take on a stately look so I decided to make him a ‘Sir’ lol… I hope people like him as much as I do.
I’ve been asked what moulds I used and they are a variety of moulds that I’ve found throughout the years, some for cake decorating and others, not. The cogs, frame and fleur-de-lis are from Mod Podge which are food safe silicone moulds made for use in polymer clay crafting but can be used for creating cake décor as well – just make sure you use them only for food and if you do crafting with clay as well as cake, make sure to get a separate set for use in each.
The other moulds I used (for the gold vest texture, and to detail the cakeboard – see closeup below) are from Marvelous Molds who make products that I love using in my decorating. I have used their products for FORever (!!!) and use them in SO many different ways!
…
For example, to add detail to Sir Jacques’ vest, I decided to use their new Symmetrical Sequin Simpress Panel. It’s meant to be used to texture a tier with sequins, easily and quickly. But I used it here to give a luxe look to his vest which is a characteristic of the clothing often seen in Steampunk.
Sir Jacques’ pumpkin head is made from rice krispie treats (RKT) that I shaped into a flattened pumpkin shape, only so it wouldn’t be as heavy and round, and would sit better on the cake tier. I then covered the RKT with a very thick panel of fondant, making sure the seam was at the bottom. I used my Dresden tool (the flatter end) to mark the grooves and used the length of my right pinky to impress the grooves more until I was happy with the ‘pumpkiness’ of my creation. Again, unfortunately, I did not take photos and now I wish I had, lol.
…
I then coloured him with a variety of orange petal dust and shortening (which I know many claim as their own but is a technique I have used since I first started decorating, mostly when using lustre dust). I then added dark brown in the grooves to create depth.
Since this was for a collaboration and I wanted to save him to use as a Hallowe’en prop at home, I used styro dummies for the cake tiers. But this can just as easily be made from real cake, with the proper support for his head of course!
…
His single goggle is handmade and detailed…using circle cutters, a piping tip to add the outlines for the screws, and an exacto knife to add the slit in the screws.
…
His hat is also made from RKT which I shaped into a tapered tier, then iced with ganache and covered with fondant (same as I would if made from cake).
…
His mouth was handcut and painted. I then added metal ‘staples’ which were cut from fondant and painted with silver lustre mixed with lemon extract (much better than vodka people! I swear by it…and smells great too lol).
Hope you enjoyed meeting Sir Jacques Steampunkin! I certainly enjoyed creating him.
It’s an honour to be part of this group again. Big thanks to Avalon Yarnes of Avalon Cakes for spearheading such a talented group and including me in the mix.
I don’t normally do scary or creepy so it was so much fun to be able to stretch my creative wings!!


You must be logged in to post a comment.