Well, it has been just over 3 weeks since the launch of my V-Petal Ruffle Simpress® and I am overwhelmed by the positive response and excitement that the new mold has generated! I am so humbled to think that a technique I created and first shared here, over 6 years ago, has been turned into a mold and is being sold around the globe! I’m pinching myself as I still can’t believe it actually, finally, happened after 2 years of planning and a few set backs due to COVID.
I am incredibly touched, seeing SO many beautiful designs created with our new mold, and am constantly being ‘wowed’ and impressed by the creativity and versatility of the cakes being made. I’ve been sharing a lot of those cakes on my Instagram and Facebook Stories and will share a few of them here, in a future post. But first, a huge THANK YOU to all who have purchased the mold and to those who have shared what they’ve created with it! I am so proud, overwhelmed and full of all kinds of emotions right now, seeing how it’s being used and the great response so far.
So, I did promise a mini-tutorial for the Tropical Flamingo head from one of the two cakes I made to accompany the initial launch.
I filmed the individual elements, including how to create three varieties of tropical leaves and two blossoms, along with how to create the head and compiled it into a real-time video that is just over 30 minutes long, with some steps highlighted, which I’ve uploaded to my YouTube channel. You can view the video here. I also sped it up, and that shortened version has been posted on my Instagram and Facebook pages.
Along with the videos, I took a few shots of some of the steps which I am sharing below. You can also find the template for the Tropical Flamingo head at the end of this post. But for the full idea of how to shape the head, it’s best to view the videos since explaining it in a few images and words, does not do it justice.
I hope these steps are helpful if you decide to create your own Tropical Flamingo cake! Remember, the V-Petal Ruffle Simpress® is PERFECT for creating the body of the Flamingo. You can check out this video from Marvelous Molds® on how to use our new mold, which also contains great tips and their best practices. However, you can also always use any ruffle or textured technique, or mold, to mimic the idea for the Flamingo body.
And now for the Tropical Flamingo Mini-Tutorial – ENJOY!
Note: these are my own techniques developed independently with my own ideas and shared for personal use ONLY. They are not to be used for monetary gain or to develop products, books, DVDs, downloads or lessons for sale, or to be taught in classes or tutorials, whether hands-on, on-line, in video format or in print, without express written consent.)
Before starting, treat your fondant with Tylose to make it easier to mold and shape, as well as to allow it to dry faster. You can also use 50/50 gumpaste/fondant mix instead.Roll the paste bewteen your palms to get a log shape with a thicker bulb on one end. Use fingers to shape and elongate the ‘neck’ area. Curve the neck using your fingers.Continue shaping with your hands to bring out the desired shape. Use the template as a guide once you have the initial shape formed.Lay the initial formed paste on the template to gauge size and continue shaping with a Dresden tool and your hands. Continue shaping and smoothing out the paste with fingers.Once the shape is where you want it, use your palms to flatten the head and neck a bit and continue to smooth out the paste. Next, add the eye and eyelashes and use a 1A piping tip to cut off the bottom where the beak will go.Next, take some lighter pink paste that has been treated with Tylose and create a cone shape that will be used as the top portion of the beak.Shape the paste between your palms to achieve the cone shape. Smooth out the wide end.Place the shaped beak to the end of the Flamingo head.Use the 1A piping tip to cut off the bottom portion of the beak.Take some black paste fortified with Tylose, and create a smaller cone shape than the pink one made earlier.Shape it as you did with the pink one made earlier. If necessary, remove excess paste until the desired size is achieved.Once happy, adhere the pieces with water or edible glue and set the head aside on wax paper, to dry, overnight or minimum 12 hours.
And here is the Flamingo Head Template below – after saving to your computer, you can resize it to the size you want, before printing.
The size of the head used on my cake was just over 6″ tall. My cake tiers were 5″ tall each and the 6″ height was perfect to just peek over the top edge of the top tier.
Here is a photo of the other elements covered in my video.
I hope you’ve enjoyed this tutorial. Please share if you use it. I would love to see what you create. You can always tag me or use #thevioletcakeshop on Facebook and Instagram.
And….HAPPY CAKING Y’ALL!!
Note: these are my own techniques developed independently with my own ideas and shared for personal use ONLY. They are not to be used for monetary gain or to develop products, books, DVDs, downloads or lessons for sale, or to be taught in classes or tutorials, whether hands-on, on-line, in video format or in print, without express written consent.)
It has been a LONG, LONG, LONG, LONG (ok, y’all get it lol!) LONG time since I’ve posted anything on my blog. My last post was in April 2020 when I shared a couple of tutorials that I made FREE for use, during the COVID pandemic. Well…the pandemic is still on-going, at different stages in different countries, almost 2.5 years later, but for the most part things are opening up or have opened back up now. Having gone through such a prolonged pandemic though, (as I’m sure is the case with everyone) SO much has changed!
For those who’ve not followed along on my Facebook and Instagram, I officially hung up my cake decorating hat/apron/rolling pin, last year, and moved on from creating new cake designs and tutorials, and from teaching. The worldwide shutdowns had a huge impact on SO many promising teaching opportunities, classes and demos that I already had planned and scheduled. During the ‘downtime’, I did a lot of reflecting and I realized that I really did not want to be travelling all the time and be away from my family as much as I would have had to, if COVID had not disrupted my plans. It also helped me realize that my level of creativity was at such a low-point, that cake decorating just wasn’t as satisfying, inspiring/invigorating (or more importantly) FUN for me as it was before, even to do as a hobby. I will of course make the odd cake here and there for personal occasions – like recently for my daughter’s big 10th birthday (see end of post for the pic) – but for the most part, my plan now, is to take a big, long break from decorating and spend my energy instead, taking care of the kiddos and trying to help grow the business my hubby started almost 19 years ago with a few business partners. We’ve recently restructured the business and made huge changes, so now we have lots of new ideas and big plans for where it will go from here. We were fortunate that the pandemic did not negatively affect our business for long, so at least I now have something to fall back on and redirect my focus to.
Though most of my plans involving cake were interrupted, there IS one opportunity that was already in the works just as the pandemic started, that luckily did not fall through, and it is the one I was most excited about! The parameters of our initial agreement did change a bit because of the impacts of the COVID shutdowns, but given my current situation, it was an opportunity I just could not pass up, as it would help cement my legacy in this industry that I spent over 13 years in.
The big news is already out on my Facebook and Instagram pages, but for those who haven’t heard yet, I have partnered with Marvelous Molds® (one of my most favourite companies) to bring you a new Simpress® mold that was inspired by my signature V-Petal Ruffles technique, a technique which has been shared SO many times on this blog! YIKES, I was so excited and stoked when they reached out to me saying they wanted to come up with their version of my ruffle technique and asked me if I would like to collaborate! How could I say no? It was super hard not to let the cat out of the bag before we launched it yesterday, especially since we had to put our initial plans on hold for almost 2 years!
Along with providing feedback and suggestions and testing out the prototype, I created two new designs using the mold, to showcase its versatility and for use in the packaging and product promo. After working with it, I have to say, it is AN ABSOLUTE TIME-SAVER and was such a pleasure to use! It almost makes me want to come out of ‘retirement’ hahaha! In all seriousness though, it was the first time in YEARS where I felt inspired to come up with new designs. It’s so easy to use and saved me so much time that I was able to devote more of my time to the actual act of designing. I couldn’t be happier with the quality and calibre of the the mold and it really makes decorating more pleasurable and such an ease!
For those who have used my V-Petal Ruffle technique, you will know that it is a very time-consuming process that does require a bit of patience to execute. The results are so gratifying though, that it makes the time spent, well worth it. But it does often mean HOURS spent hand-folding the ruffles and applying them all individually. Well, this new mold cuts that down to a FRACTION of the time, while maintaining the intricate details! I was able to cover a 7″ tier in less than an hour, which would have taken almost 5 hours using my original method.
Even better, it is the first of their molds that is 6″ in height, which was one of my suggestions, and which is perfect for those taller cakes! But it still works for shorter cakes too – you just fill the mold with a shorter panel of fondant and trim any excess off the top edge, after you panel it onto your cake.
I already shared one of the new cakes I designed using the new V-Petal Ruffle Simpress® on my social platforms, but I am sharing the second one here first!
This flamingo design has been an idea floating in my brain for years, but it never cemented into an actual design until I thought of what creative way I could use the new mold for.
As you can see, I’ve used the ruffled tier as the ‘body’ of the flamingo. This new V-Petal Ruffle Simpress® is PERFECT for simulating the feathers of any bird design you might have in mind. This same idea can be used for swan or peacock themes as well, just to name a few! It would be great too to use as the background for foliage in any tropical cake. SO many ideas popping into my head for how to use this mold. As I said before, it ALMOST makes me want to come out of retirement lol.
If you would like to get this new mold, you can check out my affiliate link here or look for it at your local decorating store that carries Marvelous Mold® products. If your favourite local decorating spot doesn’t have it yet, you can always ask them to stock it.
This is the other design I created to showcase the versatility of the new V-Petal Ruffle Simpress®. As you can see, this mold can be used for elegant designs, to fun designs, to anything you can come up with in between!
Look at those AMAZING details!!
I hope you guys love this mold as much as I do! I would love to see what you create using it. You can always share them with me by tagging my page in your posts. Who knows, I might just share some!
I also wanted to take this time to THANK EVERYONE from the bottom of my heart for your love and support over the years that I’ve been sharing my work. You have all made me feel LOVED, appreciated and like an important part of the cake community. Without your support, comments, likes and engagement, I NEVER would have had the opportunities I’ve had, nor the nerve to put my work out there and embark on these adventures! Thanks again and LOVE to you ALL!
Stay tuned, as I plan to do a mini-tutorial on the flamingo head…just need to find some time to sit down and get it filmed…
In the meantime, HAPPY CAKING Y’ALL!
Oh and finally, as promised….my daughter’s cake…
She turned the BIG double digits 10!!! in July, and this is her cake. Ya know, I still have to make her her custom cakes even though I’ve officially ‘retired’ from caking…AND as you can see, she STILL loves Tsum Tsums! She helped me design this in every aspect – colours, placement of ruffles, style of name and age, and which Minnie Tsum Tsum should be the star! She chose Royal Minnie from the Tsum Tsum game.
WOW! I can’t believe it’s been almost a year and a half since I’ve made a blog post! I have NO idea where all the time went. I have been in quite a prolonged decorating and creative funk lately, not feeling motivated, but I HAVE still been making cakes here and there, just not posting much and I guess blogging NONE, lol!
Some of my latest cakes:
Each time I think I want to post something about a cake I’ve made, I feel overwhelmed or have doubts that anything I post would be worth reading. So I don’t. But then I get a lovely comment on an Instagram or Facebook post and am reminded of the many times people have said I’ve inspired them with what I share – even when it’s about my struggles – and then instantly it seems worthwhile.
I guess I really need to just push through despite my doubts or I fear I may end up losing all interest in sharing my caking journey altogether (insert frowny face emoji here). So today, I’ve chosen to share a quick mini-tutorial on how I made this princess tiara using the new Satin Ice Shimmer Gold fondant and hopefully, it will be helpful to someone out there.
Now to preface, you can make this with any type of fondant. It just so happened that the idea for this tiara came when I was deciding what I could make with the new Shimmer fondant that I was sent to try out (which by the way comes in Gold, Silver and Pearl and can be mixed with their regular colours to make all kinds of shimmer shades). This new line from Satin Ice is such a game-changer and serious time-saver. I can see them being super useful and convenient for making all kinds of birthday cakes, including Carousel, Unicorn, Princess, Mermaid and even Outer Space themes…the list goes on. It adds that extra bit of magic to any design!
I had a hard time narrowing down what idea I wanted to try it out on first. I finally decided that a tiara would be the perfect way to showcase the gold shimmer. It’s hard to see in the daylight pics, but the shimmer in the fondant is amazing and would work equally well for wedding or glamour cakes.
Here are a couple of cell phone pics of the cake under flash setting.
As I was making the tiara, I decided I HAD to take progress pics. Mostly, I do this when I want to remember what I did, for next time, just in case there is a next time – haha! But once in a while I think to myself, I might as well share them with my followers since it might be super helpful. Also it’s been a while since I’ve shared anything, and it really is too cute not to share.
So hope you all enjoy this quickie tutorial and remember, HAPPY CAKING Y’ALL =D
~~
How to make a Shimmer Fondant Princess Tiara:
(Note: these are my own techniques developed independently with my own ideas and shared for personal use ONLY. They are not to be used for monetary gain or to develop products, books, DVDs, downloads or lessons for sale or to be taught in classes or tutorials, whether hands-on, on-line, in video format or in print without express written consent.)
Treat your paste so it can dry stiff and sturdy enough to hold its shape on its own. To strengthen your fondant (this works for all kinds), add 1/4 tsp Tylose to 4 oz. paste and knead well. Use more if you feel your paste is still too soft.
Roll paste to 2 mm thickness, approximately 11″ long and 3″ wide.
Trim your paste to 10″ long and 2.5″ wide. TIP: it’s helpful to use a crafting mat with grid measurements imprinted.
Mark the halfway point (5″ mark) using your craft knife.
Next, mark the point 3.25″ over to the right of the midway mark (or 1.75″ in from the outer right edge).
Now, mark the mirror point on the opposite side – 3.25″ to the left of the midway point, or 1.75″ in from the outer left side.
Line up a circle cutter (that is approximately 3.5″ or 88 mm wide) so that one side touches the midway mark and the other side touches the mark on the right side, and cut. Do the same with the marks on the left side.
Next, using the grids on the mat as a guide, mark the point that is 2.25″ to the left of the midway point. Do the same on the other side (2.25″ to the right of the midway point).
Using a ruler to confirm, mark the point that is 1″ up from the bottom edge and 1″ in from the right edge.
Do the same on the left side.
Line up an edge of the cutter with each of the marks and cut, as shown.
Mark the point that is 1/2″ up from the bottom edge as shown and line up the edges of the cutter with that mark and the one marked previously (the one that was 1″ up and 1″ in), and cut.
Cut an angle that connects the point that is 1/2″ up on the left edge with the point that is 1/2″ in from the left on the bottom edge. Do the same on the right side.
Using a small leaf cutter, make cut outs under the three middle points as shown.
With a small heart cutter, make a cut out as shown.
Using a number 8 piping tip, make a few marks as shown to dress up the design.
Wrap the paste around a 4″ dummy or similar size tub and allow to dry overnight or until completely stiff.
Add some small blossom cut outs to further dress up the tiara.
Finished tiara embellished with blossoms.
(Note: these are my own techniques developed independently with my own ideas and shared for personal use ONLY. They are not to be used for monetary gain or to develop products, books, DVDs, downloads or lessons for sale or to be taught in classes or tutorials, whether hands-on, on-line, in video format or in print without express written consent.)
It’s almost Hallowe’en and we just revealed a new cake collaboration. My newest creation has been getting lots of love on Facebook and Instagram and I’ve gotten a few questions and lots of amazing comments, so I thought I’d introduce him here and answer a few of those questions at the same time…
Meet Sir Jacques Steampunkin! 🎃🎃🎃
He is my contribution to the 5th installment of our Sugar Spooks collaboration. 😈👿👹👺💀☠👻👽👾🤡
He is a culmination of my love of the Steampunk genre and what I imagined a creepy old jack o’lantern would look like. I wanted to do something not seen before. As I was creating him, he started to take on a stately look so I decided to make him a ‘Sir’ lol… I hope people like him as much as I do.
I’ve been asked what moulds I used and they are a variety of moulds that I’ve found throughout the years, some for cake decorating and others, not. The cogs, frame and fleur-de-lis are from Mod Podge which are food safe silicone moulds made for use in polymer clay crafting but can be used for creating cake décor as well – just make sure you use them only for food and if you do crafting with clay as well as cake, make sure to get a separate set for use in each.
The other moulds I used (for the gold vest texture, and to detail the cakeboard – see closeup below) are from Marvelous Molds who make products that I love using in my decorating. I have used their products for FORever (!!!) and use them in SO many different ways!
…
For example, to add detail to Sir Jacques’ vest, I decided to use their new Symmetrical Sequin Simpress Panel. It’s meant to be used to texture a tier with sequins, easily and quickly. But I used it here to give a luxe look to his vest which is a characteristic of the clothing often seen in Steampunk.
Sir Jacques’ pumpkin head is made from rice krispie treats (RKT) that I shaped into a flattened pumpkin shape, only so it wouldn’t be as heavy and round, and would sit better on the cake tier. I then covered the RKT with a very thick panel of fondant, making sure the seam was at the bottom. I used my Dresden tool (the flatter end) to mark the grooves and used the length of my right pinky to impress the grooves more until I was happy with the ‘pumpkiness’ of my creation. Again, unfortunately, I did not take photos and now I wish I had, lol.
…
I then coloured him with a variety of orange petal dust and shortening (which I know many claim as their own but is a technique I have used since I first started decorating, mostly when using lustre dust). I then added dark brown in the grooves to create depth.
Since this was for a collaboration and I wanted to save him to use as a Hallowe’en prop at home, I used styro dummies for the cake tiers. But this can just as easily be made from real cake, with the proper support for his head of course!
…
His single goggle is handmade and detailed…using circle cutters, a piping tip to add the outlines for the screws, and an exacto knife to add the slit in the screws.
…
His hat is also made from RKT which I shaped into a tapered tier, then iced with ganache and covered with fondant (same as I would if made from cake).
…
His mouth was handcut and painted. I then added metal ‘staples’ which were cut from fondant and painted with silver lustre mixed with lemon extract (much better than vodka people! I swear by it…and smells great too lol).
Hope you enjoyed meeting Sir Jacques Steampunkin! I certainly enjoyed creating him.
It’s an honour to be part of this group again. Big thanks to Avalon Yarnes of Avalon Cakes for spearheading such a talented group and including me in the mix.
I don’t normally do scary or creepy so it was so much fun to be able to stretch my creative wings!!
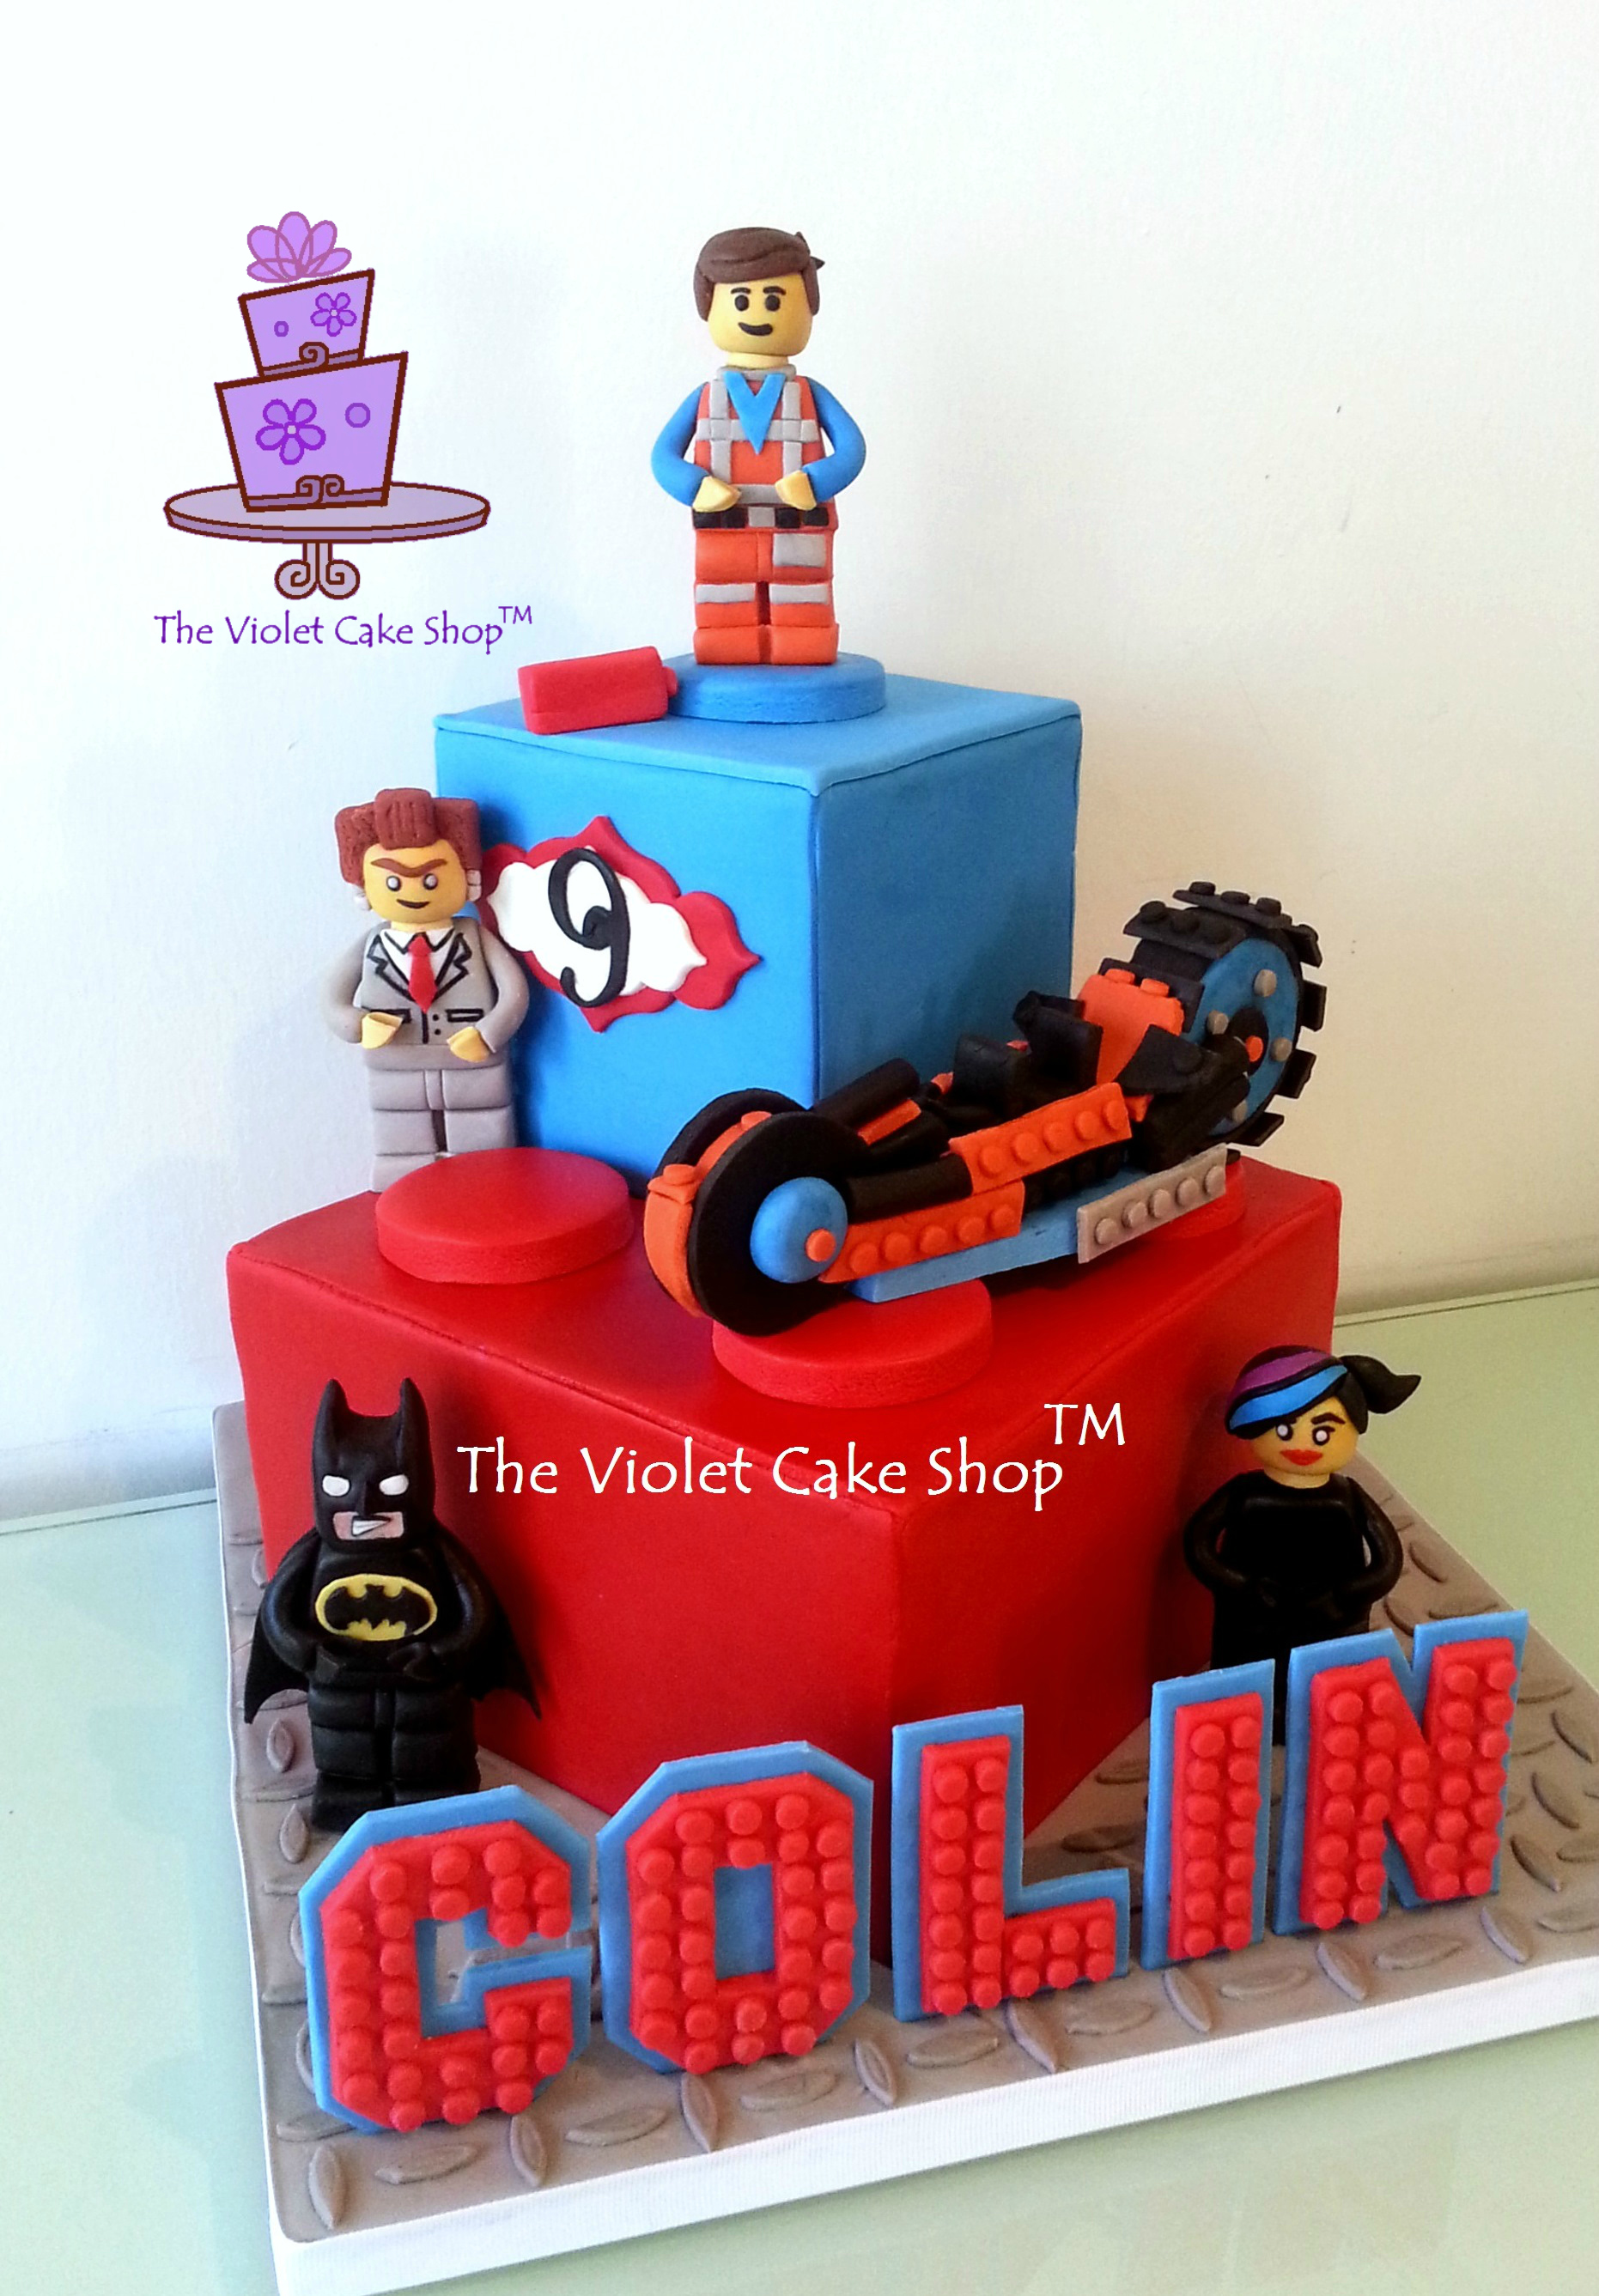
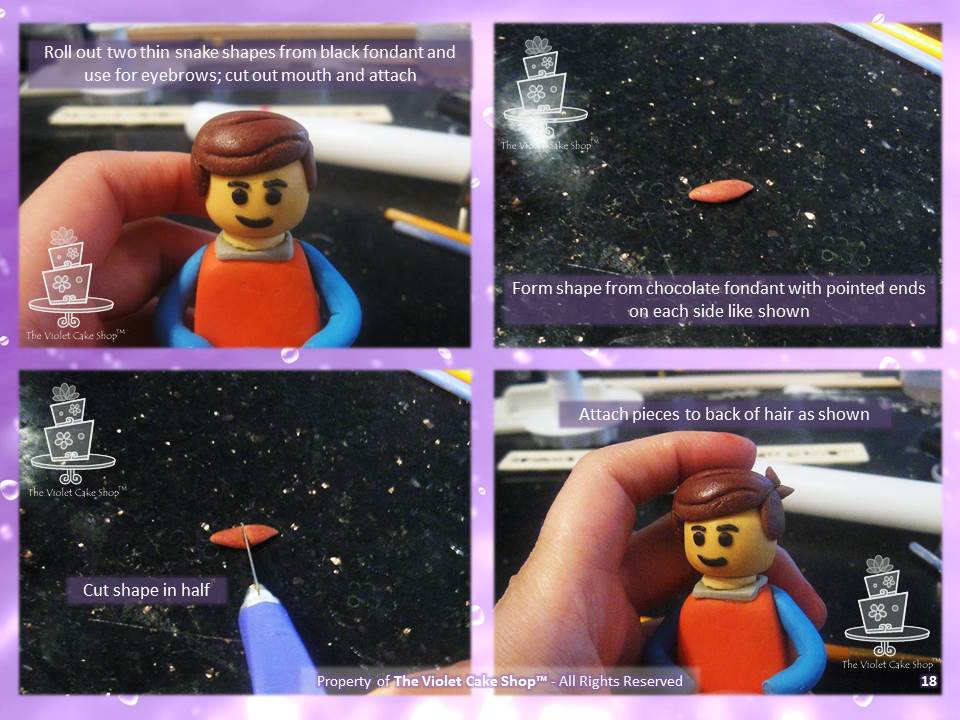
I made this cake for my son’s 9th birthday 2 years ago when the Lego Movie first came out and was all the rage, and I’m reminded of it again now, since his birthday is coming up fast and I need to start thinking of what to make for his 11th. But at that time, it was an easy decision since he was SO into the movie (it really is SUCH a FAB movie with an amazing life lesson) and I happened to have just finished another Lego Movie cake for a friend’s son which my son loved. So he KNEW he wanted to have figures of Emmet and his friends Wyldestyle and Batman, as well as his nemesis, President Business. He also HAD to have the motorbike that Emmet and Wyldestyle used to escape from Good Cop/Bad Cop.
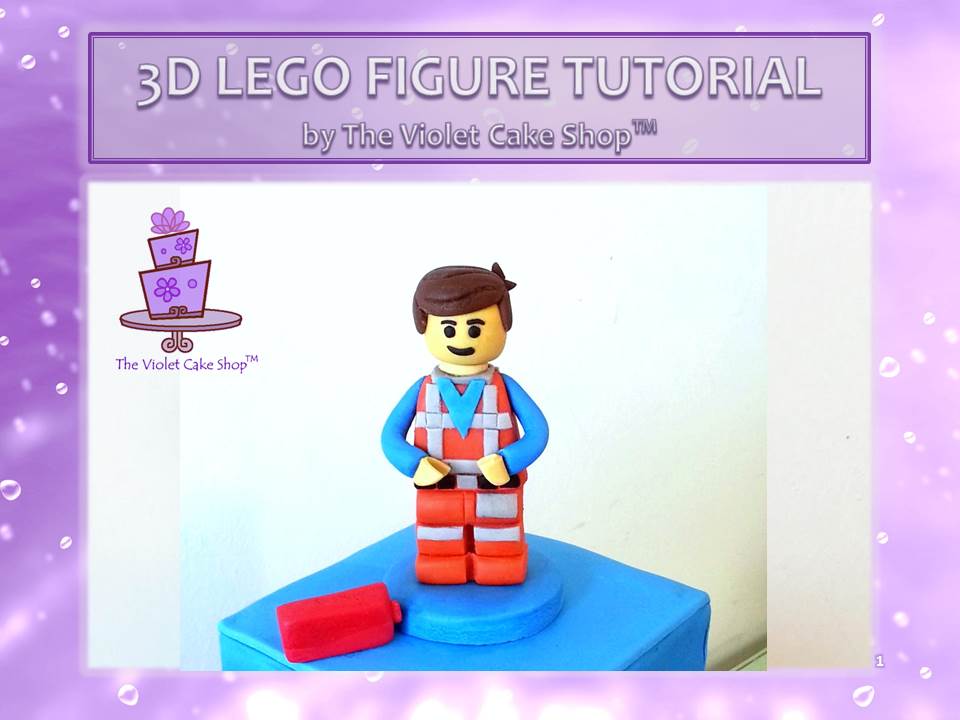
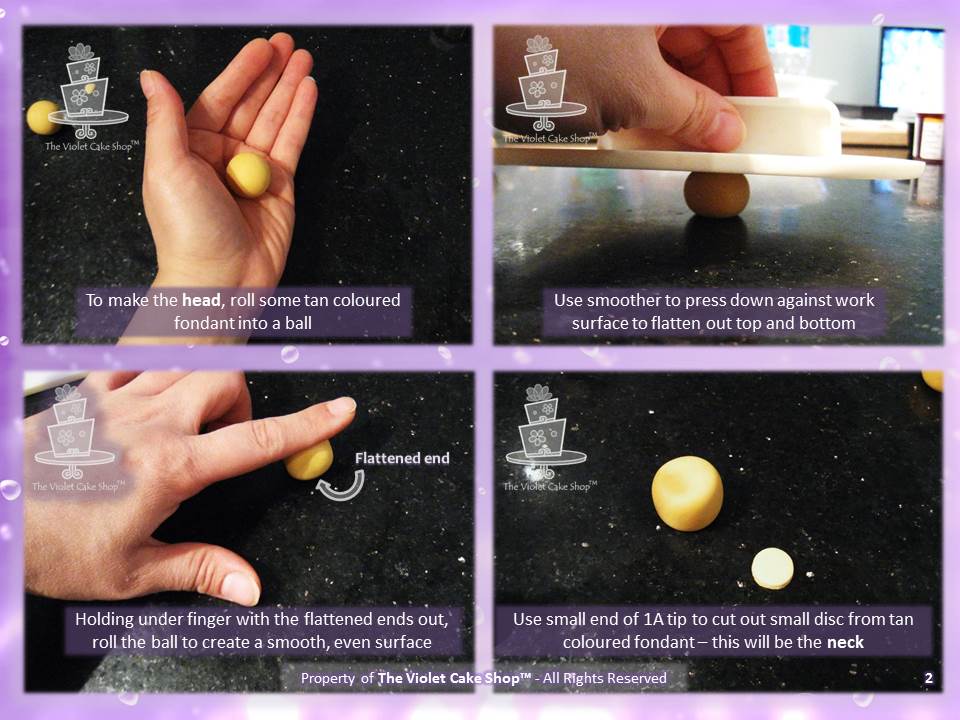
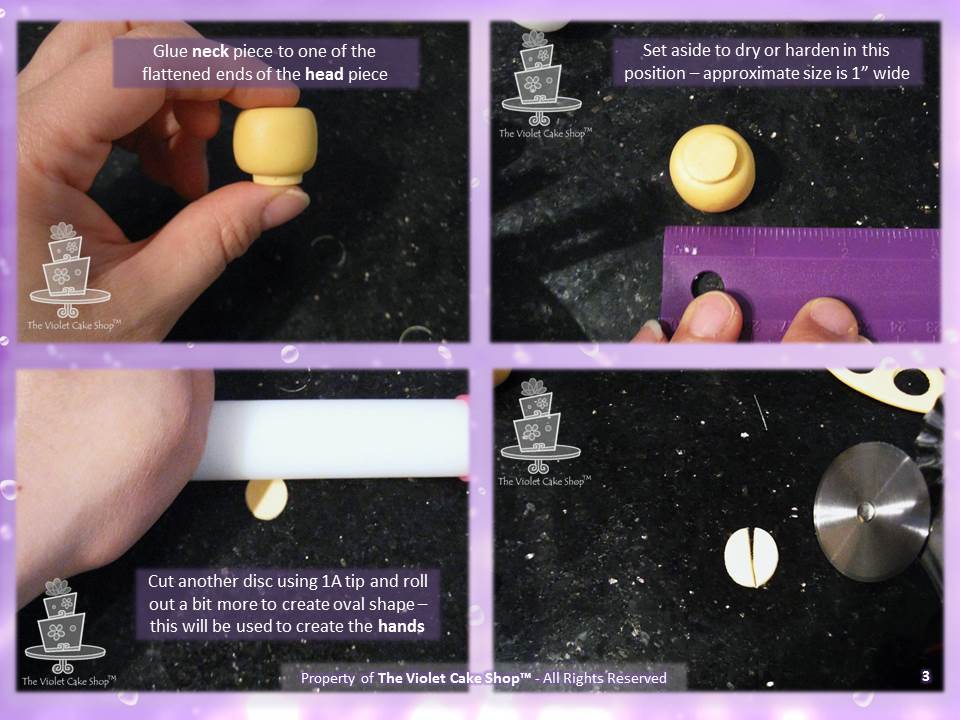
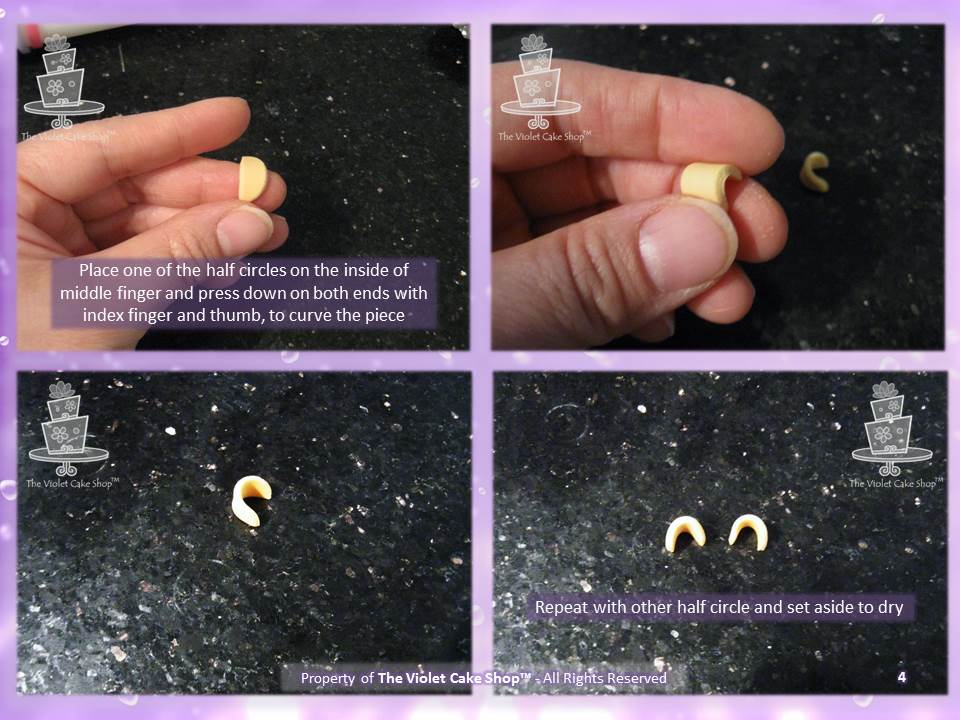
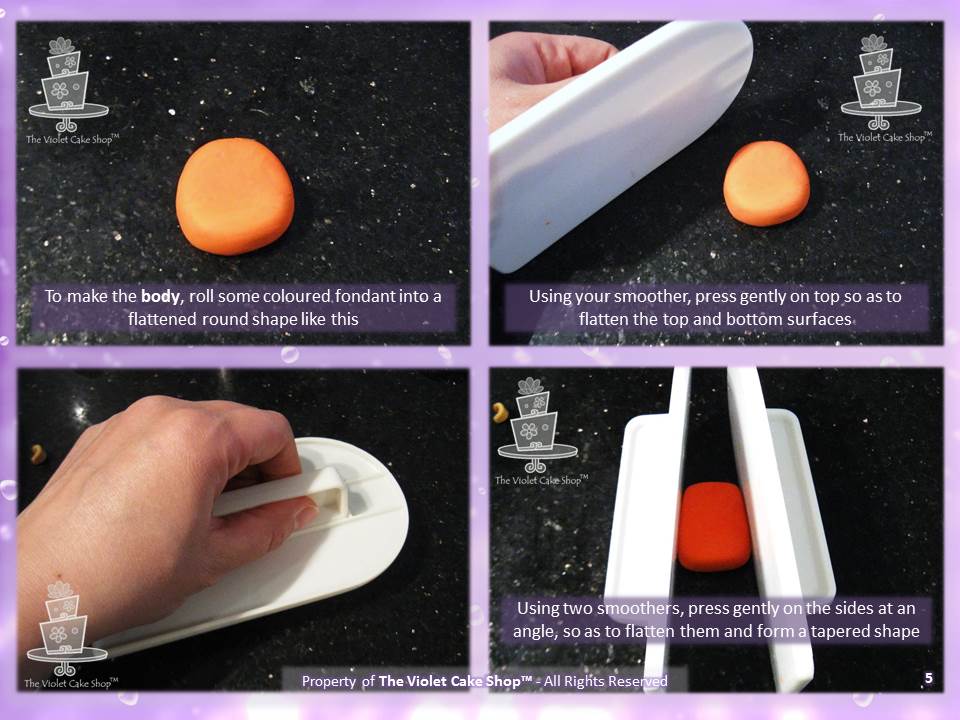
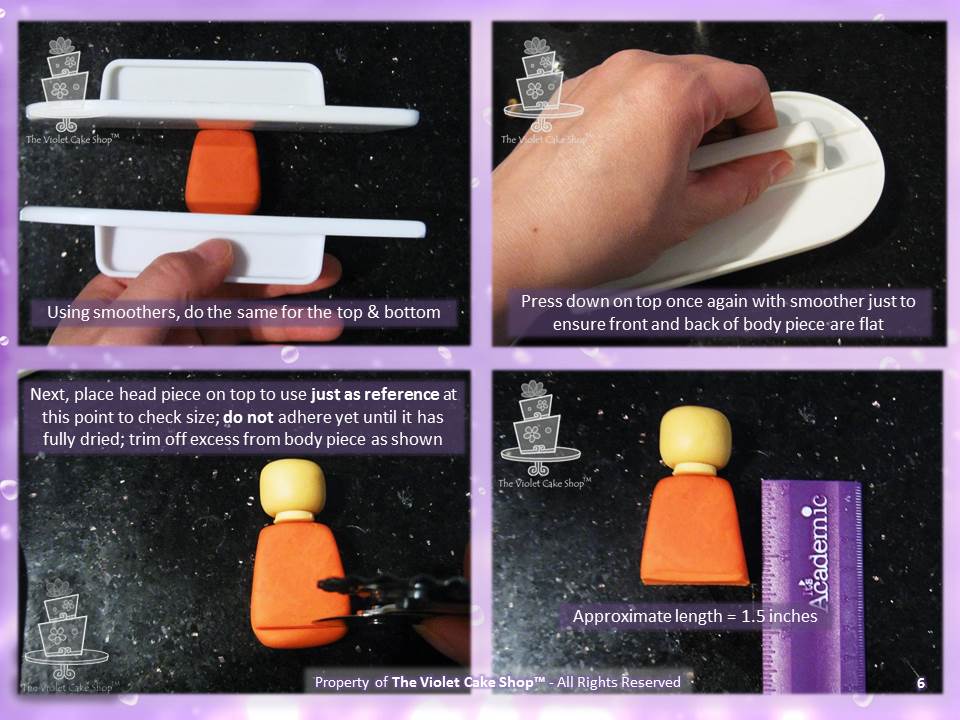
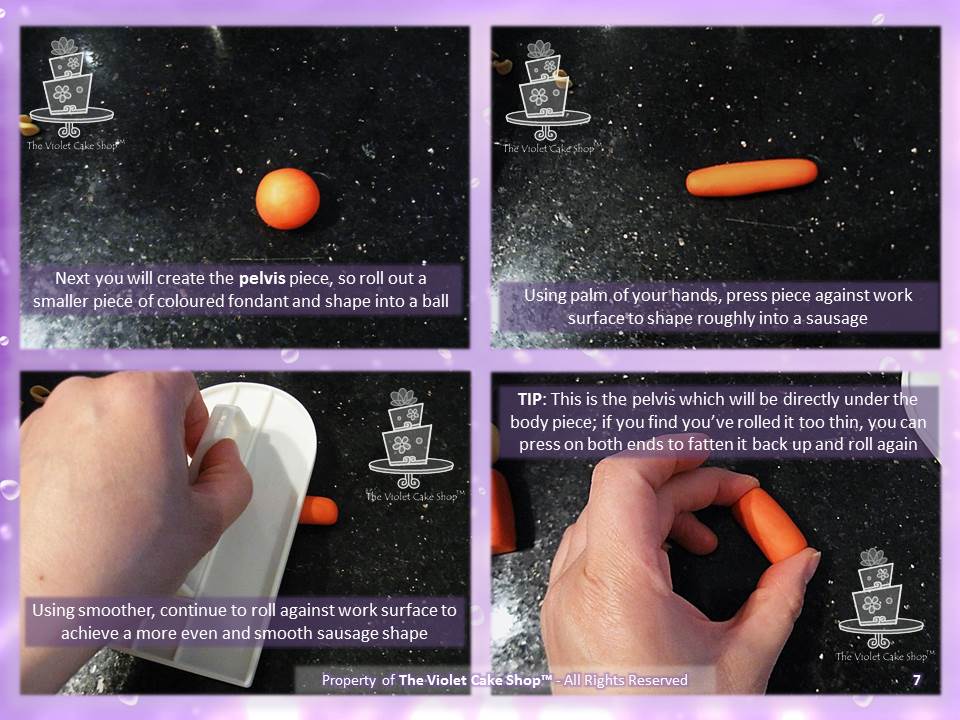
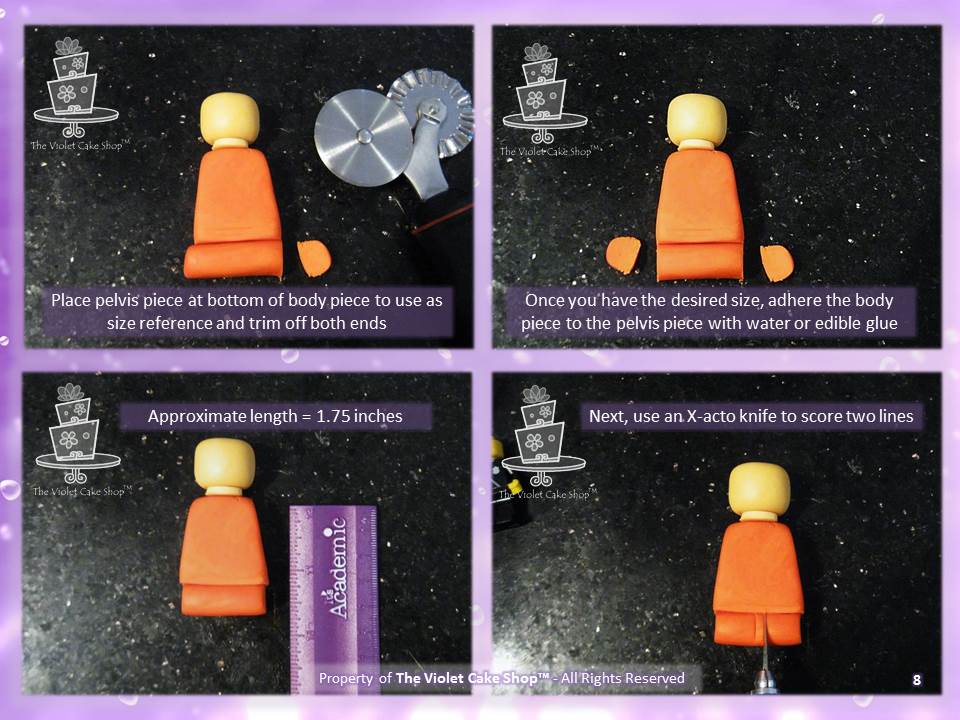
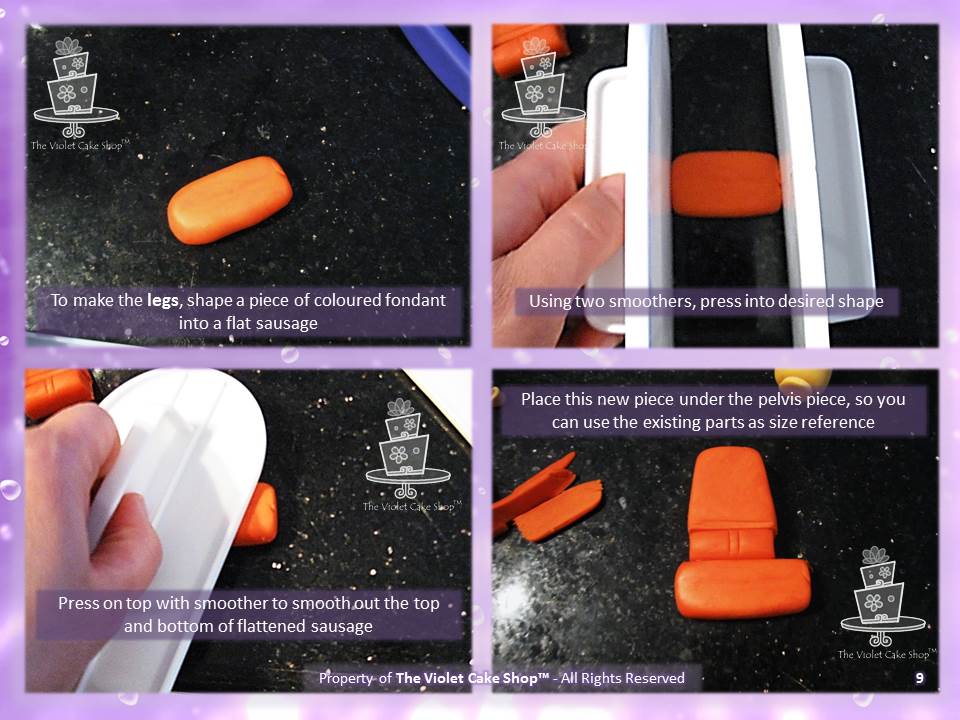
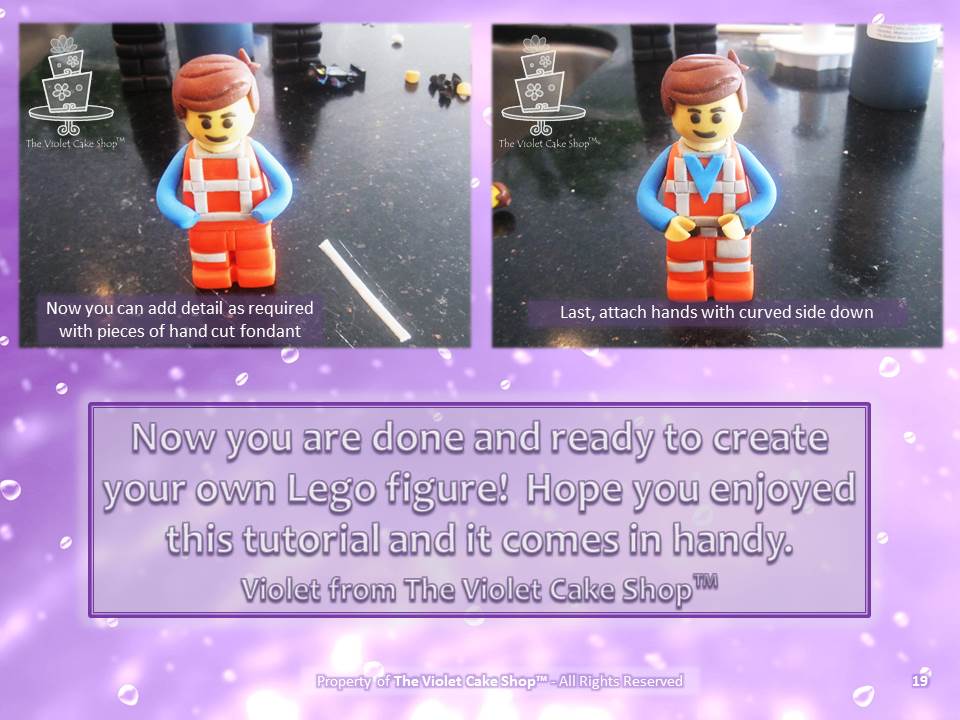
While making Emmet, I decided to put together this tutorial of how to make a Lego figure since many people had asked me how I made my previous figures and what tips I had for making mine so realistic. I am happy to say that I’ve seen lots of awesome figures made using this tutorial in the past two years and it warms my heart to be able to help others in creating something they’re super proud of. I have to admit too…I often end up having to refer back to my own tutorials when it’s been a while since I’ve made something, so there is a semi-selfish reason for making them, haha!
As mentioned before, I am uploading all my tutorials slowly here to my blog and this seemed like the perfect time to add this one to the list…so here you go and ENJOY! As always, I’d love to see what you create with one of my tutorials so please share any such work on my Facebook page, anytime =D
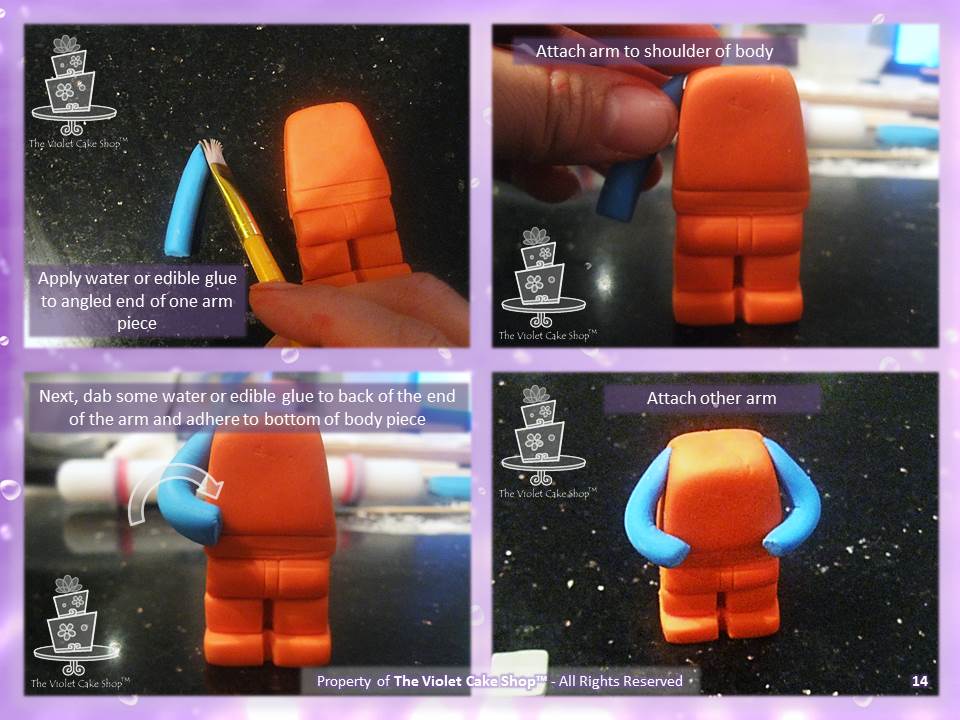
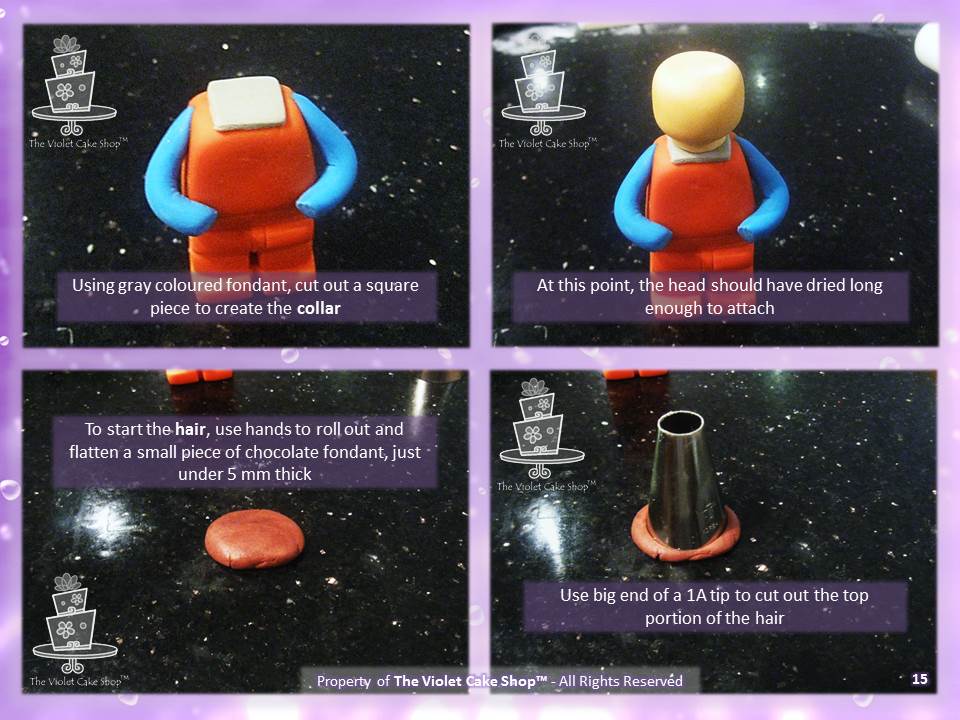
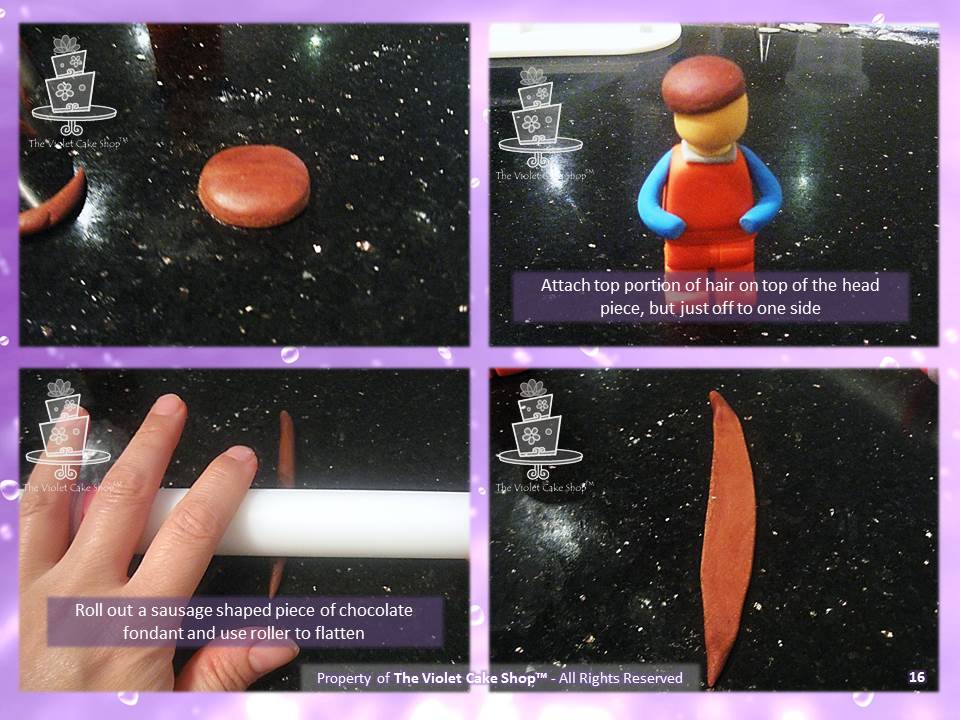
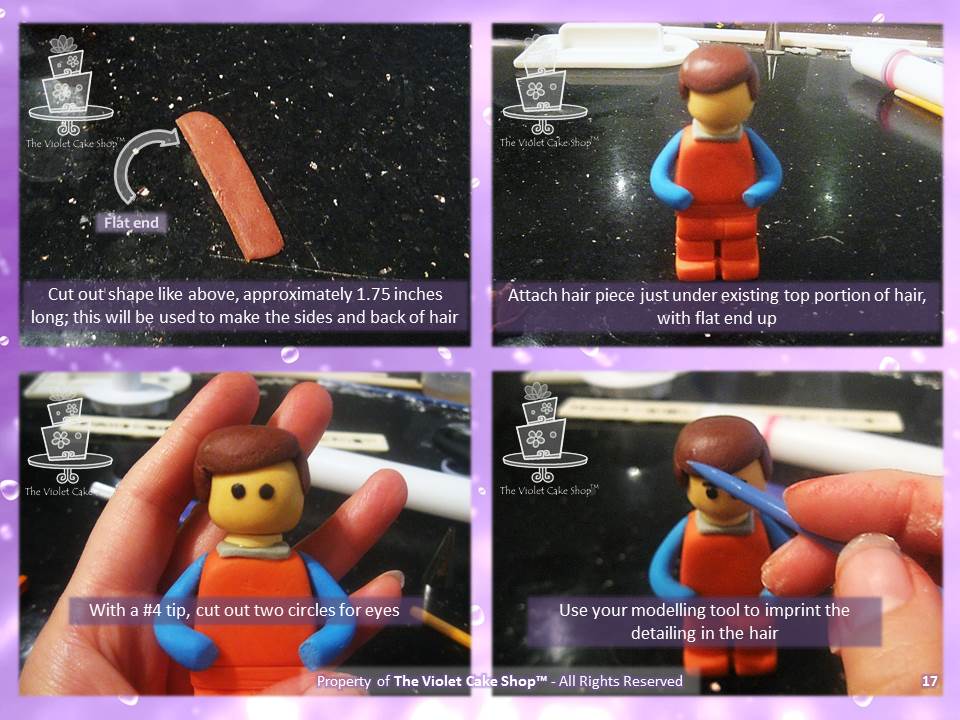
Lego Figure Tutorial by The Violet Cake Shop™:
(Note: these are my own techniques developed independently with my own ideas and shared for personal use ONLY. They are not to be used for monetary gain or to develop products, books, DVDs, downloads or lessons for sale or to be taught in classes or tutorials, whether hands-on, on-line, in video format or in print without express written consent.)
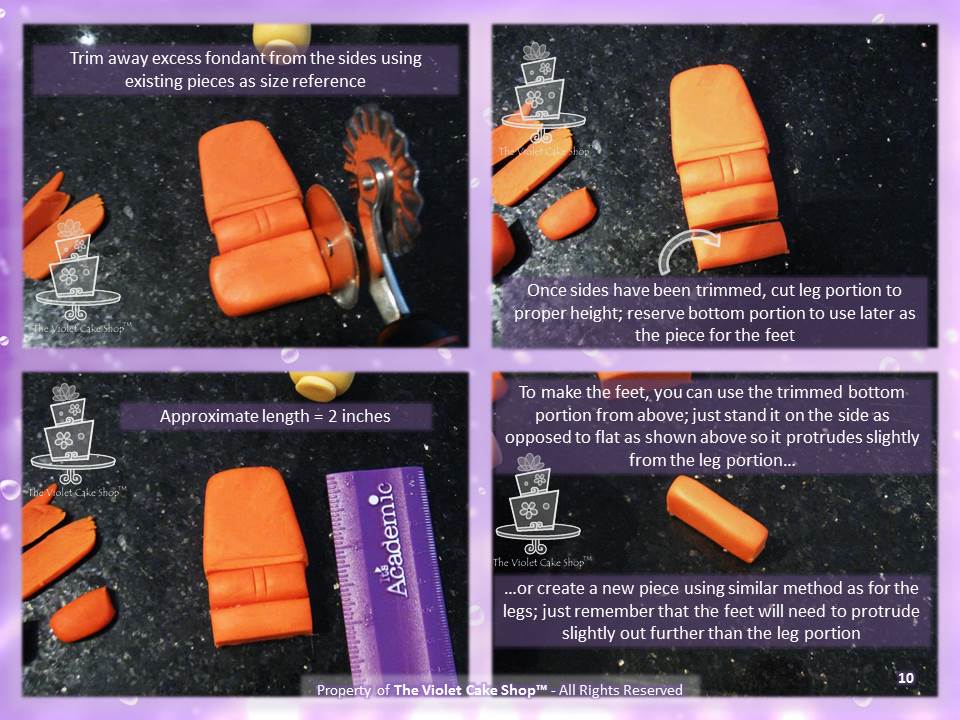
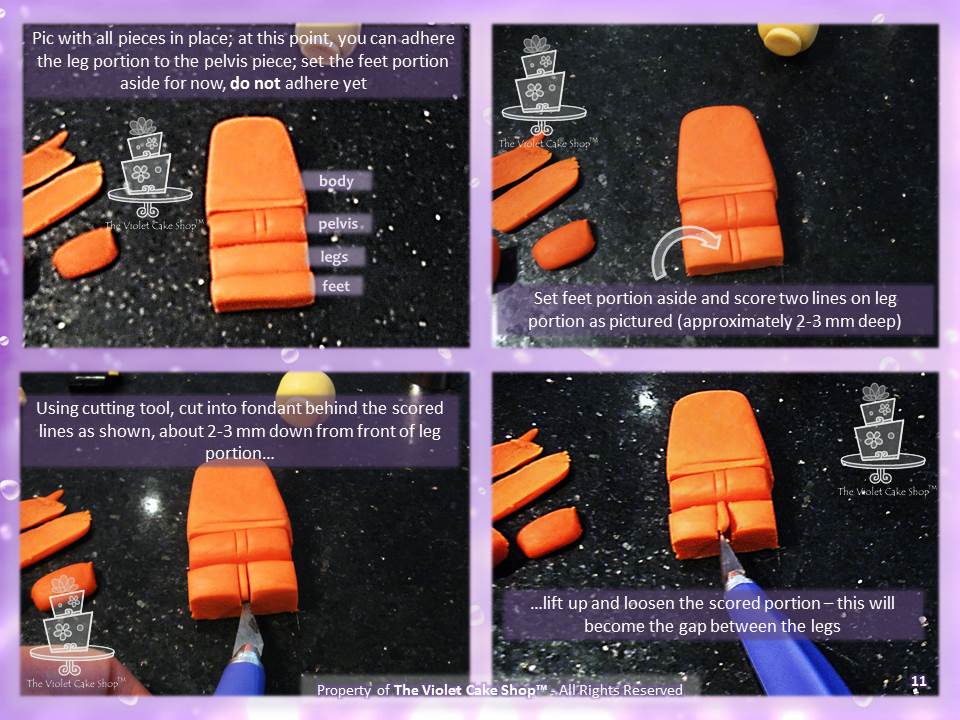
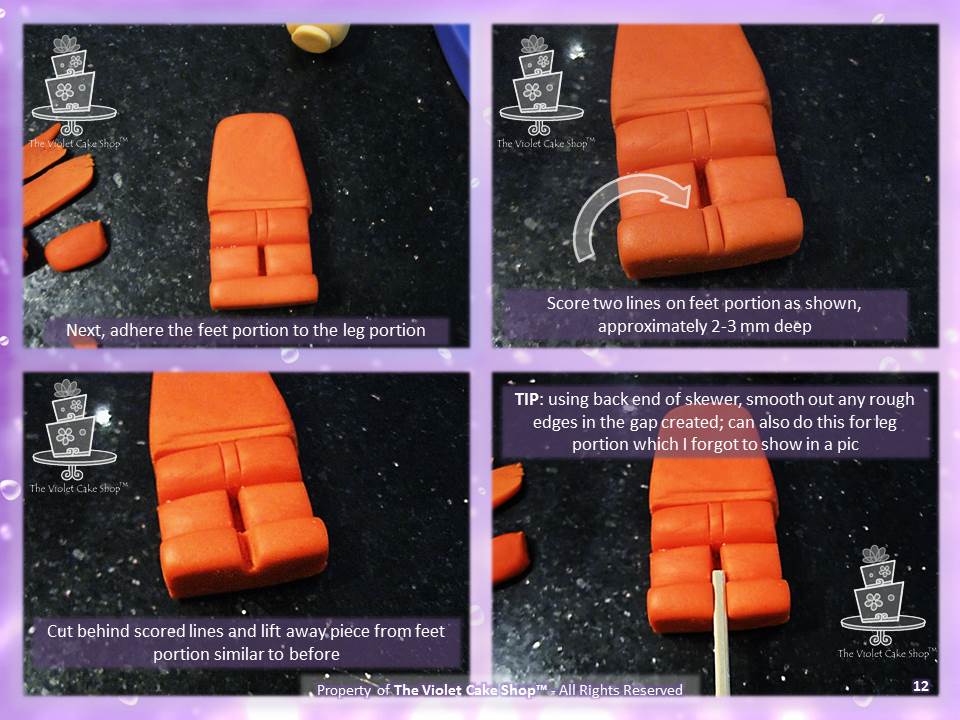
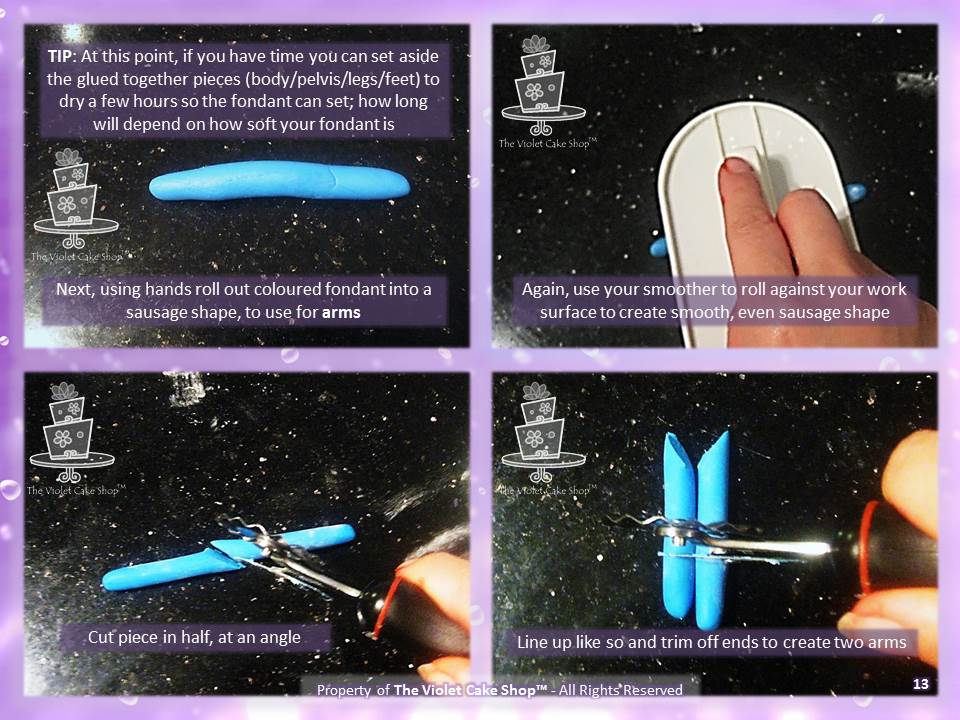
(*figure 1 – the ball should be approx. 1″ across; figure 4 – if you don’t have a 1A tip, you can use any circle cutter approx. 1/2″ across)
(Note: these are my own techniques developed independently with my own ideas and shared for personal use ONLY. They are not to be used for monetary gain or to develop products, books, DVDs, downloads or lessons for sale or to be taught in classes or tutorials, whether hands-on, on-line, in video format or in print without express written consent.)
I actually made this cake early last year but am slowly getting around to posting tutorials and tips to my blog as I’ve found they are rather hard to find on my Facebook page after they get buried down and sometimes disappear from the Timeline.
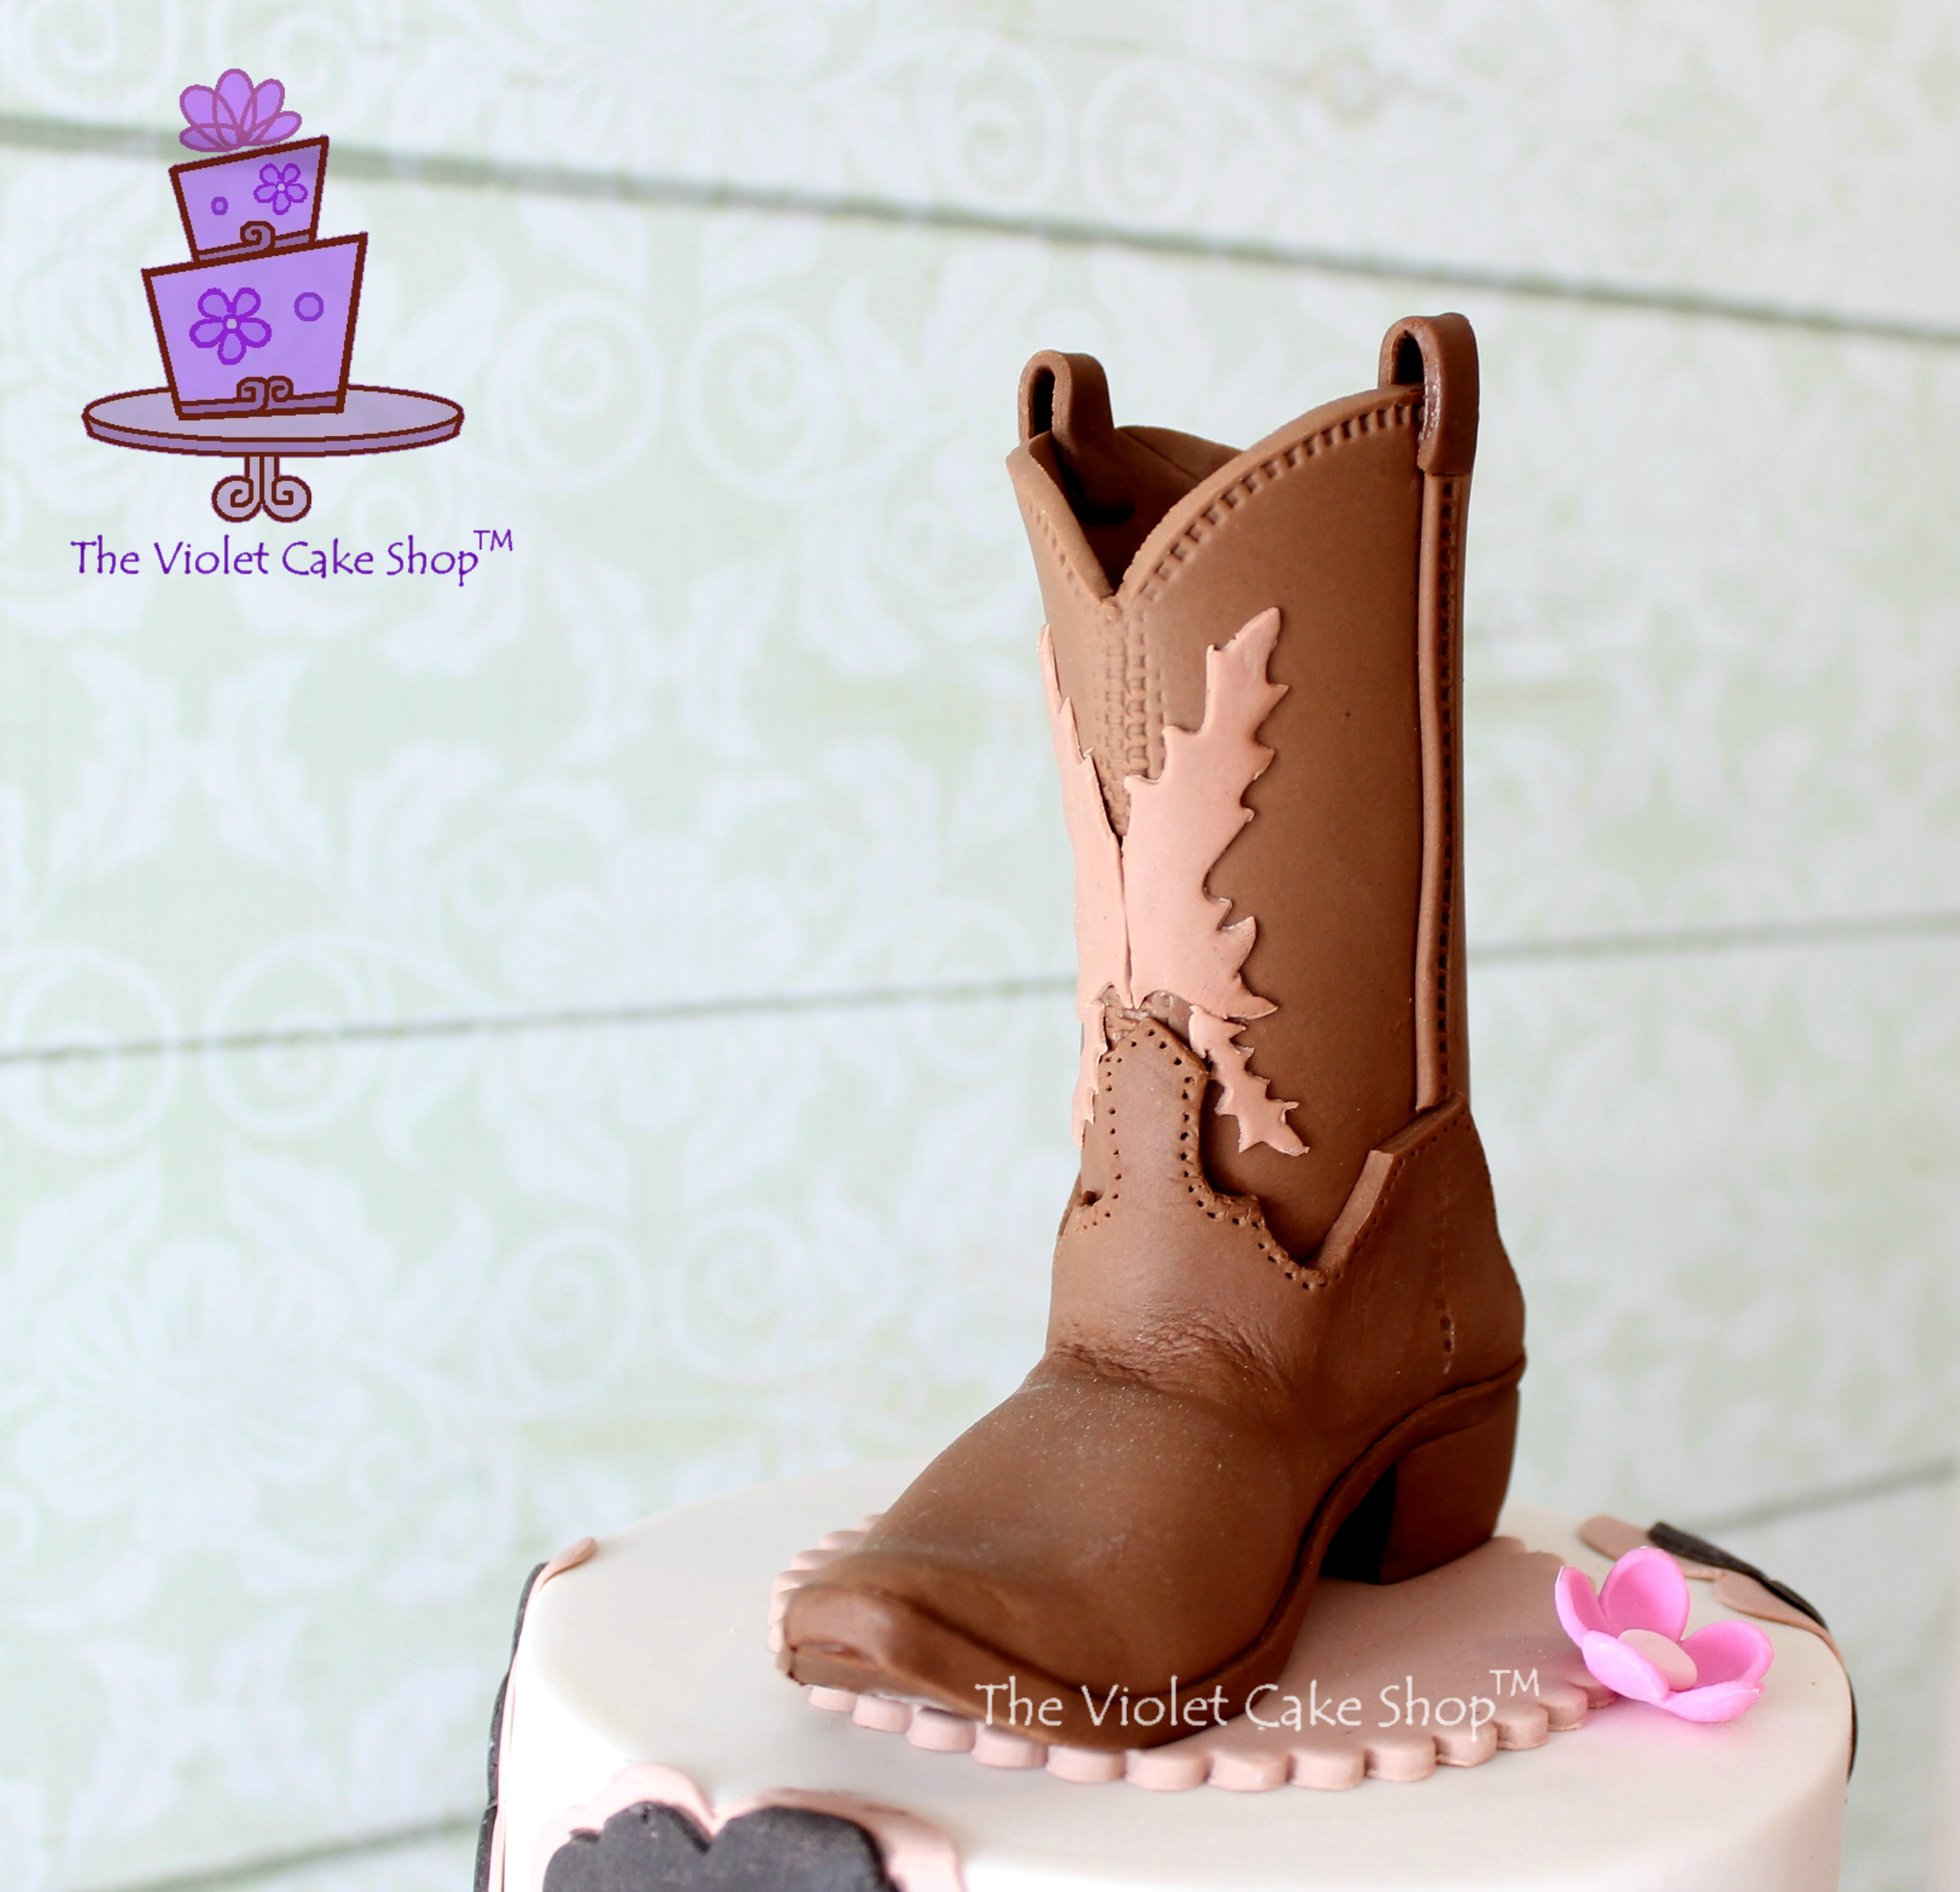
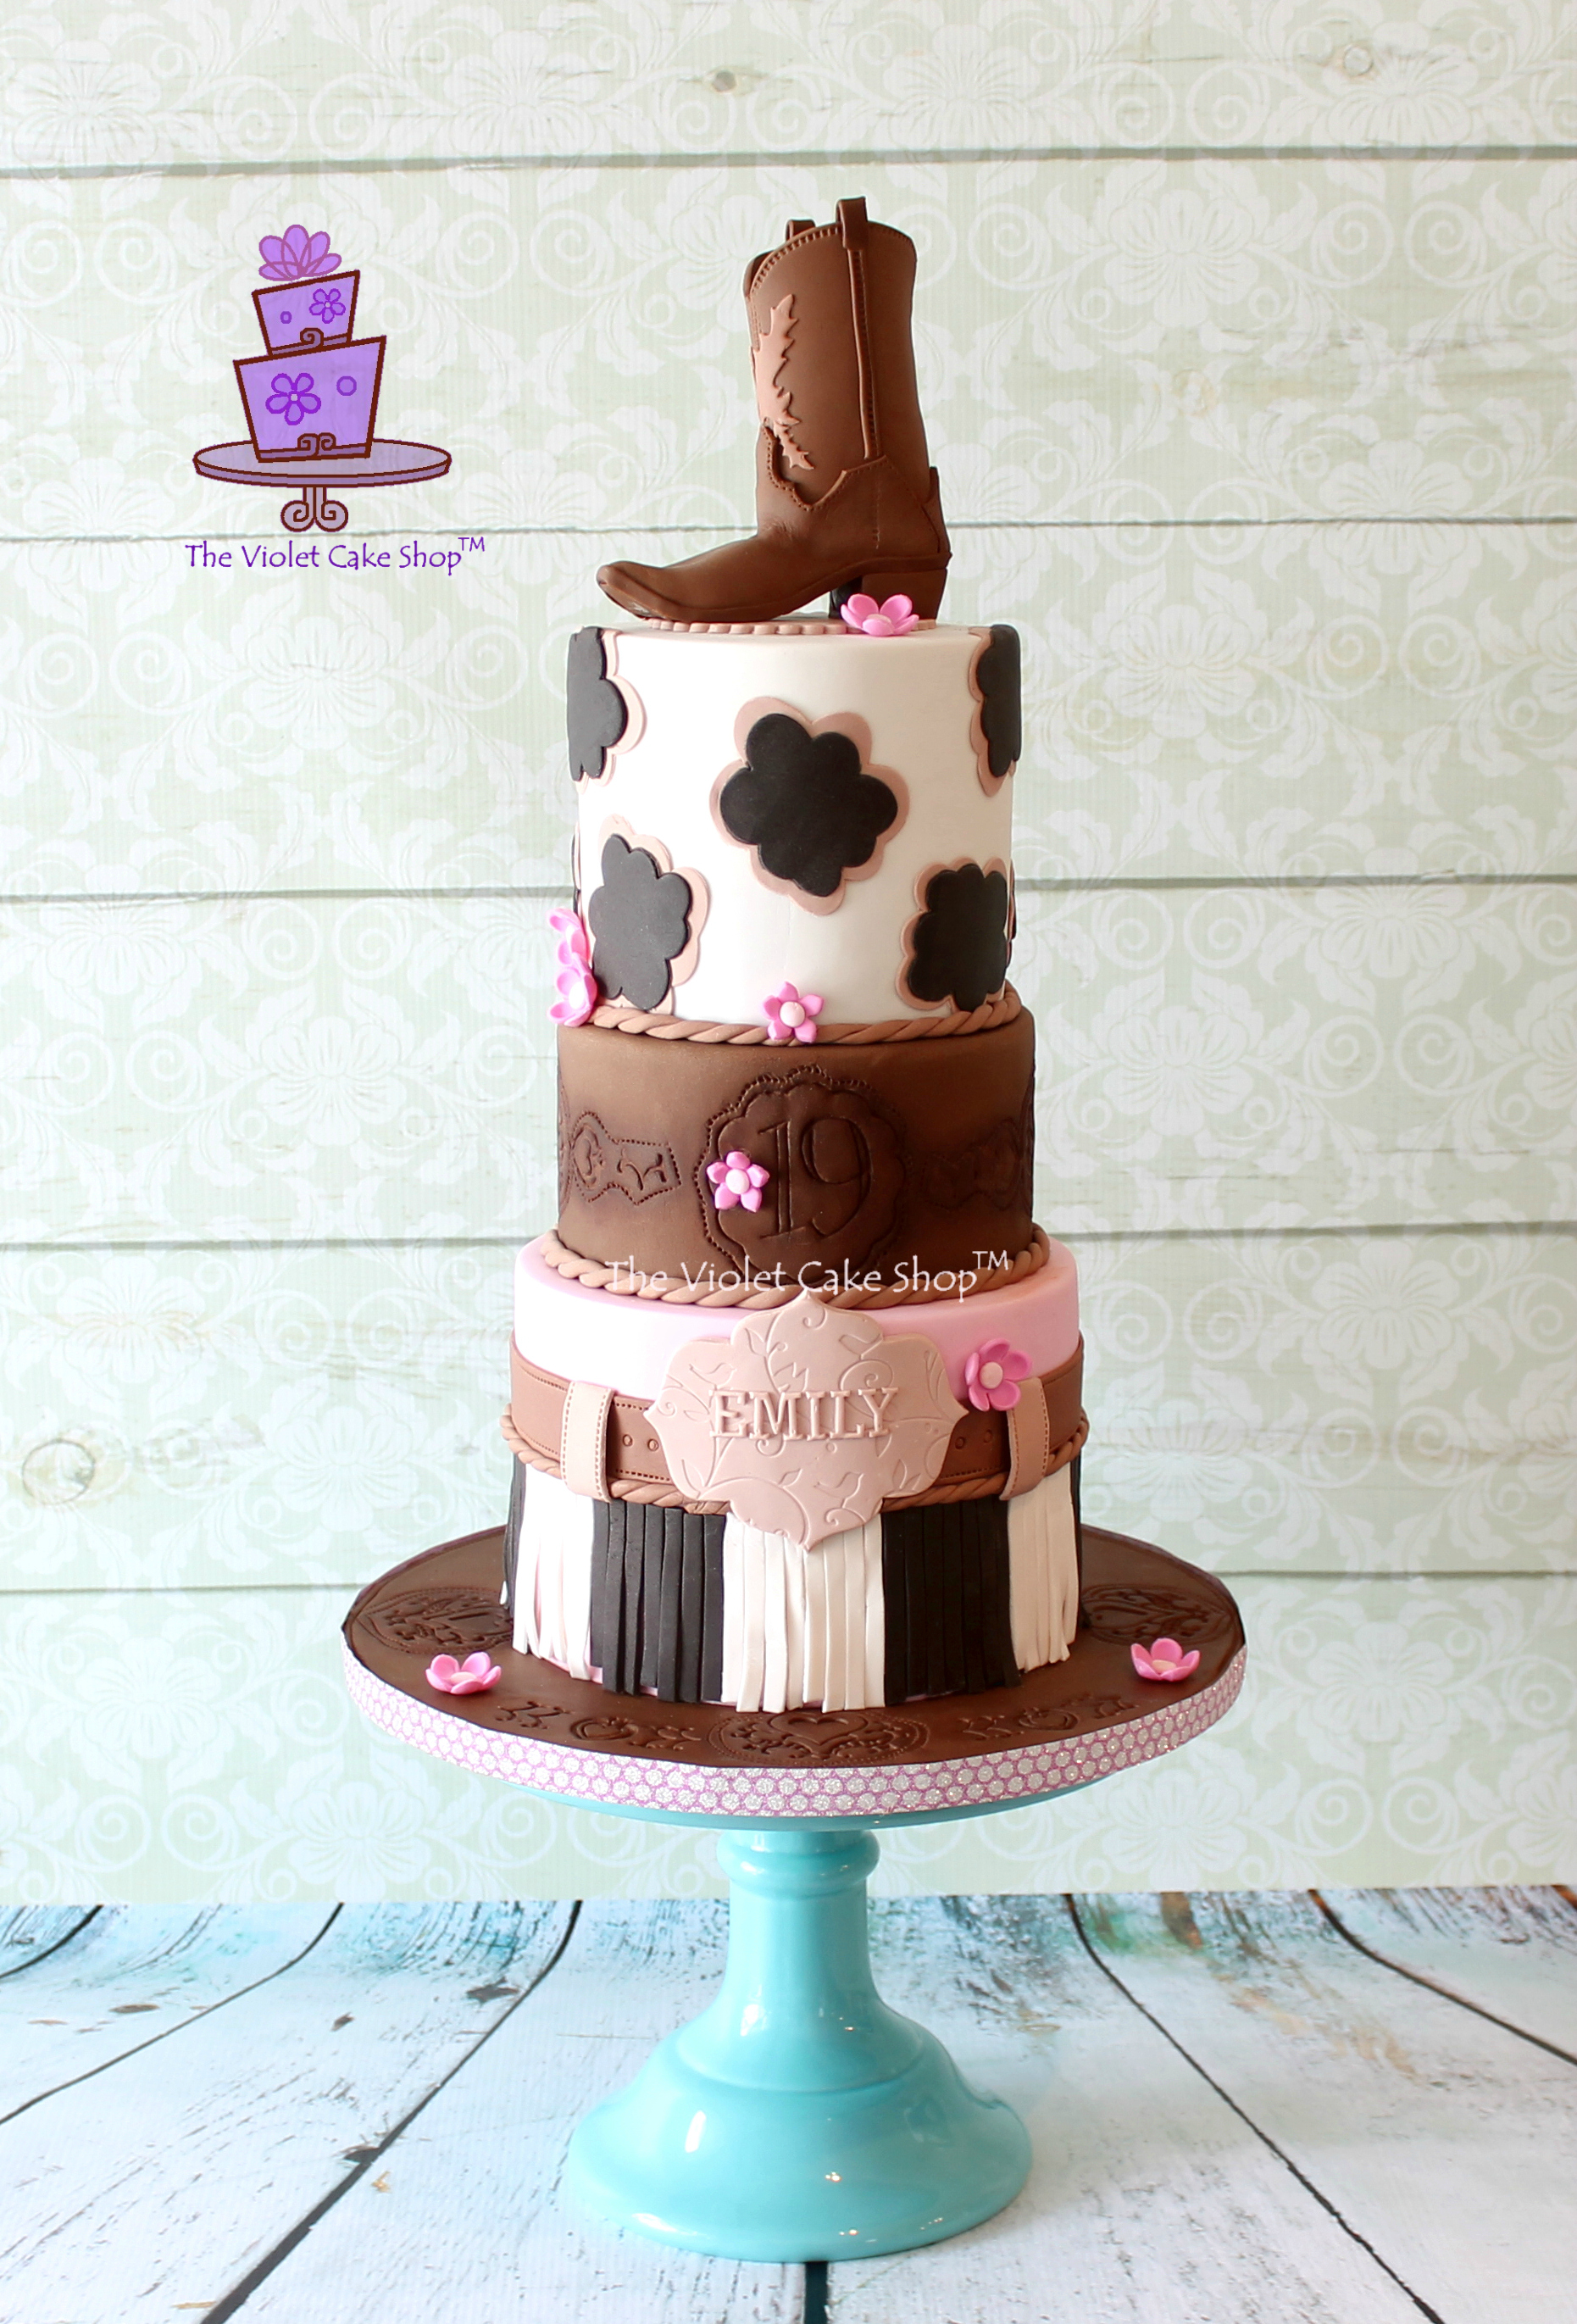
This is my Girly Western cake made for Emily’s 19th.
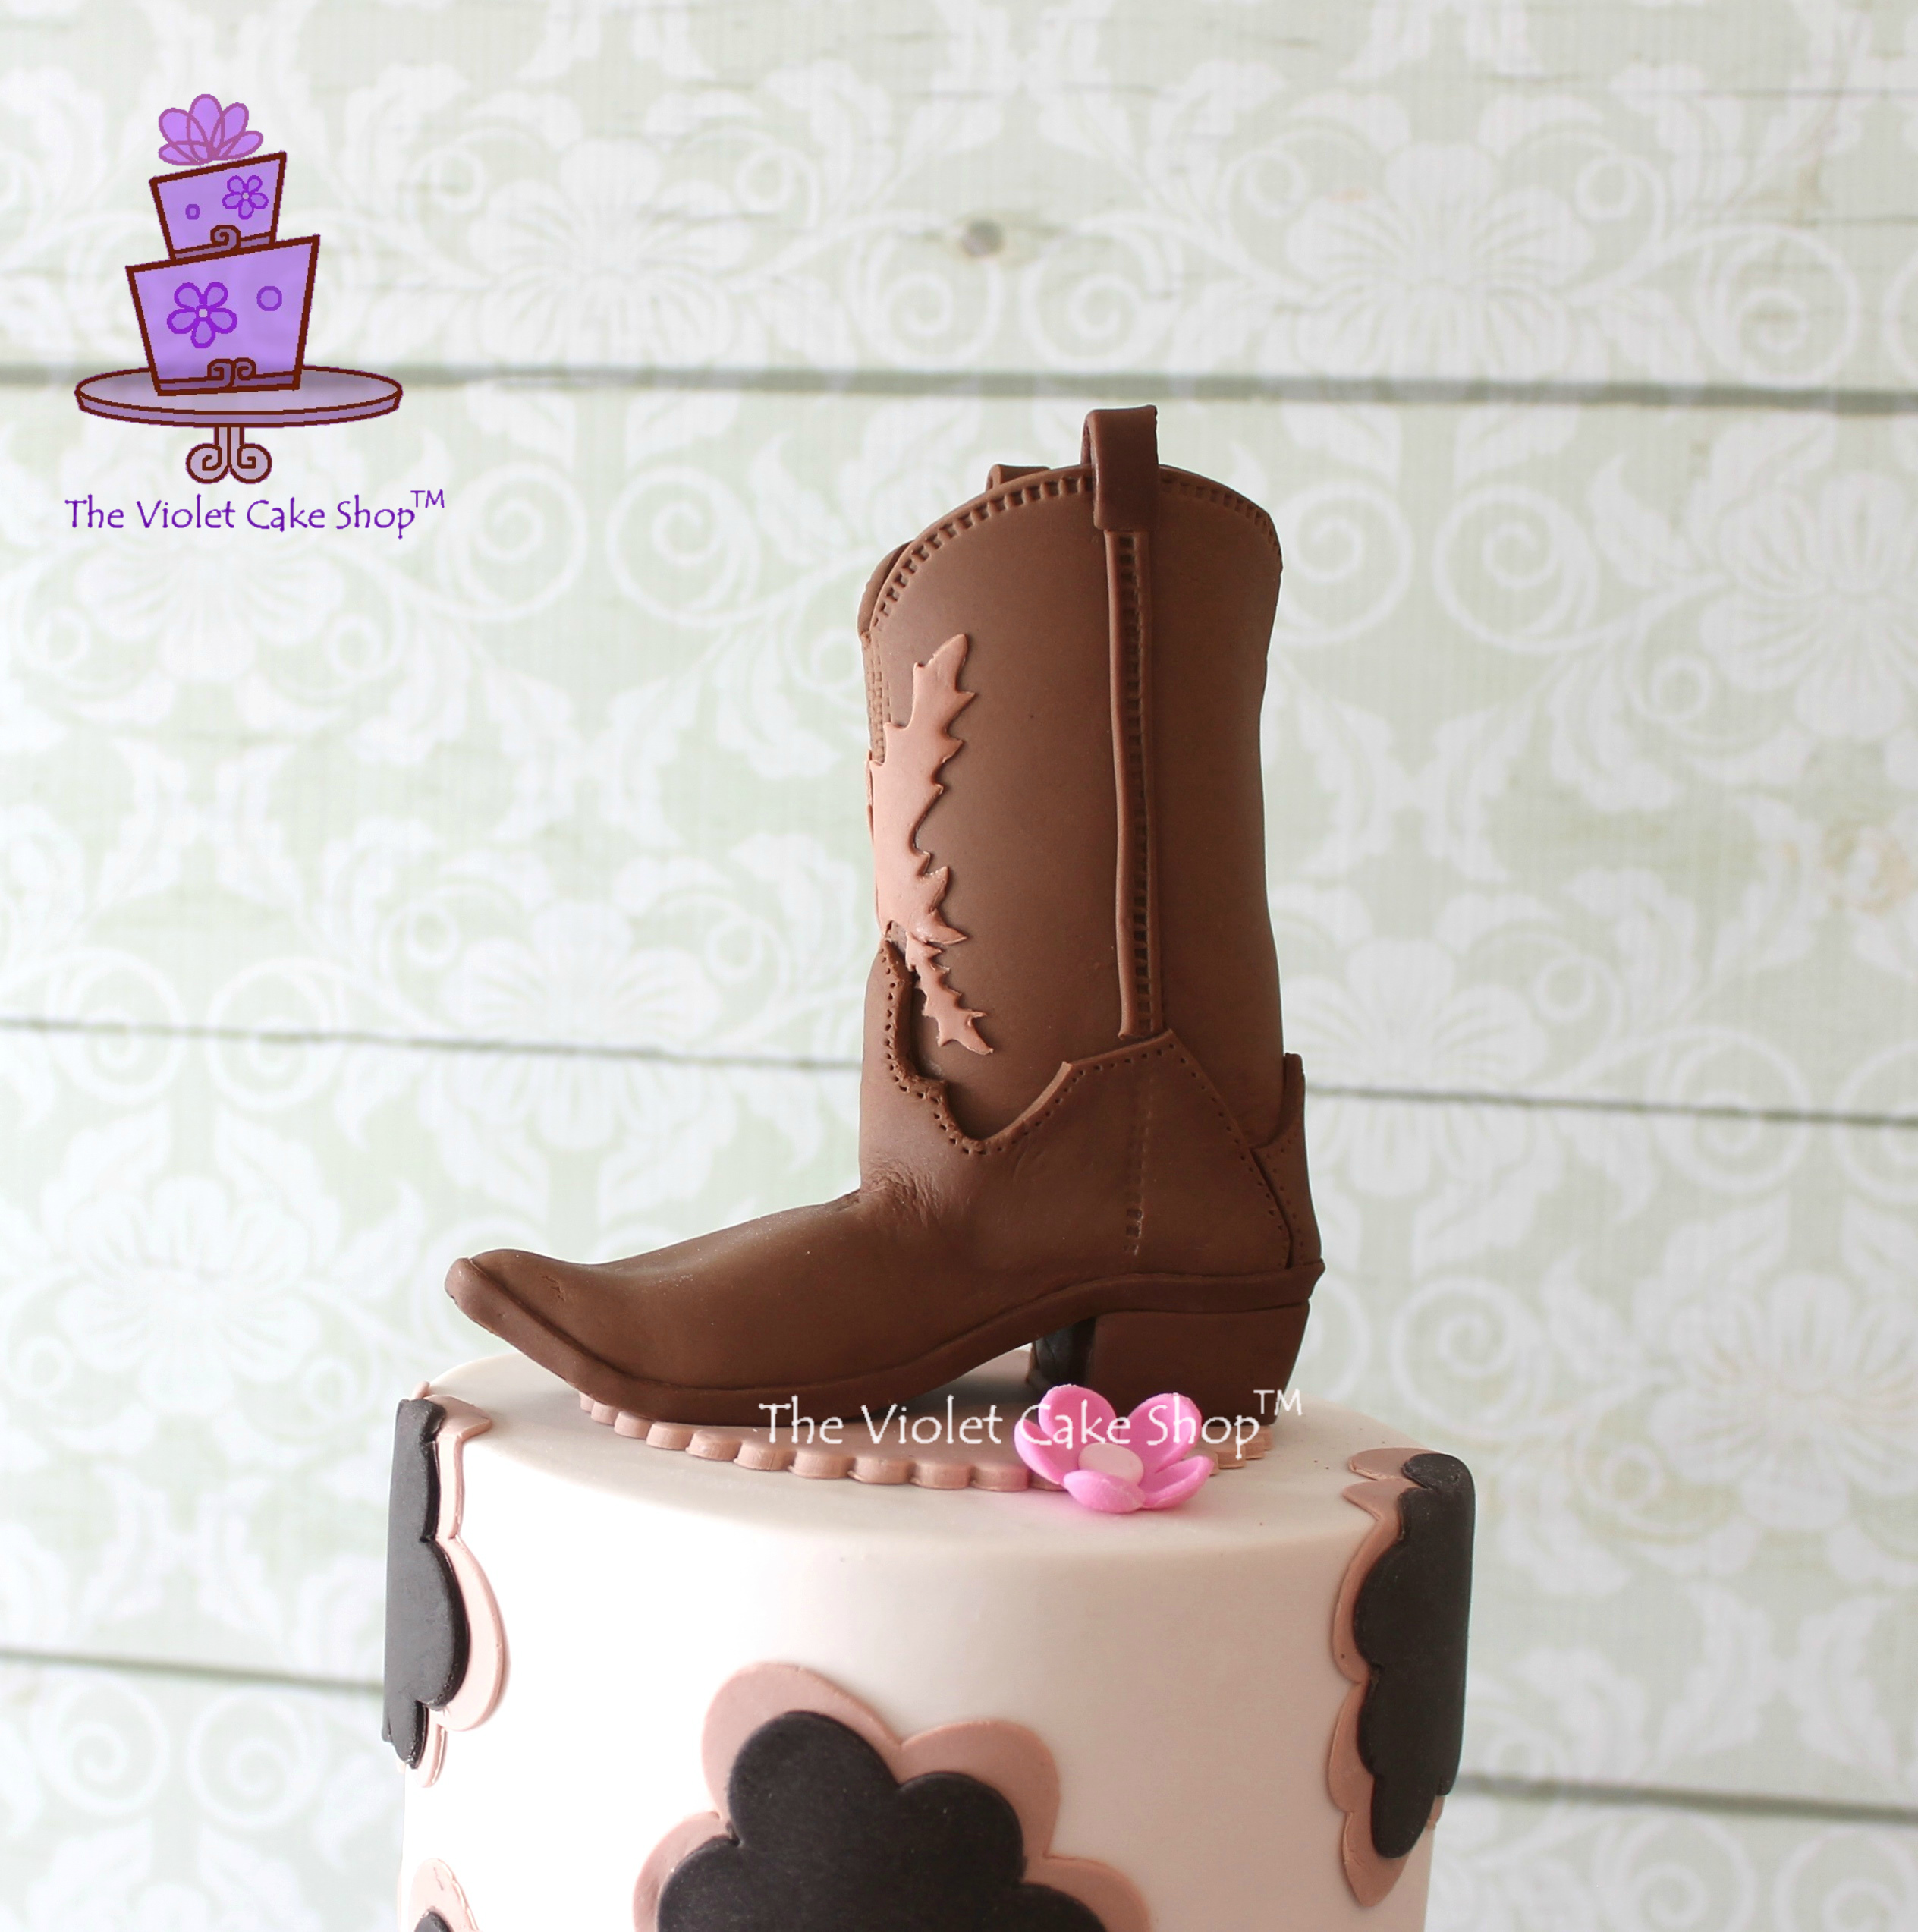
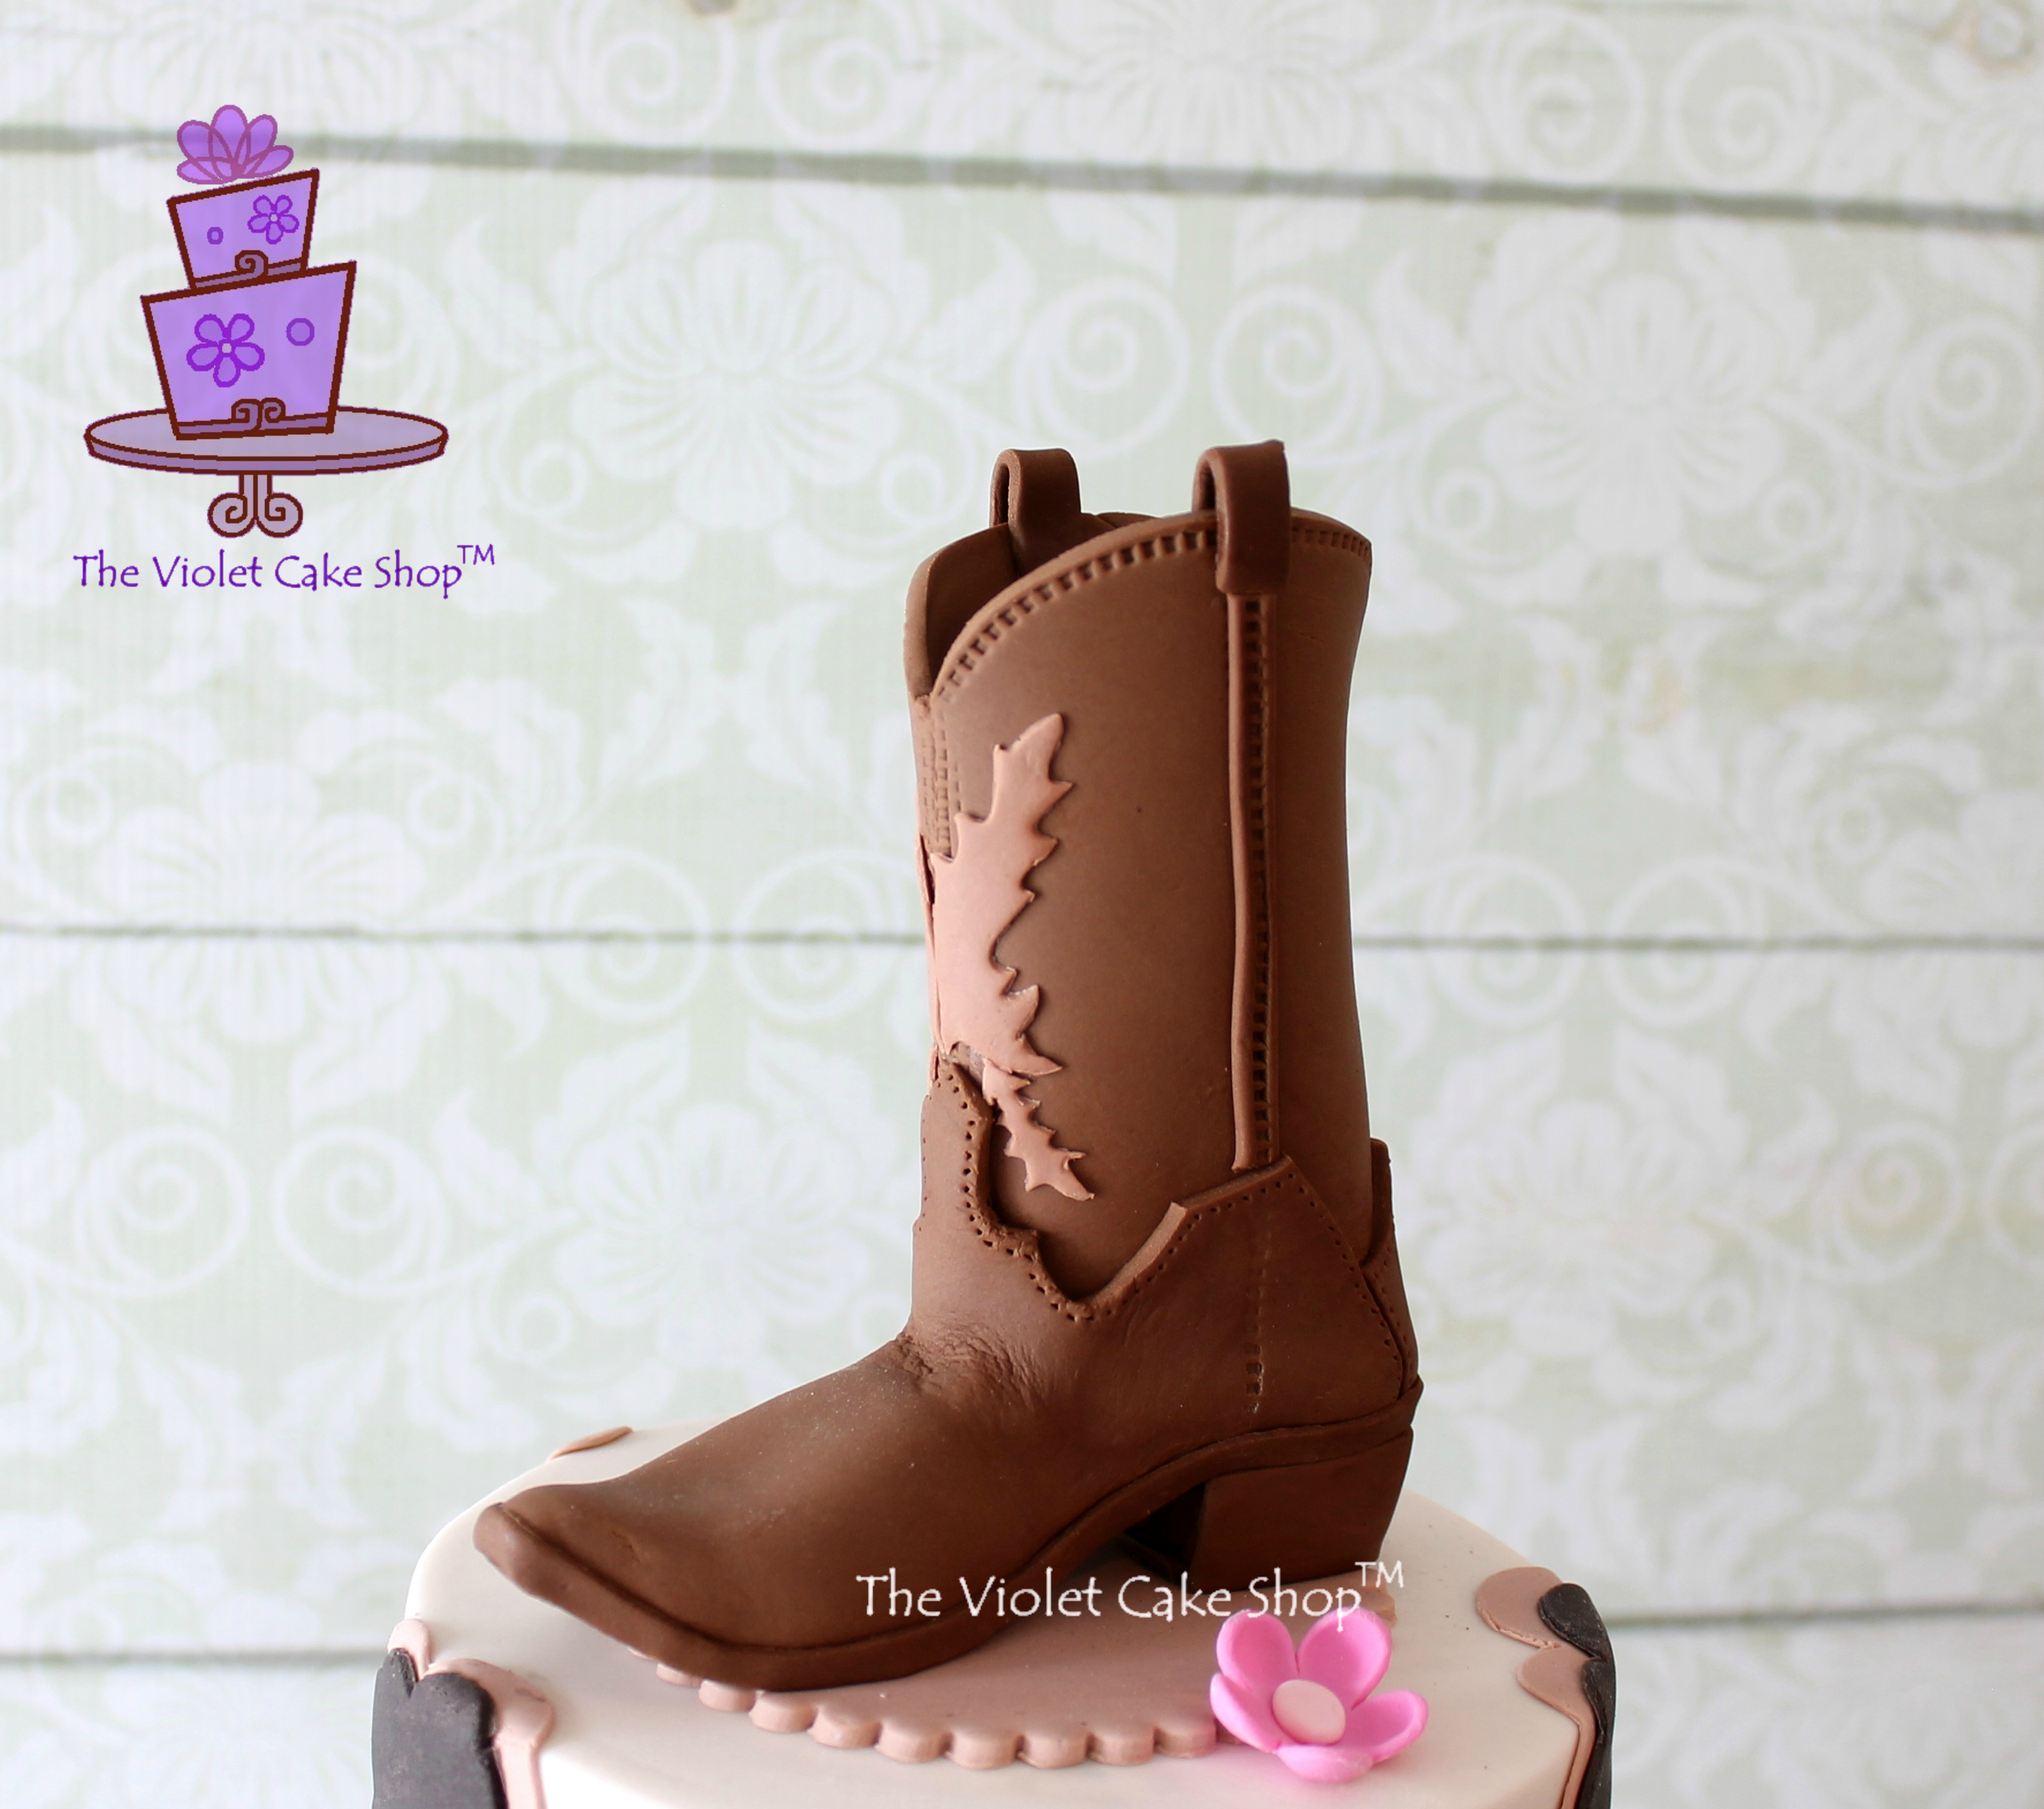
Her mom wanted something that was girly but not childish, and for it to be personalized with her favourite cowboy boot so we used this as the model for the topper.
Having never made a boot topper before, I tried to search online for any tutorial or tip I could use. I’d seen many people making boot toppers before but did not remember seeing any tips for HOW to make one. I could have messaged some online friends that I know have made one in the past, but I am kinda stubborn when it comes to these kinds of things and would prefer to try and figure it out on my own if I could and only reach out for help if I became desperate. So I decided to just “wing” it.
I also do not normally take pics along the process of any of my creations because I guess I don’t expect them to work out the first time. But this one surprised me in that it did work out right away and thankfully I took some quick shots (although they are quite messy because they were unplanned lol). I plan to get in the habit of taking progress shots from now on.
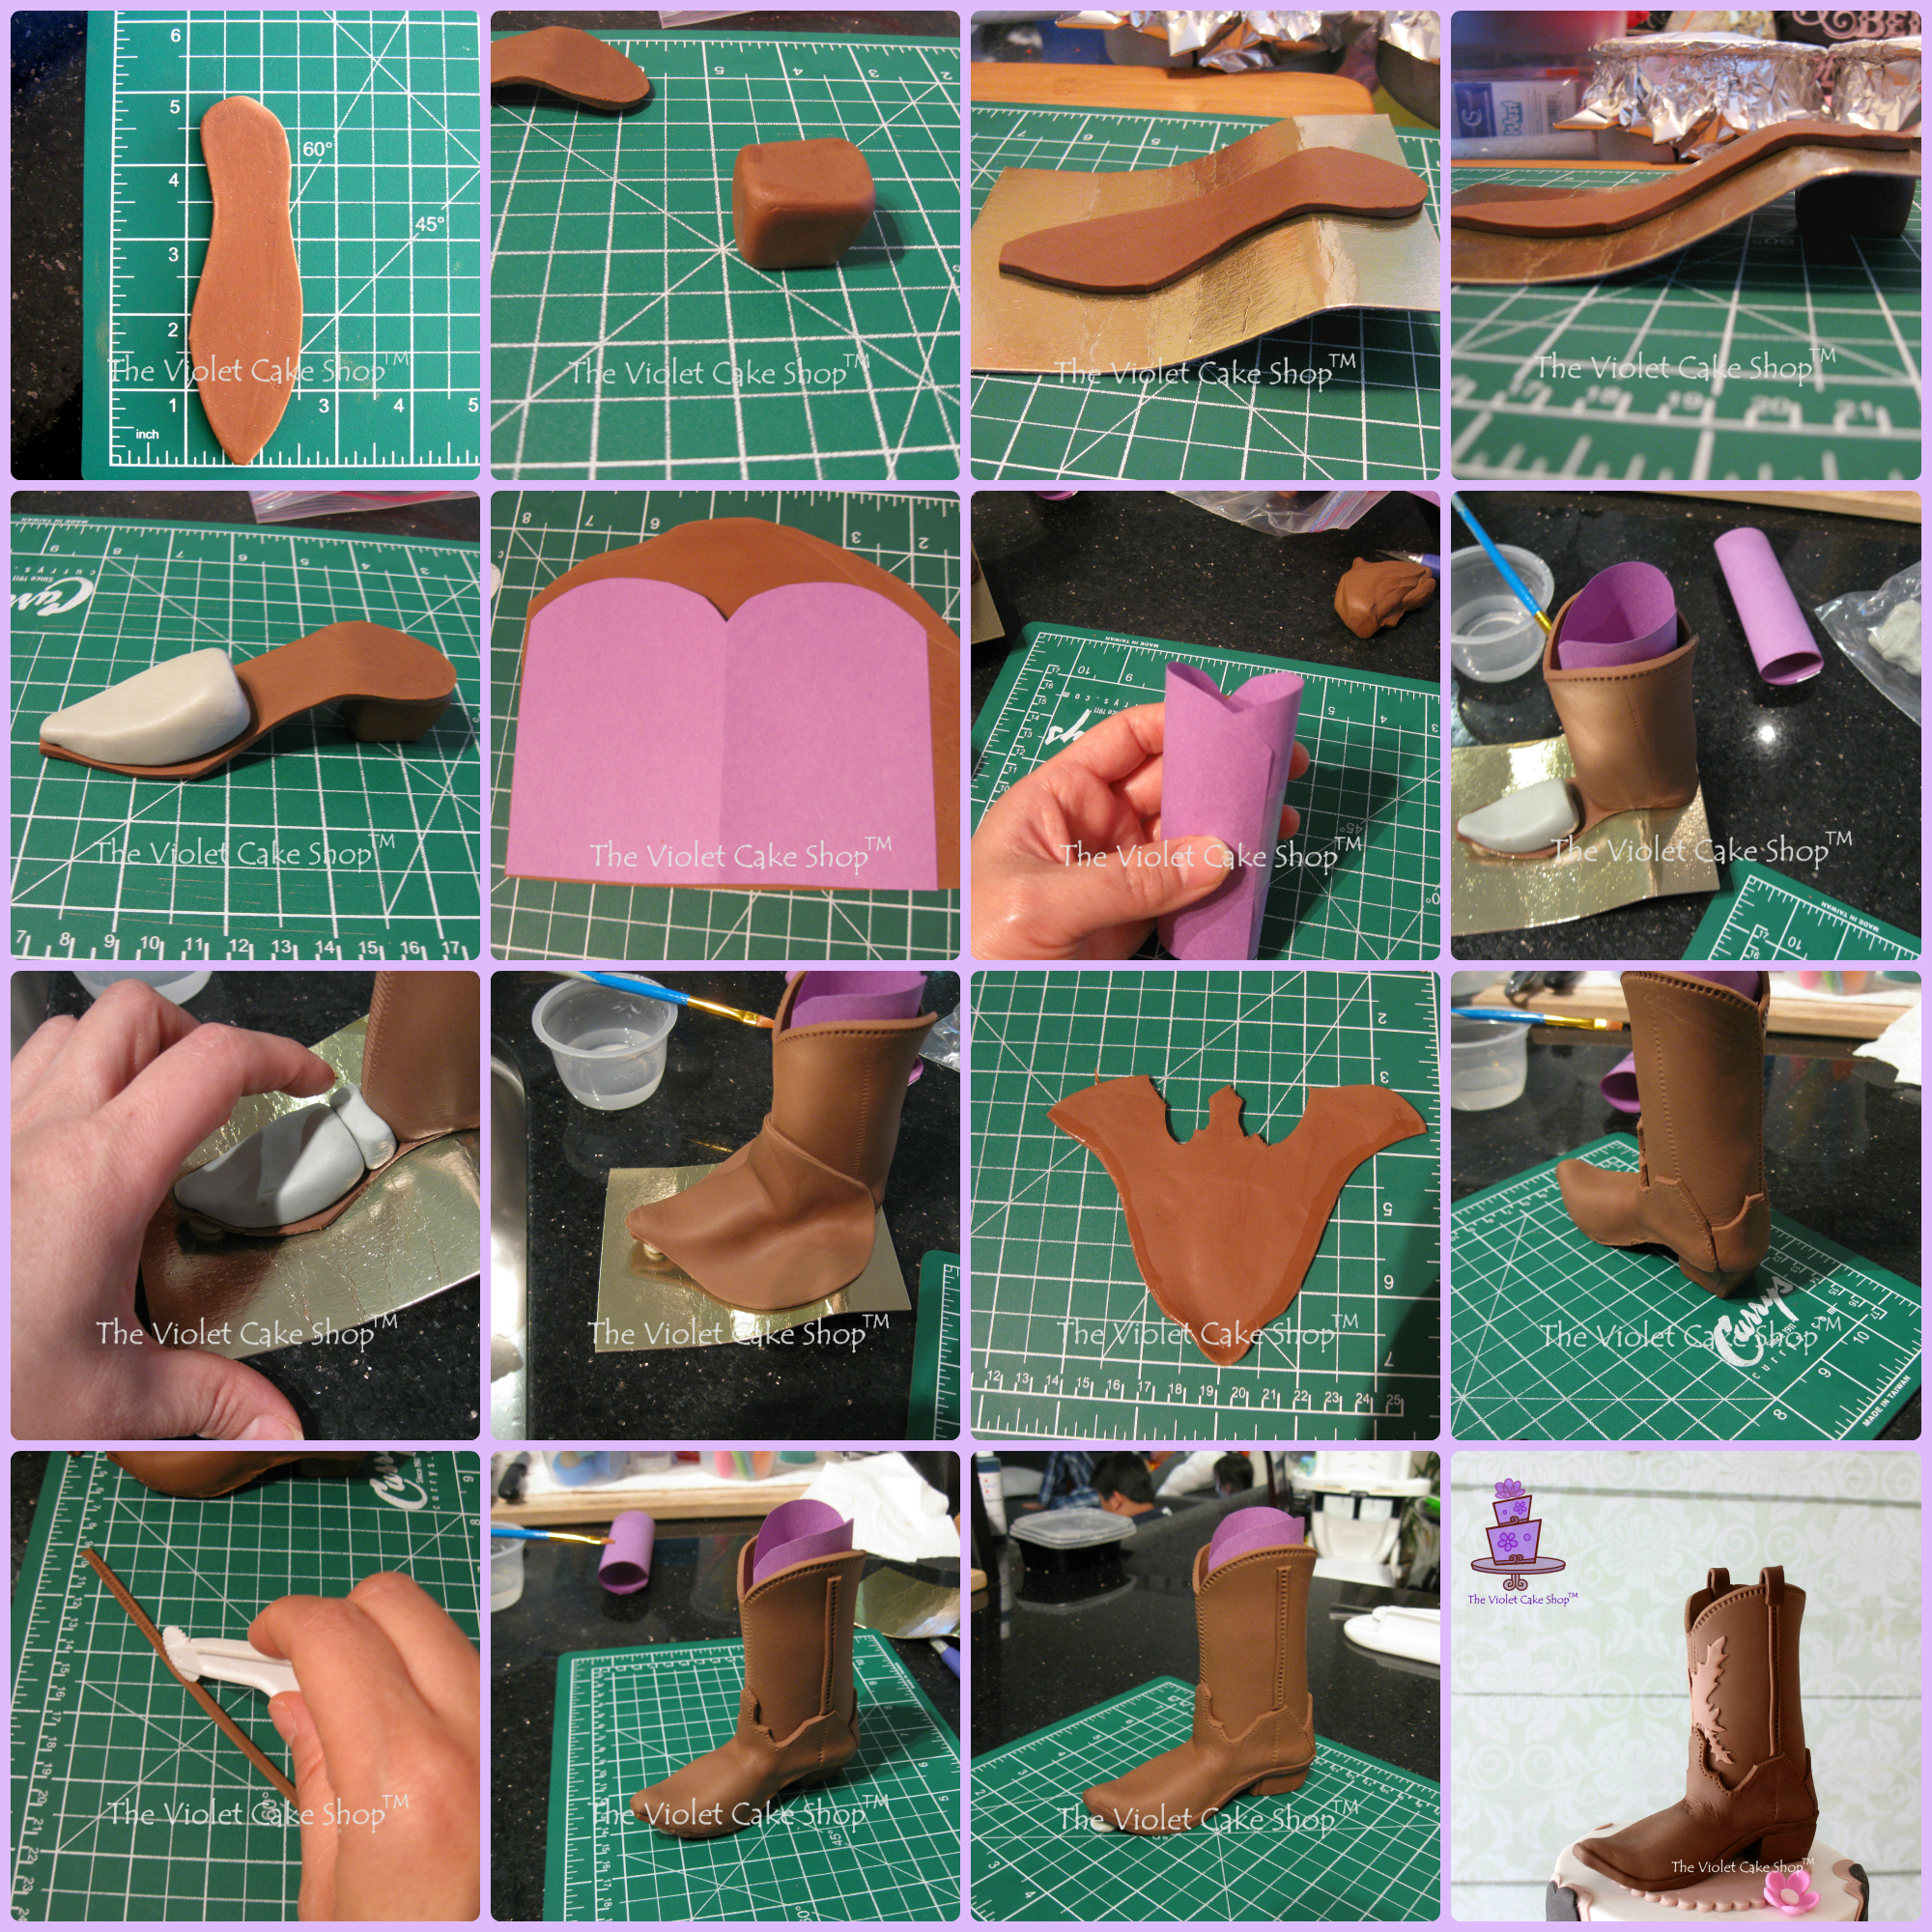
So here is a quick compilation or pictorial of the progress shots for the boot topper. Keep in mind, these are not edited and were merely taken so I could remember what I did therefore they are not the best quality nor staged well. It’s just to give an idea of how I went about “winging” it lol. Also, a lot of steps are missing but it will give you a good sense… nonetheless…
(Note: these are my own techniques developed independently with my own ideas and shared for personal use ONLY. They are not to be used for monetary gain or to develop products, books, DVDs, downloads or lessons for sale or to be taught in classes or tutorials, whether hands-on, on-line, in video format or in print without express written consent.)
NOTES:
I used a mix of Satin Ice chocolate fondant and Satin Ice gumpaste (approx. 50/50). If using MMF (marshmallow fondant, chocolate MMF for the brown in this case), you will likely not need to add the gumpaste, depending on the elasticity of your fondant. It’s only needed if you want it to dry quicker or your fondant is very soft and not pliable enough to hold its shape easily.
I let the sole of the boot dry on the makeshift cardboard former overnight (should be minimum a few hours) prior to adding the other pieces. I realized after, that I had forgotten to curl up the top or toe of the sole so had to bend it slightly afterward and placed a small wedge of fondant underneath to hold the curled shape (starting in pic 8, but you can see it clearer in pic 15).
Pic 6 shows the template I used to cut the portion of the boot that goes over the calf. I also inserted it after to help hold the shape of the portion as it dried.
In pic 10, I draped the fondant to get an impression of the shape and size I would need to cut out for the top portion or the toe of the boot. The piece that was cut out after, can be seen in pic 11. I did the same for the heel portion as well (but did not take a pic of it), see pic 12, after the heel detail was added.
Additional details were added after so the topper could match the birthday girl’s actual boot.
Hope this is helpful for some!
(Note: these are my own techniques developed independently with my own ideas and shared for personal use ONLY. They are not to be used for monetary gain or to develop products, books, DVDs, downloads or lessons for sale or to be taught in classes or tutorials, whether hands-on, on-line, in video format or in print without express written consent.)
First posted on Facebook and reposting here to my blog…
~~
FUN TIPS for modelling figures (disclaimer – I am NOT a modelling expert…there are always other ways and sometimes better ways to do things…this is just what works for me)
(Note: these are my own techniques developed independently with my own ideas and shared for personal use ONLY. They are not to be used for monetary gain or to develop products, books, DVDs, downloads or lessons for sale or to be taught in classes or tutorials, whether hands-on, on-line, in video format or in print without express written consent.):
(Figures made for my daughter’s 2nd birthday in July…all using MMF or chocolate MMF…only toothpick for support in the neck because the heads are larger)
~~
I often get PMs asking me what I use to make my figures and how I make them so that they keep their shape or prevent cracking etc. Also, I get asked what medium I would recommend for modelling as well as how to support them etc. So I have compiled some of my answers here:
1/ I use MMF (marshmallow fondant) and have only ever tried that for modelling so not sure if other forms of sugar pastes or fondants would work better or not. Although, it’s common practice to mix 50/50 fondant (or MMF) with gumpaste to get a stronger medium that dries quicker but you do have to work fast.
2/ I do not mix tylose (or CMC powder) with my MMF for modelling because I have never had an issue with the strength of the pieces, so long as you give them ample time to dry which is typically 24 hours or minimum overnight.
3/ I like to make my figures in sections and let the pieces dry for at least a day. You can dry for 2-3 hours and some pieces will be fine to support others, but if it needs to support another piece that is just as large or larger, let dry overnight but ideally 24-48 hrs.
4/ Drying and letting the pieces set, helps to prevent them from sagging or changing their shape which can happen when you put one piece on top of another, even if they are supported by toothpicks.
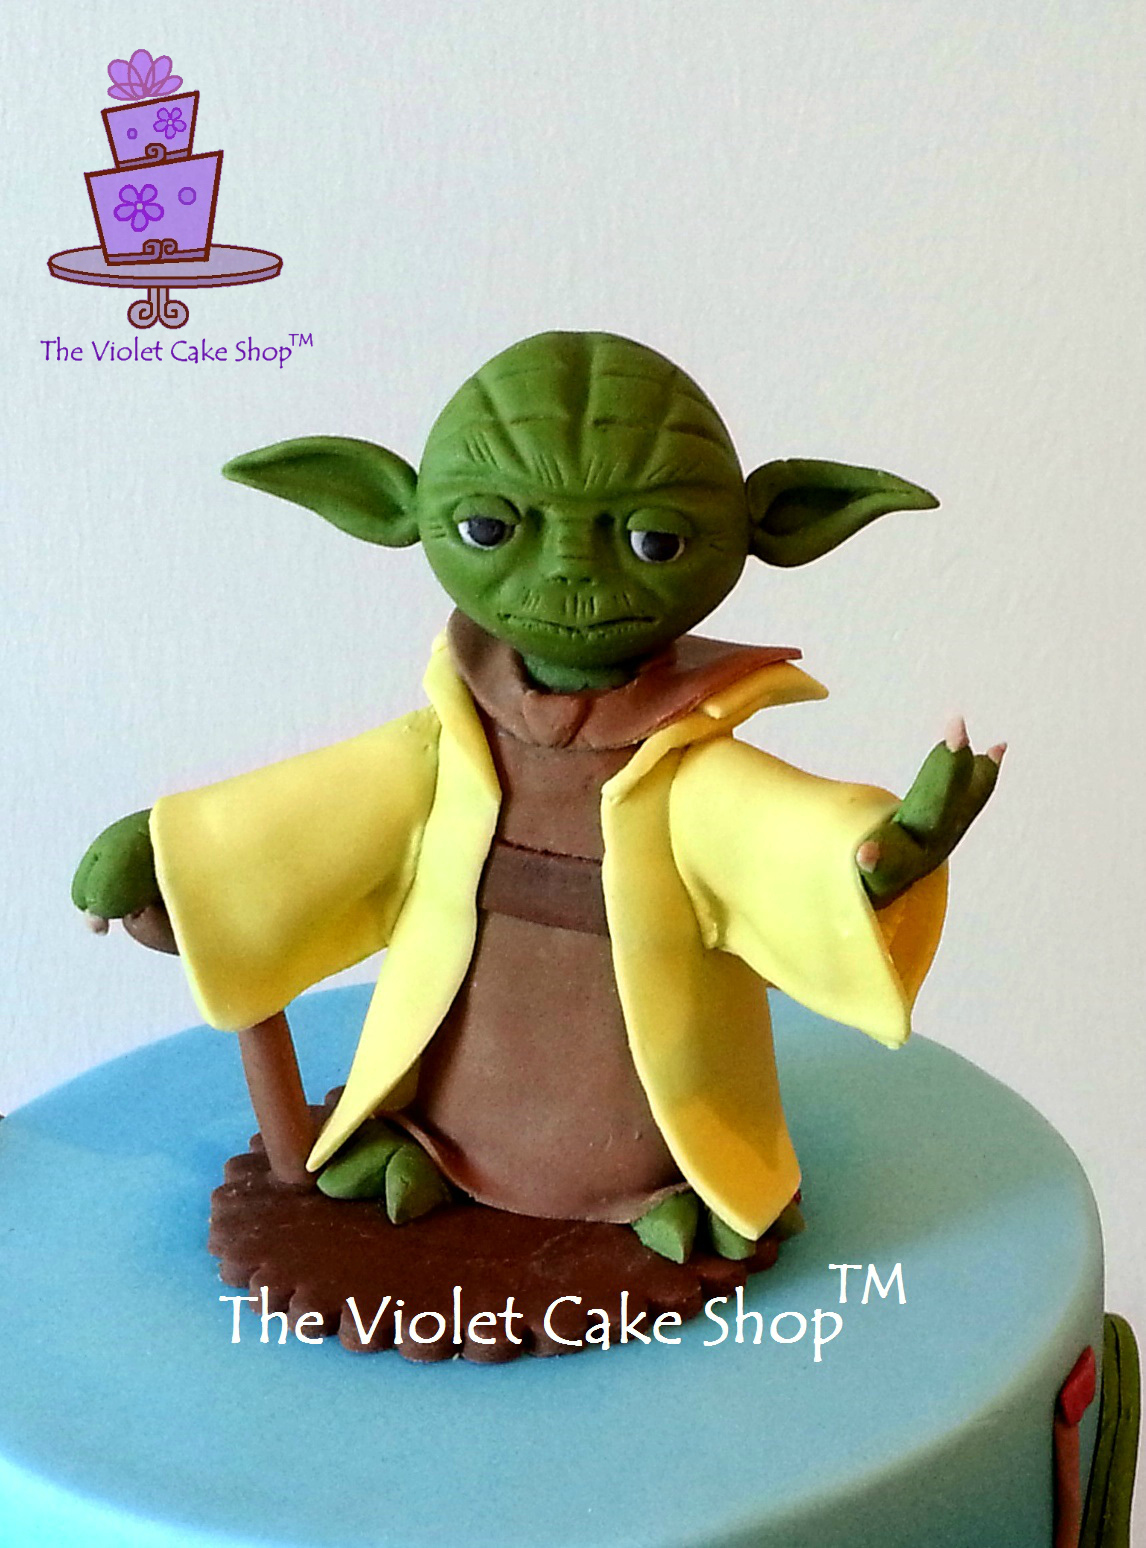
5/ I rarely use any type of support in my figures. So long as the piece is sufficiently dried, you won’t need to have internal supports unless the pieces are super tall or super thin, or you are standing the figure up (which you might notice I rarely do so I don’t have to worry about supports haha!). In this Yoda, I used a toothpick only in the arm that is outstretched.
6/ Do not push down hard when attaching one piece to another or you will get cracking from the pressure. If you do get any cracking, you can fill in the cracks using edible glue (which is just dissolving some of the same coloured fondant in water until it’s a paste).
7/ To attach pieces, use some water or edible glue and hold the pieces in place until set. This may be at least a few minutes depending on the weight of the pieces.
8/ I always will support the more delicate pieces as they dry with something that is the same height. For example, I put a bottle of gel colour under the arm of Yoda here until it was fully dried (minimum one day to be sure). The bottle was slightly shorter than needed so I just wadded up some paper towel to place in between the gap.
9/ Always add fine details last like eyes, nails or claws, tufts of hair, last. If painting, do that as your very last step as you may smudge something when handling it. If you paint ahead, make sure paint is completely dry before you handle although the sweat or natural oils from your hands may still cause them to smudge.
10/ Look for tutorials done by other artists that you can use as a guideline. It’s SO helpful to see what works for them AND, it may lead to new techniques you did not even consider. For example, the Mickey & Minnie figures I made (above) were done following a Minnie Mouse tutorial by Jacinta of Kidacity from her FB page. I did not do everything exactly as she demonstrated, but definitely I learned things like how she shaded the eyes to bring them out!
(Note: these are my own techniques developed independently with my own ideas and shared for personal use ONLY. They are not to be used for monetary gain or to develop products, books, DVDs, downloads or lessons for sale or to be taught in classes or tutorials, whether hands-on, on-line, in video format or in print without express written consent.)
Hope this helps – Happy Modelling ALL – Violet =D
Some other examples of my favourite modelled figures:


You must be logged in to post a comment.