
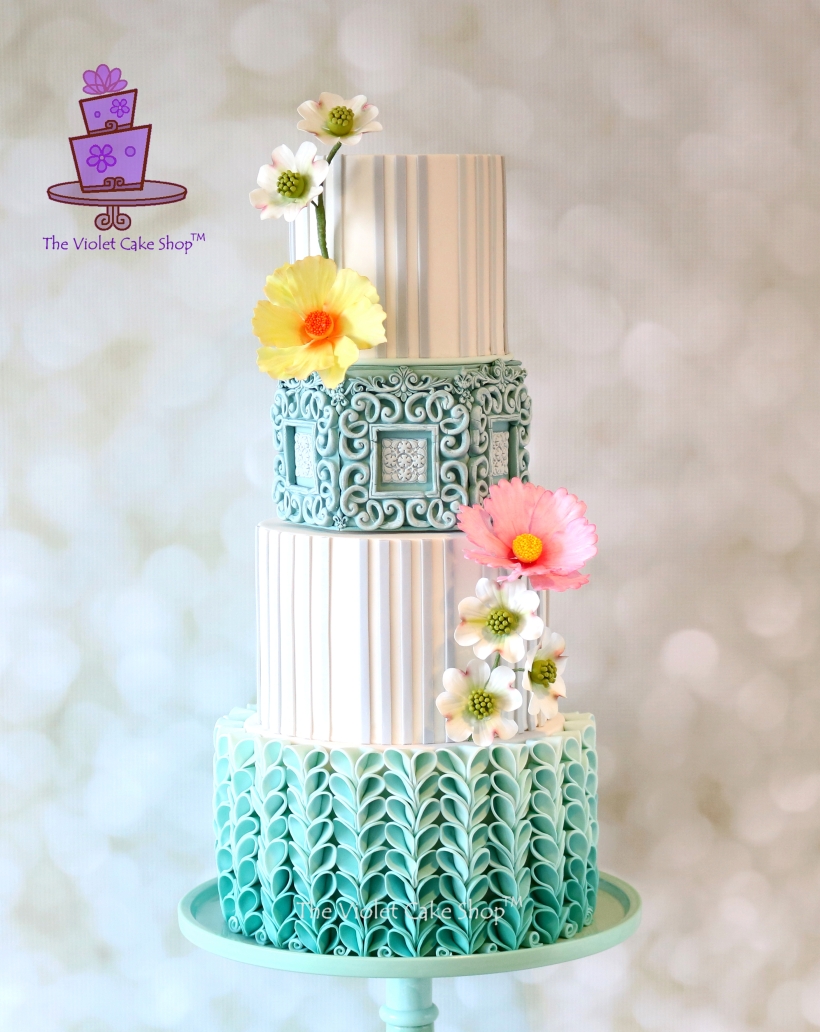
I was asked by Cake Masters magazine to submit a cake for their Ombré Cakes Collection in their latest May Issue. I was assigned the colour BLUE and was immediately inspired!

Right away, I knew what I wanted to do. I had been playing around one day, and came up with a new and unique way of doing simple ruffles. Once I saw “ombré” in the email, I KNEW I had to use this technique for the effect.
It is super simple so I hadn’t planned on doing a tutorial but luckily I had taken some pics anyway, for reference (hence the sub-par quality!) I’ve now decided to post a quick mini-tutorial after all, because I had that cake on display at The Toronto Bakery Showcase just this past week, and I got TONNES of questions about how I created those ruffles. So I’m guessing it’s not as simple as it may seem, for some.
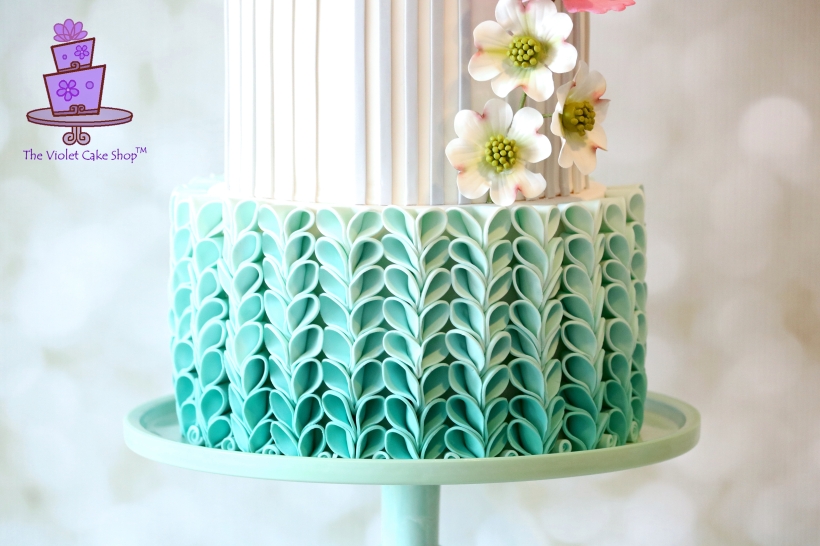
I used 8 gradients in the ombré, and with the same batch of fondant which was first coloured the deepest shade, I just kept adding in an equal amount of white each time after I was done with the shade I was working with.
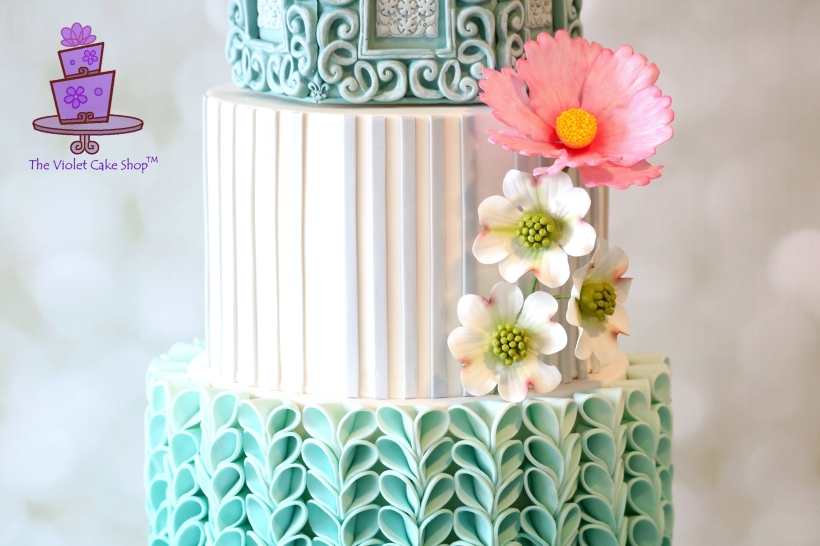
See below for additional closeup photos of this cake…
But first, here are the basic step-by-step pics of how to make my V-Petal Ruffles – ENJOY!! If you use these ruffles, please feel free to quote this tutorial and I’d love for you to share your creations to my Facebook page so I can see what you’ve done with them!
(Updated May 27-2020 – Note: these are my own techniques developed independently with my own ideas and shared for personal use ONLY. They are not to be used for monetary gain or to develop products, books, DVDs, downloads or lessons for sale or to be taught in classes or tutorials, whether hands-on, on-line, in video format or in print without express written consent.)

Cut out an oval using a 2.5″ oval cutter

Flip the oval over and dab some water on the very end of one side of the oval – this is the underside that will end up inside the folds

Fold oval over, so the good side shows on the outside

Mark the centre with the end of your brush – this helps with the folding

Dab some water just on the end of the folded over oval

Fold the ruffle at the crease you made earlier and pinch the end so it creates a point or ‘V’

Cut a small portion off the bottom – NOTE: this is only needed for the first row of ruffles that rest on the cakeboard

Attach the first row to your cake with a dab of water down the centre of the back – if they have dried a bit, you may need to add more water and hold longer; add additional ruffles in rows (here I show three columns only, to give an idea); when adding V-Petals on top of an existing one, dab water under the point or ‘V’ of the new petal before attaching; sit each new petal inside the top gap of the previous ruffle underneath; pinch the top loops together if necessary, to neaten up the seams; try to ensure each column is straight, as you work your way up

8 rows and 7 columns of ombré V-Petal Ruffles all completed =D
(Note: these are my own techniques developed independently with my own ideas and shared for personal use ONLY. They are not to be used for monetary gain or to develop products, books, DVDs, downloads or lessons for sale or to be taught in classes or tutorials, whether hands-on, on-line, in video format or in print without express written consent.)
Now for some closeups of my Blue Ombré V-Petal Ruffle cake!
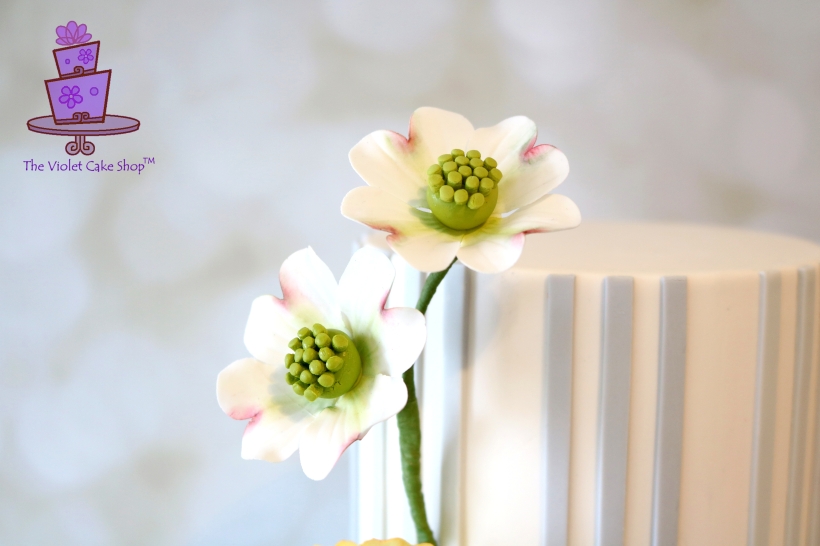
I have a tutorial in the April issue of Cake Masters for these Gumpaste Dogwood flowers that do not require special cutters. I will post that tutorial here in a few months but if you can’t wait, you can always get a copy of the magazine first 😉
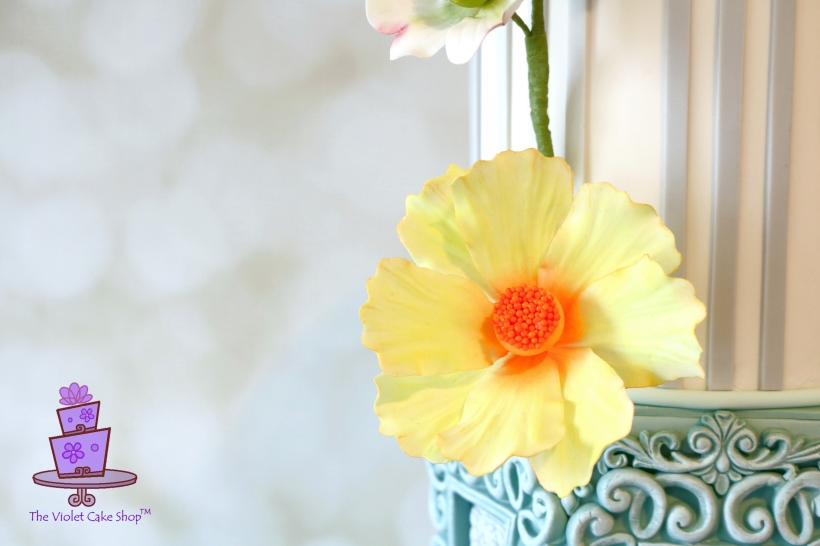
I made the cosmos using my own method but I studied those made by Petalsweet Cakes intently!
Happy Caking Y’ALL!! =D

May 5, 2016 at 3:31 pm
The cake is so beautiful, Violet and the tutorial is awesome. Thank you for starting the blog and sharing 🙂
LikeLiked by 1 person
May 5, 2016 at 3:38 pm
Thank you Jeanne!! This is such a major compliment coming from you!! ❤
LikeLike
May 6, 2016 at 12:29 am
Amazing, Violet!! So simple yet so creative and beautiful!
LikeLike
May 6, 2016 at 12:56 am
Thank you so much…glad you like it! 😊
LikeLike
May 6, 2016 at 4:21 am
Thank you Violet for sharing this tutorial. Your cake is gorgeous!
LikeLike
May 6, 2016 at 4:38 am
Thank you so much! =D
LikeLike
May 7, 2016 at 10:08 am
Just love this cake Thank you for sharing.
LikeLike
May 7, 2016 at 1:25 pm
Thank you! Glad you like it. I almost didn’t make this tutorial thinking it might be too simple lol =D
LikeLike
May 8, 2016 at 3:41 pm
love, love, love, love………..
LikeLike
May 8, 2016 at 4:02 pm
Thank you!! 😊
LikeLike
May 9, 2016 at 12:44 am
Thank you for showing this, it is beautiful.
LikeLike
May 9, 2016 at 4:26 am
Glad you like it! 😊
LikeLike
May 9, 2016 at 2:29 am
Thank you so much for sharing your design. You are such an excellent cake decorator. I have your craftsy class!!
LikeLike
May 9, 2016 at 4:27 am
Awww thanks…it’s my pleasure! Hope you are enjoying the class 😊
LikeLike
May 11, 2016 at 3:05 am
You are a amazing artist Violet and I’m always excited to see your next creation. Thanks for sharing it with us. ❤
LikeLike
May 11, 2016 at 3:11 am
Awww thanks Susana…much appreciated!! 😊
LikeLike
May 11, 2016 at 9:18 am
Its beautiful, thanks for sharing! The 2nd tier is also a beauty, did you use a mold for that or handmade? ♡
LikeLike
May 11, 2016 at 2:06 pm
Hi…thank you…yes the 2nd tier is a mold that I got from Way Beyond Cakes by Mayen’s Etsy shop. You can check out my post on my Facebook page about that tier, which has her links. Or you can search for her on FB or Etsy =D
LikeLike
May 18, 2016 at 8:32 am
Thank you for sharing your beautiful work and know how
LikeLike
May 18, 2016 at 1:01 pm
Glad you like it! 😊
LikeLike
June 27, 2016 at 12:49 am
I’m only just getting familiar with blogging on WordPress and your page was the first one I found. Wow! You have so many beautiful cakes and inspirations and tutorials. It feels like Christmas in June!
LikeLike
June 28, 2016 at 2:32 am
Awww thank you! Glad you like it. I’m still learning too and don’t blog nearly enough but it’s been very user friendly so far. 😊
LikeLike
Pingback: V-Petal Ruffles Mini-Tutorial – rubycakesnsweetsdotcom
July 6, 2016 at 8:50 pm
They look sooo good and the tutorial is very clear, thank you 🙂
If I’m putting them onto a buttercream finish can I do them in advance and apply them dry?
Do you think they will be too heavy for the buttercream to hold them?
Hope that makes sense 🙂
LikeLiked by 1 person
July 6, 2016 at 9:02 pm
Glad you like it! To be honest, I don’t work with buttercream only finishes so I really don’t know if it will be strong enough to hold heavy décor. If it were me, I’d probably do a very thin layer of fondant to cover the buttercream just to be sure and let the base dry for at least 12 hours before adding the v-petals.
LikeLike
July 6, 2016 at 9:04 pm
Oh and also, it’s best to use the petals as you go because it will be tougher to fit them into each other if they are too dry. I usually make about 6 at a time and apply row by row. HTH – Violet
LikeLike
Pingback: Tsum Tsum Mickey with Rainbow V-Petal Ruffles | The Violet Cake Shop™
October 10, 2016 at 8:07 am
Love these V / Heart ruffles xx
LikeLike
October 10, 2016 at 11:04 pm
Thank you!! =)
LikeLike
January 4, 2017 at 9:04 am
Great tutorial, thank you! Are the rufgles straight fondant or is there any tylose added or is that recommended if doing in advance? I once did wavy ruffles out of fondant a few days in advance and on the serving day they started cracking….
LikeLike
January 5, 2017 at 4:27 pm
Hi there! I add a touch of tylose if the fondant is somewhat soft to the touch. It all depends on the weather/climate. It should not crack with tylose added unless the fondant is overworked or you add too much tylose. Just add a 1/4 tsp at a time and mix into fondant until it starts to get firm enough to hold its shape when you do your cutouts. Other times instead of tylose, I will mix fondant with gumpaste. If you use marshmallow fondant, you’ll find you won’t need to add tylose or gumpaste for these type of ruffles. HTH – Violet 😀
LikeLike
January 5, 2017 at 7:22 pm
Gotcha-thank you for the comprehensive answer! : )
LikeLike
April 1, 2017 at 2:32 am
Love such clean details and beautiful cake! Thank you for sharing!
LikeLike
April 1, 2017 at 6:58 am
Thank you! 😀
LikeLike